Souvlaki

Souvlaki

  • Prep Time5 min
  • Cook Time10 min
  • Total Time15 min
  • YieldMakes 12

Ingredients

  • 1kg Boned and Skinned Chicken Thighs or Breast
  • 4 tbsps olive oil
  • juice of 1 lemon
  • 1 clove of garlic, minced
  • 2 tbsp dried oregano
  • salt and freshly ground pepper

Method

1

Trim the chicken of any excess fat,

2

Mix all the ingredients apart from the chicken together in a bowl, add the chicken and allow to marinate for at least an hour in the fridge

3

Light BBQ and grill chicken until it reaches an internal temp of 165°F or 74°C

4

Make some minty greek yoghurt by mixing plain yoghurt, chopped mint and garlic

5

Toast some flat breads and fill with salad of your choice, e.g. Rocket, red onion, tomato, cucumber, olives, feta.

6

Top with sliced chicken and top with your yoghurt dressing

Recipe by Chillin n' Grillin

Free Recipe Card

Souvlaki

Download the free PDF Recipe Card

The Shed BBQ Rubs – Review by Christine Dale

The UKBBQweek team was very kindly given these rubs by Richard Orme of BBQGourmet (www.bbqgourmet.co.uk) to review and I got the luck of the draw in being picked to review them, my thoughts in this review are my own.

BBQ Gourmet have been around for a few years now importing the very best in BBQ products from overseas, they have an amazing selection of American Rubs and Sauces, I never know where to start but have picked some cracking rubs and sauces over the last few years. I always bring hold luggage when I hear Richard is going to be at an event just so I can stock up.

My first cook was with cluckin awesome by The Shed BBQ. If you don’t know who the Shed BBQ are then a quick trip to Google will tell you all you need to know. They are now 2 times Whole Hog World Champions after winning Memphis in My BBQ competition in the US twice! That’s a real achievement. They’ve had a lot of success on American TV over the years and have a restaurant in Ocean Springs Mississippi. In recent years they have produced a whole line of award winning rubs and sauces that are now stocked in the UK by BBQGourmet.

We decided to try The Shed’s Cluckin Awesome on a rotisserie chicken, first thoughts when reading the label was that brown sugar seemed a little strange for a chicken rub, however when I thought about it I realised that this would have the effect of a rub and a sauce, we rubbed the chicken with a little olive oil and sprinkled with the rub, then allowed it to sit in the fridge for an hour. To help keep the chicken moist we always put some butter in the cavity to help self-baste the chicken. We set up the Kettle BBQ for indirect cooking and put the chicken on. The great thing about a Rotisserie is you just leave it to do its thing. After about an hour the internal temp when checked was 165°F or 74°C. As it was ready we took the chicken off and the rub had really given it a lovely colour and a gloss as you will see in the pictures. We left the chicken to rest and so sat it tented with foil for 30 mins then came the taste test. The Cluckin Awesome rub was really nice, the rub had flavoured the chicken and not just the skin. A subtle garlic and onion flavour and just a touch of sweetness made it one of the nicest chickens we have had recently, will definitely use that again. I guess these guys know their chickens as well as their whole hogs.

Next up was rack attack by The Shed BBQ. You could see that this was a different colour than cluckin awesome and this is most likely due to the paprika, the chilli in the rub is just enough to give it a kick and I reckon this would work just as well on any pork dish. We rubbed up our ribs with some mustard and sprinkled on the Rack Attack rub. The rubs are more granular than some other rubs we have used which are more powdery but this means that you get a more even covering in my opinion. The mustard helps the rubs stick well to the meat but does not leave an aftertaste when finished. These ribs were cooked on the Traeger pellet BBQ on smoke setting for an hour followed by 2h 45m at 107°C or 225°F. Then wrapped them in tinfoil with some cider (Mr D had drunk my apple juice) some butter and a little brown sugar cooked these meat side down for an hour then glazed them with some sweet baby rays honey sauce. You would think that all this sugar and honey would result in a very sweet rib, however the kick from the chillis and the flavour from the paprika and garlic gave a nice balance. They weren’t competition style ribs more fall of the bone but that’s how we eat them in Chillin N Grillin HQ. My workmates next day thought they were the best ribs they have ever eaten and that we should open a restaurant lol.

Overall I think both these rubs did a great job both presentation wise and also with the flavours they gave to the finished product. Luckily I have a little leftover to try again on some other dishes but I can see I may be buying these from BBQGourmet in the future. If you would like to do the same, please visit their website at www.bbqgourmet.co.uk to see the whole range of the The Shed BBQ products.

Susan Stoneman – Drop Crumpets

Susan Stoneman – Drop Crumpets

  • Prep Time24 min
  • Cook Time6 min
  • Total Time30 min
  • YieldMakes around 24 (depending on size)
  • Course
  • Cooking Method
    • Direct grill on plancha or griddle

Ingredients

  • 115g plain flour
  • 115g strong flour
  • Half teaspoon cream of tartar
  • 4g dried yeast
  • 250ml lukewarm water
  • Half teaspoon salt
  • 1/4 teaspoon bicarbonate of soda
  • 140ml lukewarm milk
  • Vegetable oil for frying

Method

1

Sift the flours and cream of tartar into a bowl and add in the yeast. Stir in the lukewarm water with a wooden spoon and leave covered for about an hour.

2

The dough will be full of little air bubbles. Add the salt and stir. The dough will fall at this point but will rise back up. Leave for 30 minutes

3

Stir in the bicarbonate of soda and the lukewarm milk. The batter should be a thick pouring consistency. Pour into a measuring jug as this makes it easier for pouring your drop crumpets

4

Heat your griddle to a high temperature. Put on a little vegetable oil to prevent sticking and pour little circles of mixture onto the griddle.

5

Cook for about 3 minutes on the first side. You should see lots of little bubbles form then pop – this gives the crumpet look.

6

Turn over and cook the other side.

7

Keep warm and eat with the topping of your choice. Lovely with just butter and honey.

Recipe from Susan Stoneman

Drop Crumpets

Download the free PDF Recipe Card

Pulled Thai Beef Tacos with Crunchy Asian Slaw

Pulled Thai Beef Tacos with Crunchy Asian Slaw

  • Prep Time30 min
  • Cook Time12 hr
  • Total Time12 hr 30 min
  • Yield16 Servings

Ingredients

For the marinade

  • 2 Tbsp Soy Sauce
  • 1 Tbsp Fish Sauce
  • 2 Tbsp Rice Wine
  • 1 Tbsp Sesame Oil
  • Juice and zest of 2 limes
  • 2 Cloves of garlic, minced
  • 2cm root ginger, minced
  • 1 Tbsp Brown Sugar
  • 1 Tbsp Palm Sugar

For the beef

  • 2kgs of Chuck
  • 2 gm Sea Salt
  • 1 gm Black Pepper
  • 1 gm Sechuan Pepper

For the slaw

  • ½ a red cabbage, shredded
  • ½ a green cabbage, shredded
  • 2 Carrots, grated
  • ½ a medium red onion
  • 1 red chilli, finely diced

For the slaw dressing

  • 1 Tbsp Olive Oil
  • 2 cloves of garlic, minced
  • 2cm root ginger, minced
  • 2 Tbsp Palm Sugar
  • 1 Tbsp Soy Sauce
  • 1 Tbsp Fish Sauce
  • 1 Tsp Sesame Oil
  • 2 Tbsp Rice Wine Vinegar
  • Juice of 1 Lime
  • Salt and Black Pepper to taste
  • 1 Tsp Seasame Seeds, toasted
  • A bunch of Coriander, roughly torn.

Optional

  • Satay Sauce
  • Hoisin Sauce

Method

1

Combine all the ingredients of the marinade in a zip lock bag with the beef for a minimum of 3 hours, but preferably overnight

2

Remove the beef, reserving the marinade liquid. Pat dry and coat with the salt and peppers. Leave the meet to come to room temp for 30 minutes.

3

Prepare your barbecue for indirect cooking at 110c/225f – 120c/250f until the beef hits approximately 70c/160f. Should take 6/7 hours

4

As your beef comes to temp bring the reserved marinade to the boil. You then place the beef in a casserole or Dutch Oven and braise the beef turning every hour until the beef starts to fall apart.

5

Combine all the ingredients for the slaw dressing and all the ingredients for the slaw, reserving the sesame seeds and coriander to sprinkle on top. Pour the dressing on at least 30 minutes before serving to allow all the flavours to infuse

6

You will need a minimum of two tacos per person for a main course. Warm the tacos and assemble by putting beef on and a splash with the braising liquid, dress with crunchy Asian Slaw and sprinkle sesame seeds and coriander on top. I served these with Satya Sauce and Hoisin. Enjoy

Recipe by Tim Donald t: Tim@silverbackgrill Insta: tim.donald1

Free Recipe Card

Pulled Thai Beef Tacos with Crunchy Asian Slaw

Download the free PDF Recipe Card

Spicy Thai Prawns with Mango Salad

Spicy Thai Prawns with Mango Salad

  • Prep Time15 min
  • Cook Time3 min
  • Total Time18 min
  • Yield4 Servings
  • Course
    • Appetizer
  • Cooking Method

Ingredients

For the Prawns

  • 24 raw king prawns
  • 2 Cloves of garlic crushed
  • 2cm of fresh ginger, peeled and finely chopped/crushed
  • 1 fresh red chilli , deseeded and finely chopped
  • 1 tbls of Thai fish sauce
  • 1 tbls of Soya sauce
  • 1 tbls of ground nut oil (or olive oil)
  • chopped coriander to serve
  • 1 lime cut into 4 wedges.
  • 6 mini skewers (15cm)

For the Mango Salad

  • 1 chopped up fresh mango
  • 1 chopped up red onion
  • Half red chilli (optional)
  • 1 Tomato chopped
  • 1 Tbls of fresh chopped coriander
  • 1 Tbls Olive oil (optional)

Method

1

Firstly if using wooden skewers the soak in water for at least 30 minutes so they don’t burn on the bbq.

2

Mix the garlic, ginger, chilli, fish sauce, soy sauce & oil to make the marinade

3

Put the prawns onto the skewers, I use mini 15cm skewers that hold 3 prawns to each skewer, you could use large skewers if you prefer.

4

Marinate the prawns for 30 minutes

5

Make sure your bbq is really hot, then add the prawn skewers to the bqq, directly over the heat.

6

After 1 minute turn over the prawn skewers and continue to cook for about 1 more minute until the prawns have completey changed from grey colour to pink.

7

Serve with fresh chopped coriander and lime wedges.

8

I also added a mango salad, simply chop up a fresh mango, red onion, red chilli, tomato, some coriander and serve.

Recipe from @FourSeasonsBBQ

Free Recipe Card

Spicy Thai Prawns

Download the free PDF Recipe Card

Lennox Hastie Rhubarb Vanilla Marshmallows

Lennox Hastie Rhubarb Vanilla Marshmallows

  • Prep Time30 min
  • Cook Time10 min
  • Total Time40 min
  • Yield24 Marshmallows

Ingredients

  • ½ vanilla pod
  • 200 g (7 oz) rhubarb stalks, roughly chopped
  • 500 g (1 lb 2 oz) caster (superfine) sugar
  • 7 sheets gold gelatine
  • 125 ml (4 fl oz/½ cup) filtered water
  • 4 large egg whites
  • pinch of salt
  • 3 tablespoons icing (confectioners’) sugar
  • 2 tablespoons cornflour (cornstarch)
  • For the sherbet mixture
  • 100 g (3½ oz) icing (confectioners’) sugar
  • 1 teaspoon citric acid
  • 1 teaspoon baking powder

Method

1

NOTE –  The marshmallow mixture needs time to firm, so begin this recipe at least 8 hours ahead of time.

Split the vanilla pod, scrape the seeds and place the pod and the seeds in a small saucepan with the rhubarb and 100 g (31/2 oz) of the caster sugar. Cover with a lid and cook over a low heat, stirring occasionally until the rhubarb is really soft. Blend to a smooth purée and pass through a fine mesh sieve.

2

Soak the gelatine in a bowl of cold filtered water for 5 minutes until soft.

3

Pour half of the rhubarb purée into a clean saucepan and bring to the boil. Remove the pan from the heat, drain the softened gelatine leaves and add to the pan. Stir until dissolved, then stir in the remaining rhubarb purée.

4

Place the filtered water and the remaining caster sugar in a saucepan and heat to 120°C (250°F).

5

Remove the pan from the heat, wait 1 minute and then add the rhubarb purée.

6

Whisk the egg whites with a pinch of salt until firm peaks form.

7

Mix together the icing sugar and the cornflour. Use this mixture to dust a baking tray lined with baking paper.

8

Spread the marshmallow mixture to a thickness of 3 cm (1¼ in) onto the baking tray and then sprinkle the icing sugar and cornflour mixture over the top (reserving a little). Place in the refrigerator to firm for at least 8 hours or overnight.

9

Add the rhubarb syrup mixture to the egg whites a little at a time, whisking continuously until all of the fruit is incorporated and the mixture is thick enough to hold its shape.

10

Combine the ingredients for the sherbet mixture. Dust a cook’s knife with the remaining icing sugar/cornstarch mixture and cut the marshmallows into cubes. Roll the cubes in the sherbet mixture, and toast over a fire.

Recipe kindly supplied by Lennox Hastie from Finding Fire: Cooking at its most elemental (Hardie and Grant £30)

Free Recipe Card

Rhubarb Vanilla Marshmallows

Download the free PDF Recipe Card

Over the Top Chilli

Over the Top Chilli Christine

Over the Top Chilli

  • Prep Time20 min
  • Cook Time4 hr
  • Total Time4 hr 20 min
  • Yield4 Servings

Ingredients

For the meat patty

  • 1kg Minced Beef
  • 6 Rashers of unsmoked bacon minced in food processor
  • 2 tsp Coriander powder
  • 2 tsp Cumin
  • 2 tsp Unsmoked paprika
  • 2 tsp Oregano
  • 1 tsp Garlic powder
  • 1 tsp Onion powder
  • 1 tsp Chilli powder
  • 2 ancho chillies rehydrated and blitzed to a paste 1/2 added to mince reserve the rest for the sauce. (Or jarred chipotle or ancho paste)
  • Salt and pepper to taste

For the sauce

  • 2 onions
  • 2 celery sticks
  • 4 garlic cloves
  • 1 tsp of coriander
  • 1 tsp of cumin
  • 1 tsp of chilli
  • 1 tsp of paprika
  • 1 tsp of oregano
  • 2 tins tomatoes
  • 2 tins pinto beans
  • 1 tin sweetcorn
  • 2 peppers
  • 1 tbsp peanut butter

Method

Preparing the BBQ Jerk Chicken

1

Combine the ingredients for the beef patty and create a thick ball or patty.

2

Fry onion & celery in your pot/Dutch oven until soft add garlic and spices, fry 2-3 mins

3

Add tomatoes, remaining ancho paste and beans bring to boil.

4

Set up the BBQ for indirect cooking at 250-275f

5

Put the patty on a grill and rest on top of the pot/Dutch oven and smoke until 160 internal temperature.

6

Then remove patty, chop up and add to the chilli with the peanut butter and peppers.

7

Let it smoke for another 1-3 hours topping up with water if needed.

8

Serve with rice, baked potatoes or over wedges

Controlling the Temperature of your BBQ

Hood Thermometer on a Kettle BBQ

Learning to cook different food on your BBQ means controlling the temperature is key so we’ve put together some tips to help you add the right amount of fuel and maintain that temperature using your vents.

Why controlling the temperature of your BBQ is important

It may be easy to fall under the illusion that cooking at a higher temperature will result in your food being cooked faster and as long as you turn it regularly it will be fine however this isn’t the case. 

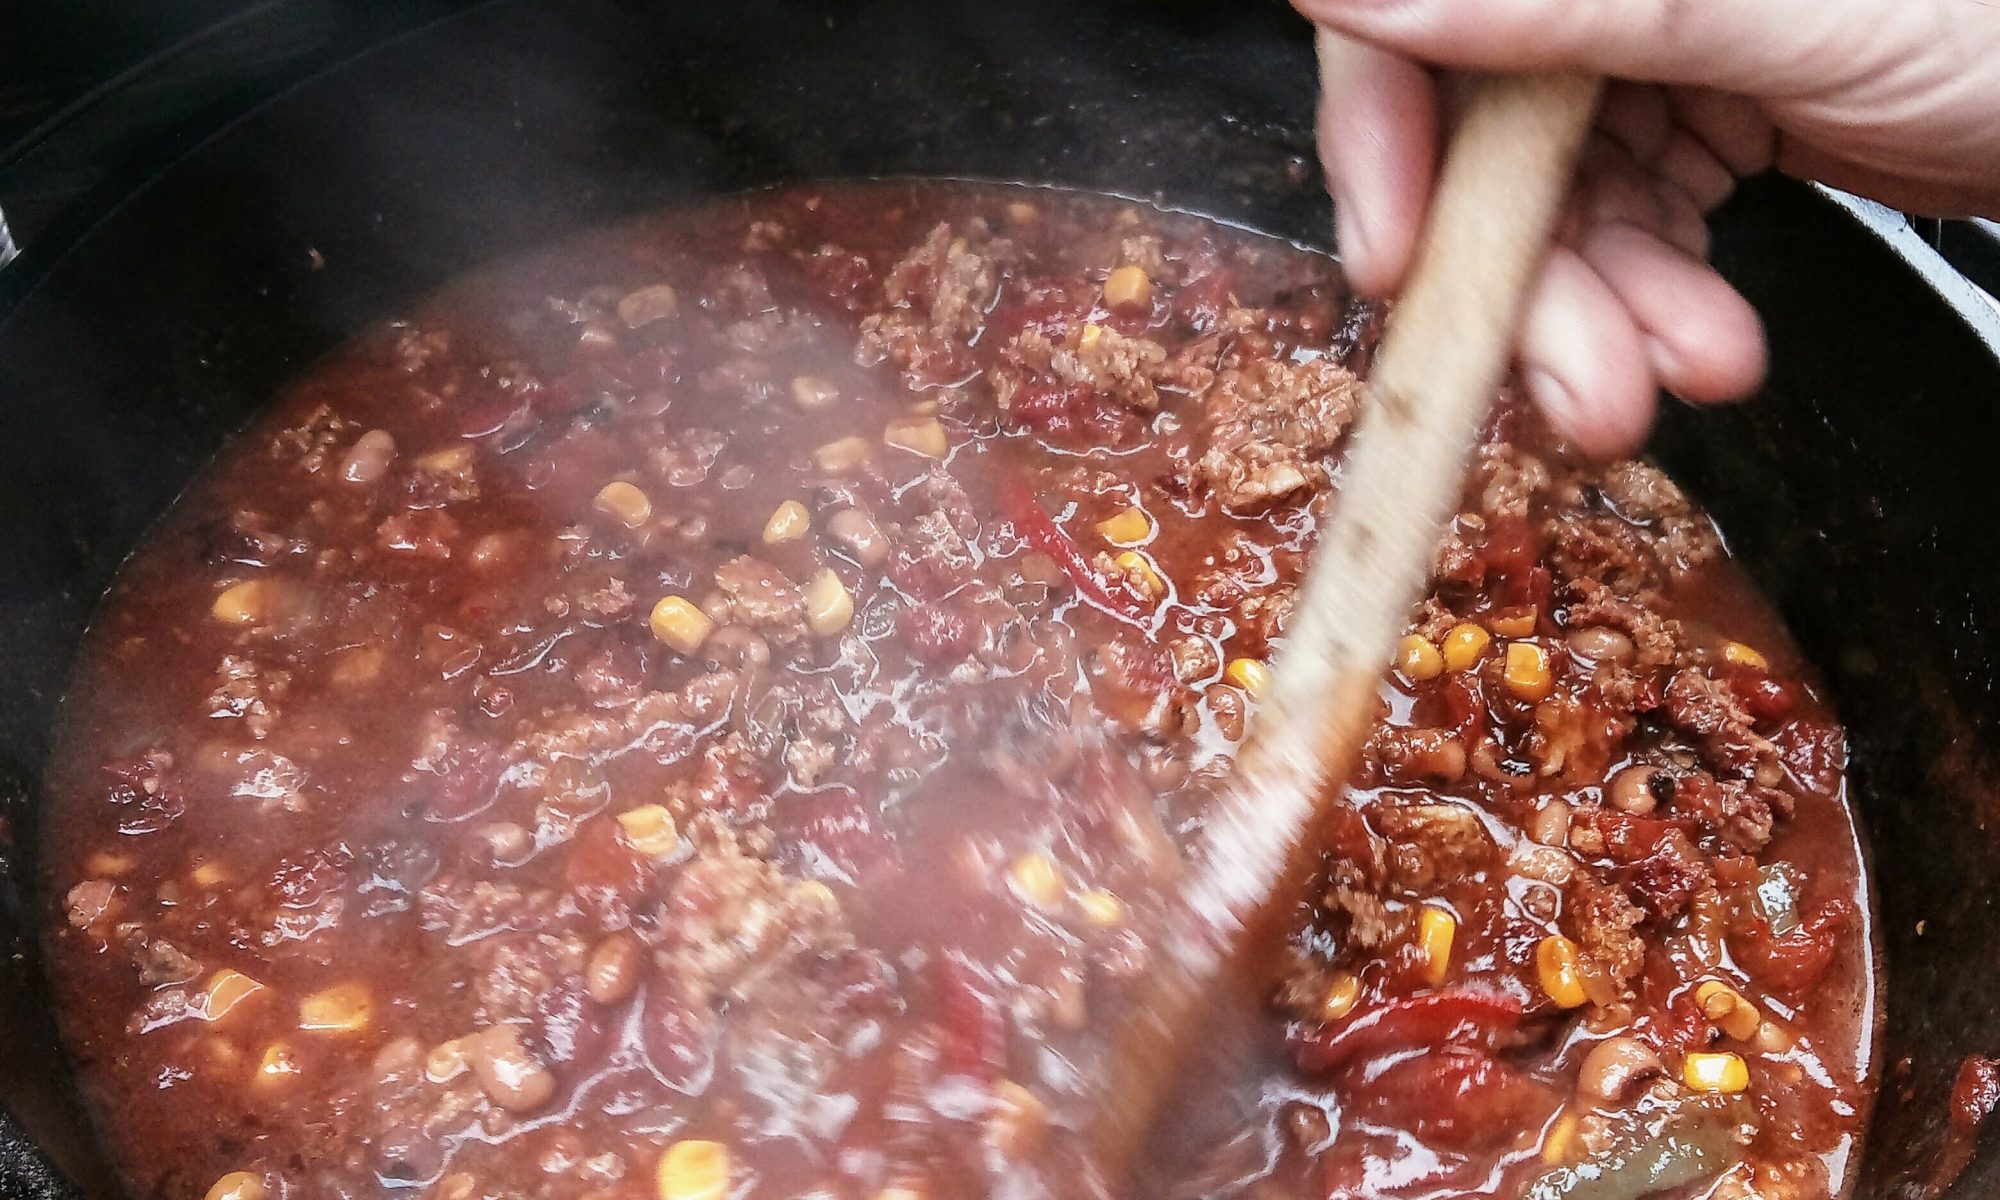
By dialing your temperature back a little and cooking over a controlled heat, the experience is a little more relaxed, your food will cook more evenly and you won’t have to turn or move your food around so much to avoid it burning. Every time you turn or move your food, you will lose a little bit of the natural juices. Turning something like a burger once or twice during cooking will avoid this however turning it 10-15 times to avoid it burning on the outside will result in them drying out.

I’m not going to pretend that temperature control is easy to master, it can take some practice to get right, however there are a few simple principles that will make it easier for you.

Controlling the temperature on your gas BBQ

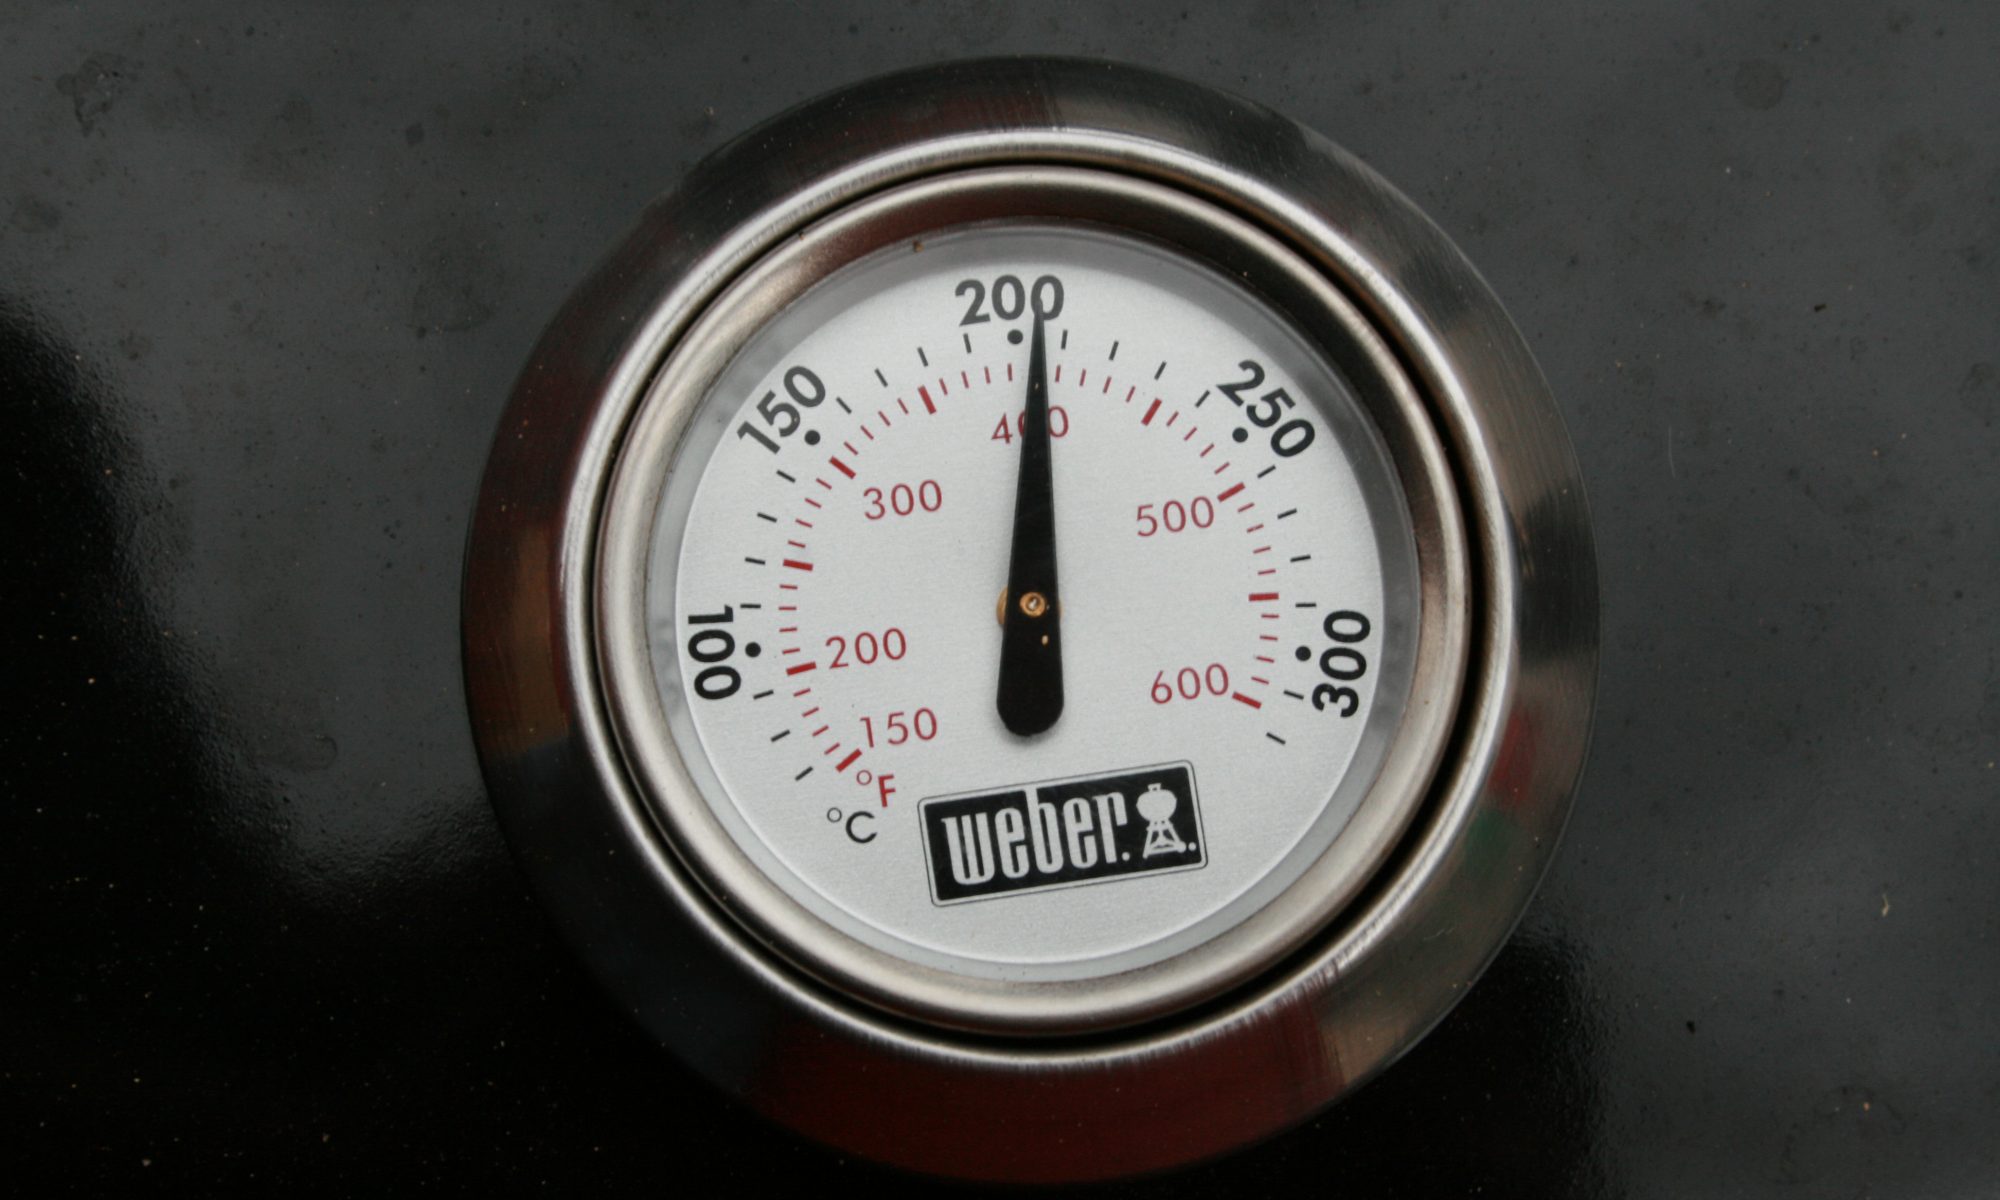
Controlling the temperature on your Gas BBQ is simple as it is similar to the conventional oven in your kitchen. You can easily control the amount of gas being supplied to each burner using the controls on the front of your BBQ and therefore decide how high or low the temperature is. After pre-heating your BBQ, you can adjust the valves up or down to increase or reduce the temperature.

The basic principle of controlling heat is this:

More fuel = More heat

It is really easy to demonstrate this on a gas BBQ. Opening the valve more provides more gas to the the burner giving you more heat. Opening the valve less will provide less gas to the burner and therefore less heat.

These same rules apply to a charcoal BBQ. The key to hitting the right temperature is by using the correct amount of fuel.

Using the right amount of fuel in your charcoal BBQ

A charcoal BBQ can be a little intimidating when it comes to temperature control as there can be a lot of guess work involved when you are getting started. A recipe will always give you a guide temperature to cook your food at but converting that over to the right amount of charcoal to add can be tricky so here I’ve always found that this is a great place to start.

If you are using a Weber chimney starter to light your coals, and using a long lasting briquette, the following measurements should allow you to hit some key target temperatures. These measurements are based on a 47cm and 57cm kettle BBQ.

Controlling the temperature of your charcoal BBQ

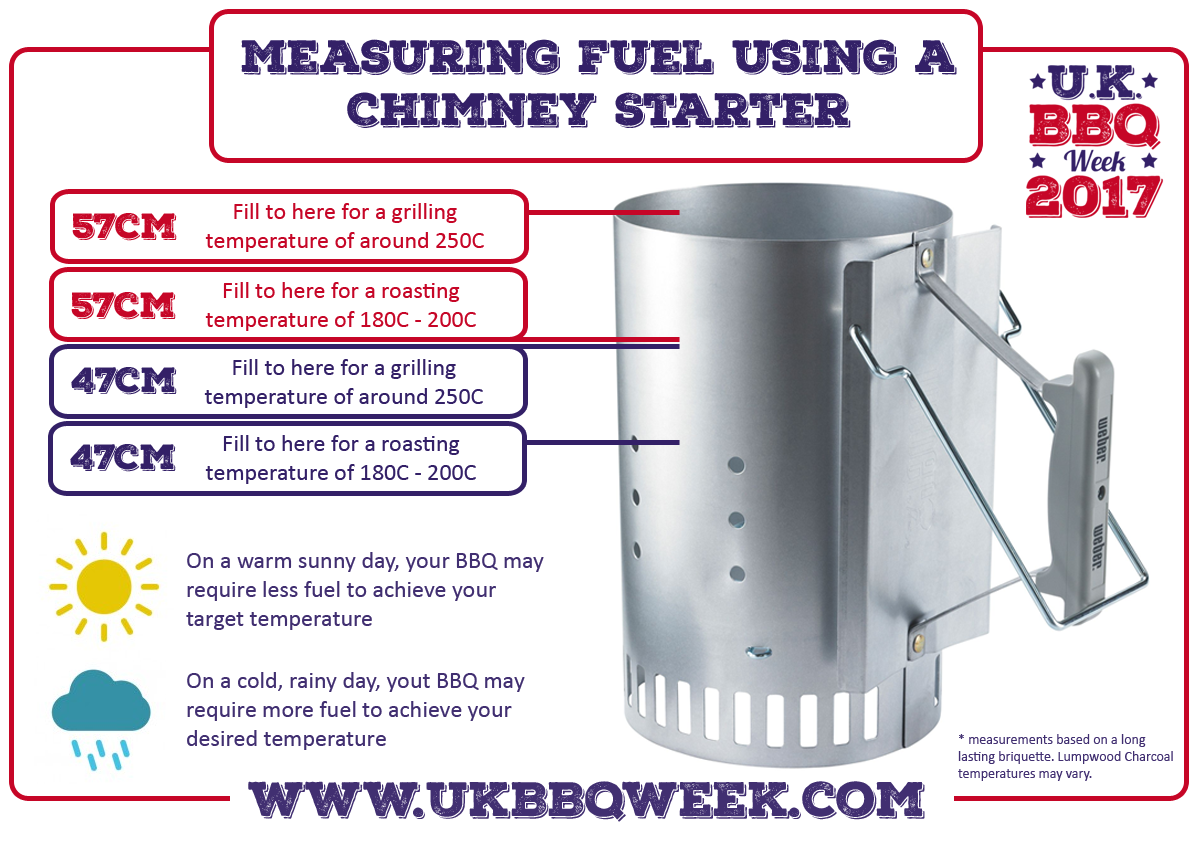
Lumpwood Charcoal can vary due to it’s irregular size but keeping notes on measurements and the resulting temperature will soon give you your go to levels.

Controlling the temperature on your BBQ can be a stumbling point for beginners so here are some tips to help you get to grips with it.

Hitting the exact temperature isn’t essential

One of the first hurdles I had to overcome was to think of BBQ temperatures in ranges rather than an exact temperature. I wasted a lot of time agonising over getting the temperature to exactly what the recipe stated but the great thing about BBQ is that it isn’t an exact science. Let me give you an example.

If I was setting my BBQ up for low and slow cooking and the recipe stated that I should be cooking at 110 C, I would light the charcoal and bring the BBQ up to temperature. I would adjust the vents, remove a few coals or add a few more until the temperature was exactly 110C. It took a lot of time to get this just right and I now realise that it wasn’t completely necessary. 

Getting your temperature within a range is absolutely fine, the important thing is to maintain a consistent temperature. So if a recipe states 110C, as long as you are in the range of 105C to 120C then you won’t go far wrong.

Allow the temperature to settle before putting your food on the grill.

After you have lit your coals in your chimney starter and poured them into the BBQ, put the lid on and leave the temperature to settle. It can take a little time for the coals to finish lighting and reach their peak temperature. If your temperature is running a little high, you can remove some of the charcoal or adjust your vents a little (which we will discuss in the second half of this article) to even out your temperature. Once your temperature is sitting steady, you can add your food.

Keep a note of how much charcoal you are adding each time you cook and what temperature it resulted in.

You don’t have to count the number of briquettes or weigh your lumpwood but simply keeping a note of ‘½ Chimney starter, ⅓ Chimney starter’ etc and the resulting temperature will allow you to refer back to it at a later date.

Controlling the temperature using your vents

Airflow through your BBQ is important to keep your coals burning and your vents can be used to control the heat being produced by your coals. With the lid closed and both top and bottom vents fully open, air will be drawn through the bottom vent and exhausted through the top vent creating an airflow through your BBQ.

Closing both vents completely will result in your charcoal extinguishing as you have removed the oxygen supply needed for fire to burn. Using this theory, it is possible to restrict the amount of air flowing through your BBQ by adjusting the top and bottom vents.

I highly recommend adjusting the amount of fuel added to achieve your desired temperature rather than relying on the vents to manage your temperature. Vents are great for fine tuning your temperature and finding the ideal vent setup will allow you to maintain a steady temperature however if you have added too much fuel you will struggle to keep the temperature down using vents alone.

The smallest of adjustments to your vents can have a dramatic impact on the temperature of your BBQ but remember that closing them off too much can result in your coals going out. If you find your temperature is running a little high or is starting to climb, closing the top and bottom vents by a few millimetres can be enough to steady the temperature. If your temperature is well above your target range, I would remove some of the lit coals to bring it down then fine tune with the vents.

While you are recording the amount of charcoal used in your BBQ journal, make a few notes about the final vent setup used to achieve your temperature. You will then begin to learn your go to vent settings for specific temperature zones.

Fire management can be tricky to master and maintaining a steady temperature for the duration of a long cook is something that will get easier with experience so don’t be disheartened if you struggle the first few times you do it.

Remember that it is easier to add a little charcoal to your BBQ if your temperature is low than to bring down a high temperature. Having the right size of fire at the start will make keeping the temperature consistent a lot easier with your vents. 

Sign up for our FREE Newsletter

Keep up to date with all the latest news on UK BBQ Week by entering your name and email address below. We will send you our latest recipes, helpful articles and details on our latest competitions.


Smoking on a Gas BBQ

Smoking Brisket on a Gas BBQ

Many of us own both Gas and Charcoal BBQ’s and whilst smoking is traditionally done using charcoal, it couldn’t be easier to get started smoking on a gas BBQ!

Before we dive into the article, I just want to mention one thing. The old Gas vs Charcoal debate has been going on for quite a few years and is sure to carry on into the future. On one hand, some people say that gas is more convenient and on the other, some say that charcoal is the only true way to BBQ. There are valid arguments for both and I’m not going to get into them right now.

All I will say is this. If you own a gas BBQ or are planning on buying one then go for it! I’ve learned a lot on my Gas Weber and all those skills have transferred over to my charcoal BBQ’s as well. My first ever brisket was smoked on a gas BBQ and it turned out great! At the end of the day, you are still outside, cooking over flame and learning how to make outstanding food.

How to add Smoke to your Gas BBQ

On your gas BBQ, you would traditionally use wood chips or pellets in a heat proof container to generate smoke. If you are cooking on a Weber gas BBQ, they sell a smoker box that fits directly on top of the flavorizer bars or you can make your own using a foil drip pan covered with some foil and a few holes punched on top.

On a charcoal BBQ, wood chips will generate smoke almost instantly when placed on the coal. Smoking on a gas BBQ is a little different. It can take up to 15 minutes for the chips to start producing smoke so I would recommend putting the smoker box onto the BBQ while you are preheating it so when it is up to temperature, you should be producing smoke.

You can also add smoke using a smoker tube filled with wood pellets. By lighting one end of the tube and placing it on the cooking grate, it will slowly produce smoke.

Tips for smoking on your Gas BBQ

Placement of the smoker box is crucial on a gas BBQ. The ambient temperature inside your BBQ won’t be high enough to get the wood chips smoking. The smoker box needs direct heat from the burner to get the chips smouldering so place the smoker box under your cooking grate, on top of the flavorizer bar. The burner directly below that flavorizer bar should be lit to provide enough heat.

Airflow on a gas BBQ is a little more random than on a charcoal BBQ as it doesn’t have a single vent that channels the air out of the BBQ. This means it’s a little harder to direct the flow of smoke over your meat. When smoking on a gas BBQ, it’s really important that you keep your lid down as much as possible while the chips are smoking to contain the smoke inside the hood. You may find you need to add a second batch of chips to allow your meat to take on the desired smokey flavour!

Always soak your wood chips in water for around 20 minutes before placing them in the smoker box. The idea is to get them smouldering slowly to give off the optimum amount of smoke. Dry wood chips will eventually ignite and burn away. Pellets on the other hand should be dry before placing them in a smoker tube to ensure they keep burning. As the tube will not be placed directly over a heat source, you shouldn’t have to worry about them igniting.

Low and slow BBQ is simple on a gas BBQ. On my 3 burner Spirit, The first burner on high is enough to keep the temperature around 110°C. Place your smoker box filled with wood chips over that first burner and your meat over the unlit 3rd burner and close the lid. As I said above, My first ever brisket was smoked on my gas BBQ and I’ve had some great results with pulled pork as well!

Lots of beginners think they can’t smoke because they use a gas BBQ and they always seem surprised when I explain how simple it is. Don’t feel like you have to wait until you own a charcoal BBQ or dedicated smoker to start smoking, crack on with your gas BBQ and learn the basics now.

Click to Download your Smoking Wood Chart
To help you start smoking on your Gas BBQ, we’ve put together a wood smoking chart to help you decide what wood chips you can use with different meats. 

Click Here to download your FREE Smoking Wood Chart in pdf format

There are many other smoking woods available but this is a great selection to get you started and learn what flavours you like.

Sign up for our FREE Newsletter

Keep up to date with all the latest news on UK BBQ Week by entering your name and email address below. We will send you our latest recipes, helpful articles and details on our latest competitions.


Smoking on your Charcoal BBQ

Smoking Chunk on Charcoal

Smoking on a charcoal BBQ is a great way to get started and learn the basics of smoking. My first attempts at smoking over charcoal were on my Weber Kettle and with a little practice, you can get great results. You can add wood to your charcoal or briquettes for any direct or indirect cooking method to ramp up the flavour.

Should you use wood chips or chunks?

Cherry Smoking Chunks

Depending on the flavour or intensity of smoke you are aiming for, you can use chips or chunks (from reputed firewood providers like Cutting Edge Firewood) when smoking on a charcoal BBQ. Both are placed directly onto the coals. Wood chips should be soaked for about 20-30 minutes before adding them to the coals. They are smaller in size and if you don’t soak them, they will burn quickly giving you very little smoke. When the wood chips are wet, they should give around 10-15 minutes of smoke so if you are aiming for a mild smoky flavour they are perfect. They are also perfect for shorter cooks or if you are cooking direct.

Chunks are larger and will therefore burn for a longer time. One or two chunks added to the coals can provide around 1 hour of smoke. Some people may choose to soak the chunks before adding them to the coals but in my opinion this isn’t necessary. Dry wood will produce a cleaner smoke and if they burn a little quicker, you can always add another chunk.

Tips for smoking on a Charcoal BBQ

When I talk to anyone who is interested in learning how to smoke, I always recommend they start smoking on a charcoal BBQ they already have. You can do almost any form of smoking on a Kettle BBQ and whilst they may not be as easy to manage as a dedicated smoker, you can get very similar results.

Aim to be subtle with your smoke and treat it like any other flavour you add to your food. By all means you can add a little extra if you like the flavour but too much will result in your food tasting and looking like it was in a house fire!

I like to think of it this way.

Let’s say you add a rub to a whole chicken before putting in onto the BBQ to roast. You would never dream of going back and adding more rub every 15 minutes or so until the chicken is cooked. The flavour of the chicken would be overpowered by the layers of rub and result in a rather unpleasant meal! The same rules apply to smoke. 15 minutes of smoke at the very beginning of the cook is enough to give you a great flavour but you will still be able to taste your seasoning and more importantly the meat.

The smoke will only penetrate into the meat whilst the outer surface isn’t sealed. After 20-30 minutes at normal roasting temperatures, the smoke will struggle to get into the meat so there is little point in adding more. Food that is cooking low and slow will take longer to seal so can therefore take on more smoke but remember not to be too heavy handed.

Another important factor to remember is airflow. If you are cooking indirect and want to add smoke, the position of your lid vent is crucial. The same can be said for any indirect cooking. Your lid vent should always be placed directly over your food to ensure the air is drawn in through the bottom vent, through the coals and wood then it passes over your food before exiting the BBQ through the lid vent. If the vent is placed over the coals, the airflow will be through the coals then straight up and out through the vent.The caveat to this setup is that the hood thermometer may now be placed directly over the coals giving you a false reading as to the actual temperature at grill level where your food is placed. I would recommend you have a grill level thermometer to get accurate temperature readings.

A great place to start!

A kettle BBQ is the ideal beginners BBQ as you can do almost any form of cooking on it including smoking. Something like the Weber 57cm Mastertouch has all the features you need to learn all aspects of BBQ. When smoking on a charcoal BBQ, a lid is essential and hinged cooking grates make it very easy to add more coals or wood chips without having to remove your cooking grate from the BBQ.You can easily learn the basics of smoking on a kettle before moving up to a dedicated smoker. Start with adding a few wood chips or chunks to your current cooks and experimenting with different flavours before moving on to some of the bigger cooks like ribs or brisket.

Click to Download your Smoking Wood Chart
By adding a little bit of smoke at the start, then building from there, you will slowly learn what wood flavours you like and how strong you like them. To help you match the different wood flavours with your meat, we have put together a chart with some of the most common smoking woods showing their strength and what meats they go well with.

Click here to download your FREE smoking wood chart in pdf format

There are many other varieties of smoking wood but this is a great selection to get you started and help you learn the different levels of flavour.

Sign up for our FREE Newsletter

Keep up to date with all the latest news on UK BBQ Week by entering your name and email address below. We will send you our latest recipes, helpful articles and details on our latest competitions.