How to setup your BBQ for Indirect Cooking

50/50 method

Unlike direct cooking, you do not cook your food over the heat source. Instead your food is placed opposite the heat source and with the lid down, it will cook indirectly in the ambient heat within your BBQ.

You can cook using the indirect method on both gas and charcoal BBQ’s and most of the setups are the same with charcoal having a few extra. Each one of the methods below has it’s own advantages and disadvantages and which one you use will depend on what you are cooking.
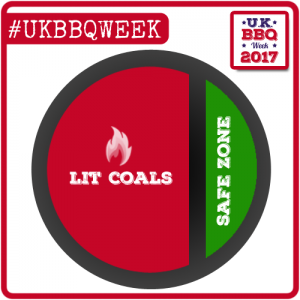
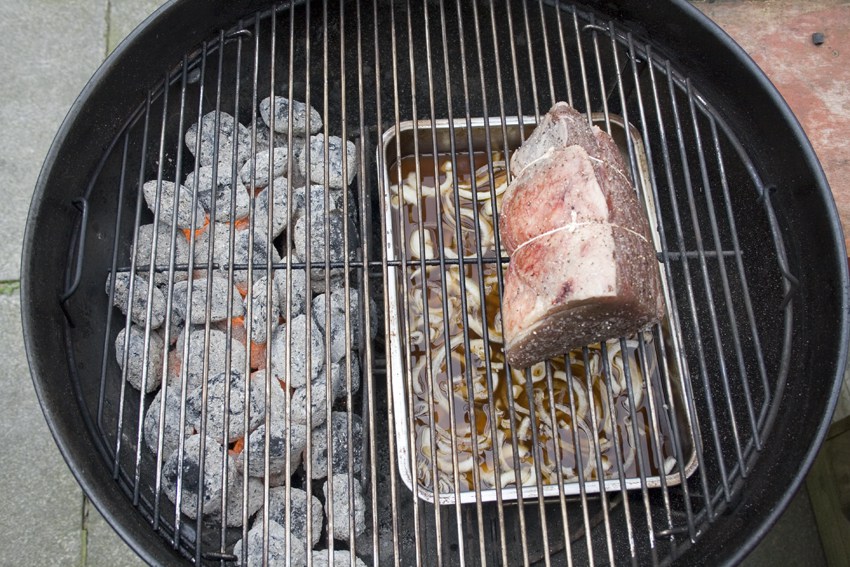
50/50 Method

Indirect Cooking using the 50/50 method

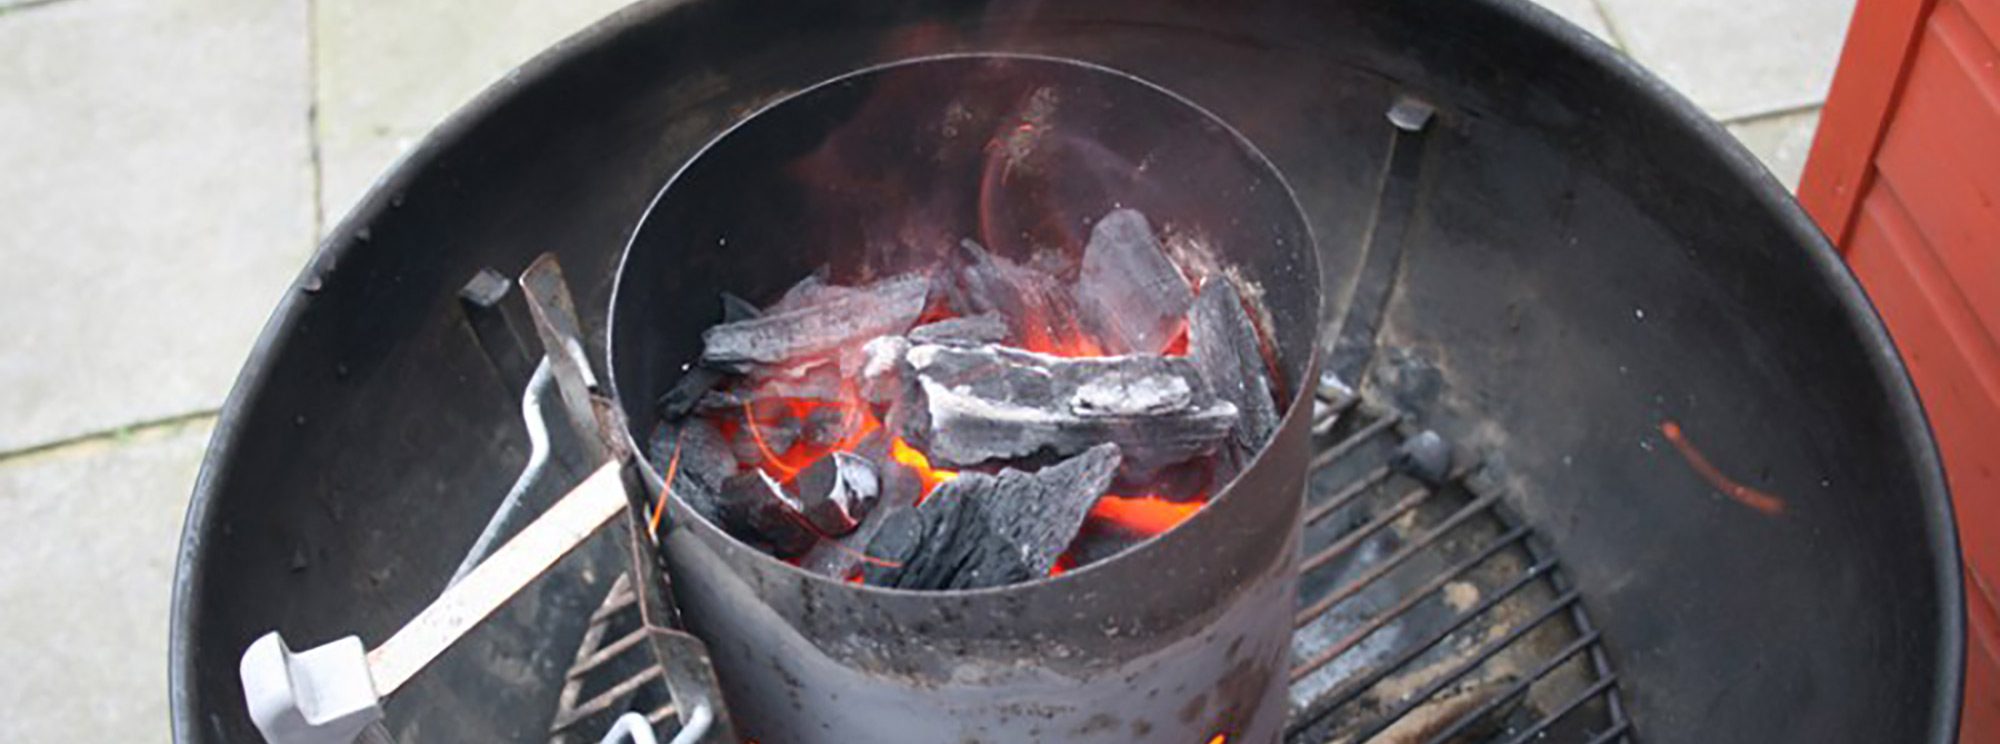
One of the most common indirect cooking methods is the 50/50 Method. On your charcoal BBQ, you would cover half of your charcoal grate with coals then place your food on the cooking grate above the area without coals. With the lid on, the ambient temperature will rise and cook your food in a similar way to your oven, but much tastier!

This would also be your method of choice for cooking indirect on a 2 burner gas BBQ. You would light the left hand burner and place your food on the right hand side of the cooking grate.The only disadvantage to this setup is that the heat source is only coming from one side of the meat. If you are roasting a chicken for example, you would need to turn it halfway through to help it cook evenly.

This is a two zone cooking setup so you have an area of direct and indirect heat making it great for searing a large piece of meat then moving it to the indirect side to finish cooking.
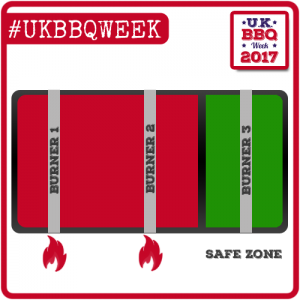
50/50 Split Method

Indirect Cooking using the 50/50 Split Method

Similar to the first method, you will have half your charcoal grate with no charcoal but this time, instead of placing all your coals to one side of the charcoal grate, you split them to the left and right leaving an area of indirect heat in the centre of the cooking grate where you place your food.

On a 3 burner gas BBQ you would light the left and right burners, leaving the middle one off, and place your food directly over the middle burner.

You will not have to rotate your food using this method as the heat source is coming from either side of the meat, helping it cook more evenly.

Whilst it is not essential, using charcoal baskets or charcoal rails to hold the coals in place will stop them from falling into the indirect area.

Once again, you will have an area of direct heat for searing.

Ring of Fire Method

Indirect Cooking using the Ring of Fire Method

This method is solely for charcoal BBQ’s, unless you fancy bending your burners into shape, and it involves placing your coals around the entire outside edge of the charcoal grate leaving the middle empty.

Your food would then be placed in the centre of the cooking grate giving you an even heat distribution around the entire BBQ. This method is great for roasting large, single cuts of meat such as a whole Chicken or Beef roast.

It isn’t an effective two zone cooking method as your area of direct heat around the outside of the BBQ is quite small so if you are planning to sear your meat before or after roasting, one of the other methods might work best.

The Bullseye Method

The bullseye method is the mirror opposite to the ring of fire, with your charcoal placed in the centre of the charcoal grate leaving the outer ring empty. This means your area of indirect heat is around the outer edges of the cooking grate.

This cooking method is better suited to lots of smaller cuts of meat and is traditionally used for things like Chicken wings. With the coals all in the middle of the grill, you have an area where you can sear over direct heat then move your food to the outside to cook indirect.

Using something like charcoal baskets or charcoal rails to hold your fuel in place makers it easier to avoid the charcoal falling to the outer edges and you can keep the charcoal concentrated in the centre of the grill.

There is no single best cooking setup on your BBQ. Each one of these methods has it’s advantages for different cooks so try them all and learn what works best for each recipe you cook.

Sign up for our FREE Newsletter

Keep up to date with all the latest news on UK BBQ Week by entering your name and email address below. We will send you our latest recipes, helpful articles and details on our latest competitions.


Knowing when your food is cooked

Thermapen 4

Internal meat temperatures can help absolute beginners know when their food is ready to come off the BBQ and is safe to eat. It can mean the difference between dry, overcooked food and succulent, moist food.

By learning the recommended safe internal temperatures and removing your food when it reaches that point, you know that all bacteria has been destroyed but the meat is still tender and moist.

By using temperature probes, you no longer have to guess when your food is ready therefore allowing you to take it off the BBQ at the optimum time.

Food Safety

Food safety is a somewhat boring but highly important subject and is especially important when it comes to meat. There are many factors that can affect food safety such as the quality of your meat and how it is stored.

In this article we are going to cover the cooking of meat and safe internal temperatures.

Meat is considered safe to eat when the internal temperature has risen to the point where harmful bacteria has been destroyed. These safe internal temperatures vary for different types of meat but a great general rule of thumb is to cook your food to an internal temperature of 75C. Cooking fresh, quality meat that has been stored properly to this internal temperatures will, in most cases, avoid the risk of food poisoning.

For a more detailed list of internal meat temperatures, there is an amazing article over on Amazing ribs which discusses the different temperatures at which meat is pasteurised and other factors to consider.

I would just like to debunk the myth that you are more at risk of food poisoning whilst cooking on a BBQ as opposed to in your kitchen. Providing that basic food hygiene rules are followed and you are checking your internal temperatures, there is no reason for food poisoning to be a bigger issue whilst cooking on your BBQ than in your kitchen.

People will often overcook their food on a BBQ for fear of it being raw in the middle. By reading the internal temperatures of your meat, you will know when it is safe to eat and this doesn’t change when you step into the backyard.

Knowing when your food is ready to eat

Another important reason to read the internal temperatures of your food is to know when it is ready to eat.

For a lot of meat this is simply when it has reached a safe internal temperature.

For tougher cuts of meat, such as brisket and pork shoulder, you will need to take the internal temperature higher to break down the fats and connective tissues. On the other hand, leaner cuts of beef can be served rare meaning the internal temperature will be lower than the recommended 75C.

Experience will help you decide when something is cooked by look and feel but while you are learning different cooking techniques, internal temperatures are the perfect way to make sure your food turns out  great every time.

You need to pay attention to how your meat looks and feels at different internal temperatures and you will soon be able to tell what stage your food is at. You can then use internal temperatures as a final check before lifting your food off the BBQ.

Monitoring your food temperatures using a probe

So now that we’ve covered the reasons behind monitoring the internal temperature of your meat, let’s look at the different ways to take a reading using temperature probes.

There are 2 main types of temperature probes commonly used by the BBQ community. The first of these are instant read thermometers. They give you a quick reading of the internal temperature and will help you decide when your food is ready to come off the BBQ.

Wired Thermometer

If you want to monitor the temperature of your meat for the duration of the cook, you would need to use a wired thermometer.

Using a wired thermometer allows you to leave the probe in the meat as it cooks. It will continuously monitor the temperature and give you a reading on an external unit. A thermometer like this is great for monitoring how fast your food is cooking, when it might be time for the next stage of a cook e.g. wrapping, braising etc and also how long it may be before the cook is finished.

When using this style of thermometer, it is important to place the probe in the thickest part of the meat as this will tell you when the centre of the meat has reached an internal temperature. It’s always a good idea to check a few other parts of the meat with an instant read thermometer to make sure it is cooked evenly all the way through.

Instant Read Thermometer

Taking a reading with an instant read thermometer is simple. Insert the probe into the thickest part of the meat until the tip reaches the centre. Within a few seconds you should have an accurate reading of the internal temperature at the centre of the meat.

Cooked or Not Cooked

When checking meat that is being cooked on the bone, make sure the probe isn’t hitting the bone and it is situated within the meat. For something like a whole chicken, you would probe both breasts and both legs to ensure the chicken is cooked evenly all the way through.

Internal temperatures may seem a little like ‘Cooking by numbers’, and I suppose it is, however it takes all the guesswork out of BBQ and will help you understand what happens to different cuts of meat at different temperatures.

Sign up for our FREE Newsletter

Keep up to date with all the latest news on UK BBQ Week by entering your name and email address below. We will send you our latest recipes, helpful articles and details on our latest competitions.


Chimney Starter: An Essential Accessory

Lit Chimney Starter with Charcoal

An Essential

For anyone with a ‘natural’ BBQ where you need to light either charcoal or briquettes a Chimney Starter is an essential item to own.

What is a Chimney Starter and How to they work?

A chimney starter is by far one of the easiest ways to light the charcoal for your BBQ.

The old method of placing a few fire lighters under a stack of charcoal then dousing it with lighter fuel not only adds a bad flavour to your food, but it can take a long time before your coals are ready to cook on. Add to that the fact that not all the charcoal will light at the same rate and it can easily stress you out before the first piece of meat hits the grill!

A chimney starter takes away all that annoyance as it will light all your charcoal evenly and quickly. It becomes especially useful when lighting briquettes as they are notoriously harder to light that standard lumpwood charcoal.

So how do they work?

You simply fill your desired amount of charcoal into the chimney starter. Then place some form of lighter on the charcoal grate of your BBQ and set the chimney starter on top of it.

The starter is designed to draw air through the bottom, up through your charcoal and out the top (like a chimney). The rush of air flowing through the coals lights them up quickly and as they are all held together in the cylinder, they are evenly lit all the way through.

You will know your coals are ready when the top layer of charcoal has turned white and the flames are dancing at the top.

Using a BBQ Glove, simply pour the lit coals into the BBQ and add your cooking grate. After a few minutes with the lid on to pre-heat your cooking grate, you are ready to cook.

A full chimney starter of lumpwood charcoal should light in around 10-15 minutes. Briquettes can take up to 20-25 minutes to get a full chimney going.

A lot of people moved away from charcoal BBQ’s as they were such a pain to light but this simply isn’t an issue any more. It is recommended that you pre-heat your Gas BBQ for around 15 minutes before cooking so the time difference between the two is negligible.

Adding the right amount of fuel

Another great benefit of a chimney starter is that they allow you to measure the amount of charcoal you are adding to your BBQ so you will quickly learn how much fuel is needed to achieve a desired temperature.

By keeping track of the level the chimney was filled to and the resulting grill temperature, it can make it easier to hit your target temperature i.e. ½ chimney starter of briquettes = 160-180C….. Ideal for roasting when setup for indirect cooking.

I’ve never talked to someone who has purchased a chimney starter and didn’t think it was one of the best investments they had ever made. They make getting a fire going really easy and hassle free allowing you to concentrate on the things that matter, cooking your food!

Sign up for our FREE Newsletter

Keep up to date with all the latest news on UK BBQ Week by entering your name and email address below. We will send you our latest recipes, helpful articles and details on our latest competitions.


How to setup your BBQ for Direct Cooking

Direct cooking is often known as grilling and it involves placing your food directly over the heat source. You can achieve different temperatures by controlling your heat source but generally, direct cooking is used to cook thinner cuts of meat such as steaks, burgers, sausages and chicken.

With larger cuts of meat, there is a risk that the outside of the meat will be overcooked before the middle of the meat reaches a safe internal temperature and so it is easier to use the indirect method for these cuts.

The Full Grill Setup

The most traditional set up for direct cooking is simply to have the entire BBQ setup for direct heat. If you are using a gas BBQ you will have all your burners on or on a charcoal BBQ, your charcoal will be spread evenly across the entire charcoal grate.

Setting your BBQ up this way means that anywhere you place food on the cooking grate it will receive direct heat from underneath.

This isn’t to say that the heat will be even across your entire cooking grate. Even with a gas BBQ, when the heat source is a little easier to control, you will still get hot and cold spots on the cooking grate. Typically the outer edges of the cooking grate will be a little cooler than the centre.

The same can be said for charcoal BBQ’s. Even if you spend time spreading the charcoal evenly, there will still be some spots that are hotter. This isn’t necessarily a bad thing but as long as you are aware of it, you can move your food around to account for this.

The Safe Zone

Gas BBQ Setup with Safe Zone
Gas BBQ setup with safe zone
When cooking direct I rarely use the full grill setup. Instead I like to set up my BBQ so that 60% of the cooking grate has direct heat and the remaining 40% is left with no heat source under it. This part of the cooking grate the safe zone.

On my 3 burner gas BBQ, I cook with the left and middle burner on and the right burner off. On my Weber Kettle I will spread the charcoal over 60% of the charcoal grate.

You might be asking why you would only use a portion of your cooking grate rather than the entire area?

The closer your food is to the heat source, the faster it will cook. Having an area with no coals gives you complete control over how quickly your food cooks. Food that is cooking too quickly can be moved into the safe zone. The food will still continue to cook but at a slower rate.

This is a great setup for beginners to master direct cooking on their BBQ’s.

Tips for cooking over Direct Heat

Keep the lid closed

Keeping the lid of your BBQ closed will not only help your food cook faster but it reduces flare ups. All Good BBQ’s are designed with vents to allow the optimal amount of air to flow through them with the lid closed. Fat dripping from your meat onto the coals or burners will result in a flame. If you have the lid open, you are feeding those flames with an abundance of oxygen and that never ends well!

Don’t turn your food too often

I sometimes think this is a manly thing. We love nothing more than to stand around the BBQ, tongs in hand just waiting to turn something or move it around the grill. It gives us a sense of purpose but we’re really doing more harm than good.

For one, if we’re constantly turning the food it means the lid is open (see the tip above). The main reason that most people feel they need to keep turning their food is due to flare ups from the fat dripping onto the coals which can sometimes get out of control. A momentary flare up will not burn your food however persistent flame will cause your food to burn. Keeping the lid on your BBQ will keep the flare ups under control.

The second benefit to not turning your food too often is to help retain the natural juices in your meat. Constantly flipping your food can squeeze the natural juices out. When cooking over a direct heat, try to turn your food no more than once or twice.

Keep your temperature under control

When cooking at a very high temperature using the direct method, things can become a little frantic if you have a full grate of meat to deal with. I’ve found that dialling the temperature back a little makes everything easier to manage.

If you put the first two tips into practice then a lower temperature will not affect your cook time. It simply allows your food to cook in a more controlled way.

My tendency, when I was learning to BBQ, was to turn all the burners on my gas BBQ to 11 or to fill my chimney starter as high as I could. The temperature would be sitting around 230-240 C. Add into the equation that I didn’t know anything about safe zones at the beginning and you can imagine a grill full of burgers and sausages got a little hard to handle!

Now I prefer to grill at around 200 C which is still a high temperature but more manageable. Cooking ‘hot and fast’ doesn’t always have to mean as hot and as fast as possible.

Hopefully these simple tips will help you get to grips will cooking over a direct heat. With time you will gain the confidence leave your lid on and walk away, leaving your BBQ to do the work for you.

Sign up for our FREE Newsletter

Keep up to date with all the latest news on UK BBQ Week by entering your name and email address below. We will send you our latest recipes, helpful articles and details on our latest competitions.