BBQ Plus Rotisserie Kit for Weber Go Anywhere

I have had a go-anywhere for years. I gave it away to my Godsons mum as they didn’t have a BBQ, but hubby missed it, and we bought another. It’s a great bbq to take with you camping or to the beach.

I have bought a few things from BBQ Plus, their moto is to scour the planet for the best Barbeque add-ons, utilities tricks and tips and bring them together on their online shop  BBQ Plus.

Their rotisserie kit for the weber go anywhere adds a new dimension to cooking away from home, or even at home if you want to use less charcoal for a quick roast chicken. It is easy to assemble and doesn’t need any tools as it fastens together with wing nuts. But the best thing is the Rotisserie motor can be powered 3 different ways, a mains adaptor, batteries or a usb power bank!

I recently cooked a roast chicken and powered the rotisserie with a power bank, the motion of the rotisserie was smooth with no juddering. It turned at the perfect speed to stop anything from burning. I have a basket that attaches to the spit so the next cook may be wings for wing Wednesday.

All in all I can thoroughly recommend this addition to your go anywhere

Astons Carne Asada Tacos

A tasty taco recipe by Aston Prideaux

Sometimes the best cooks are the ones with no rules! I didn’t use the right chopping board, didn’t use the right cut of steak, probably didn’t cook the steak the best, do we care? Absolutely not! Because these tacos absolutely rocked! They are simple, easy quick and affordable to make, and just absolutely knock out your tastebuds with flavour!

Astons Carne Asada Tacos

Ingredients

Carne Asada marinade:

  • 1kg Bavette or onglet steak
  • 1 lime, zest and juice
  • 1 orange, zest and juice
  • 4 tbsp soy sauce
  • 1x thumb of ginger, minced
  • 4x large cloves garlic, minced
  • 2 tsp paprika
  • 1 tsp cumin
  • 1 tsp oregano
  • 1 tbsp salt
  • 1 tsp @tajinuk seasoning
  • Pepper

Masa Tacos

  • 260g masa harina flour
  • 390g hot water
  • 2 pinches salt

Toppings

  • 2x avocados
  • 1x lime, zest and juice
  • Salt
  • Tomatoes
  • Coriander leaves
  • Tajin
  • @cholula.uk hot sauce

Method

1

Put all the marinade ingredients in a large bowl

2

Add Steak to Marinade

3

In another bowl add all the ingredients for the tacos, mix together then roll into 16 balls. Squish, or roll out

4

Cook until done then set aside

5

Prepare guacamole by mashing the avocados and adding juice and zest of one lime and a pinch of salt

6

Cook the steak until its done to your liking, set aside to rest

7

Chop tomatoes and coriander.

8

To serve, spread some guacamole on the tacos, slice the steak and add a couple of bits to each taco. Top with tomatoes and coriander and finish with a sprinkling of tajin seasoning and some hot sauce

Check out Astons Instagram account here

https://www.instagram.com/smokin_maple_meats/

BBQ Plus CharcoalSaver Deluxe Charcoal Grate

I love my Weber Kettle. It’s a very versatile grill and was one of the first ones we bought with a lid which makes a huge difference to the many ways you can use it. It’s built to last with a solid warranty behind it as well.

For all the years, I’ve been using a Weber Kettle, it has always annoyed me at how much good, unspent charcoal was being wasted as the spaces between the steel were too big and good, hot, burning bits of charcoal were simply falling through and going to waste. They also got caught in the one touch cleaning system when cleaning out the charcoal.

I had heard about people who used 2 charcoal grates and laid them criss-cross over one another. They said it decreased the wastage rate of the charcoal.

Last year I came across a company called BBQ Plus who had manufactured a criss-cross grill grate. They were even able to post to Northern Ireland which can be problematic.

The grate is a game changer, No longer are my hot coals falling through the grate. It is also very reasonably priced. It is well made, and I know it will last a lot longer than the original grates. Clean up is faster as there are no coals getting caught.

You can check it out here:-

https://www.bbq.plus/products/bbq-plus-coalsaver-charcoal-grate-for-22-57cm-weber-kettle-grills

PG Grills PKGO

The PKGO is a portable charcoal grill that may appear unassuming but it packs quite a punch.

Its classic aluminium clam shell design makes it rust proof and contributes to its durability and heat retention
Despite its compact size, using the flip kit to change the lid into a second bbq gives 400 square inches of cooking space. Two cast iron cooking grates are included.

I cooked for my works bbq and did smash burgers and korean chicken kebabs for seven.

After loading it with a chimney full of coals the PKGO can easily reach over 300c. The high heat is great for grilling meats and is the go to bbq for anyone competing in a Steak Cook Off association competition.

Many people buy a set of grill grates which play a crucial part to get good grill marks on your steak.
They evenly distribute the heat, allowing for consistent cooking results and no flare ups.

I competed at Maldon Smoke and Fire Festival last year in the Steak Cook Off Association competition and came third in a field of 12. I was the only lady griller and I beat the European Champion.

While it might seem a bit pricey for a portable grill the quality justifies the cost.

Review by Christine Dale

PK Grills are available from Pro Smoke BBQ

https://prosmokebbq.co.uk/collections/charcoal-grills/products/pk-grill-pkgo

Go Anywhere Xtender200 Cooking System

Long time supporter of UK BBQ Week Smokerig BBQ, Staffordshire based designers and manufacturers of BBQ equipment, have started producing accessories for the ever popular Weber Go Anywhere.  Their latest product is a riser kit which  is reviewed here by Phil who runs the BBQ blog  Love2BBQ

The Smokerig BBQ Xtender: Enhancing Your Weber Go Anywhere Grill Experience
The Smokerig BBQ Xtender Cooking System is an innovative accessory designed to elevate the performance of the beloved Weber Go Anywhere portable grill. Crafted entirely from robust 304 stainless steel, this British-made product epitomizes quality craftsmanship and meticulous attention to detail.
For grill enthusiasts seeking enhanced versatility, the Xtender proves to be a game-changer. Its addition expands the portable grill’s cooking capabilities, offering a wide array of cooking options. Notably, the ability to execute rotisserie cooks stands out as a highlight, appealing to aficionados of succulent, evenly cooked meats.
Having had the opportunity to test the Xtender, both myself and Mark Quigg were impressed by its quality and functionality. From the moment of assembly, the superior craftsmanship becomes evident. The precise fit of the Xtender onto the Go Anywhere grill further reinforces its excellence.

What does the Xtender offer? 

Smokerig provides several options to cater to diverse cooking preferences:

  • Xtender3: This model adds three levels of cooking, increasing the cooking capacity by 200mm. With this added space, users can accommodate larger cuts of meat and experiment with various cooking techniques.
  • XtendeR: Complete with end plates and a motor bracket, this option facilitates rotisserie cooking, opening up a realm of possibilities for roasting whole chickens and flavorful kebabs.
  • Xtender+: Combining enclosed cooking system plates and rotisserie end plates, the Xtender+ offers the best value, allowing for both low and slow cooks and rotisserie delights.

The optional heat deflector plate further enhances cooking versatility by enabling true indirect cooking within the fully enclosed cooking chamber. This feature is particularly beneficial for achieving tender, flavorful results on larger proteins.
Setting up the Xtender is a straightforward process, despite its ‘flat-packed’ delivery. Once assembled, its sturdiness becomes apparent, promising reliable performance during grilling sessions. While switching end plates may require a bit of attention due to small wing nuts, the overall experience remains hassle-free.
Upon placement onto the Weber Go Anywhere grill, the precise fit of the Xtender underscores its compatibility and reinforces its status as a seamless extension of the portable grill.

Highlighted Key Features:

  • Three Cooking Levels: The Xtender adds significant height to the cooking area, allowing for more substantial cuts of meat and diverse cooking techniques.
  • True Indirect Cooking: The fully enclosed cooking chamber ensures precise temperature control, ideal for smoking and longer cooks.
  • Rotisserie Option: With the included rotisserie bracket, users can enjoy the versatility of rotisserie cooking, enhancing the grill’s capabilities.
  • Durable Construction: Crafted from corrosion-resistant 304 stainless steel, the Xtender promises long-term durability and easy maintenance.
  • British Craftsmanship: Proudly manufactured in Staffordshire, UK, the Xtender reflects a commitment to quality and attention to detail.

In summary, the Smokerig BBQ Xtender emerges as a worthy investment for Weber Go Anywhere grill owners seeking to expand their cooking options. Its versatility, precise cooking control, and durable construction make it an invaluable addition to any outdoor cooking setup. Whether grilling for two or hosting a larger gathering, the Xtender promises to elevate the grilling experience to new heights.

You can check out Phil’s blog at Love2BBQ

and you can check out the quality products at Smokerig BBQ here

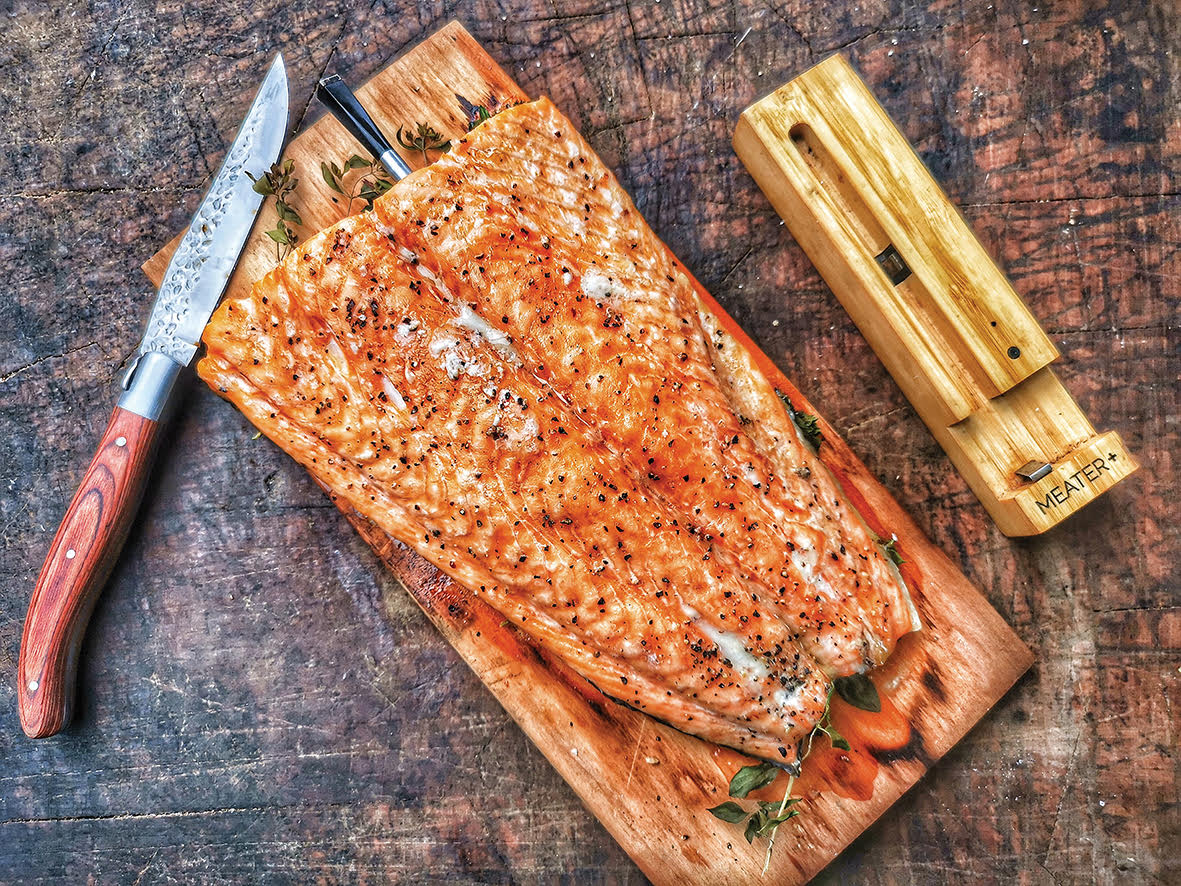
Planked Salmon in a Wood-fired Oven

Salmon is a delicate fish, so cooking on a plank such as maple or cedar keeps it from falling apart and helps to not overcook it, and you can add extra flavours, such as the lemon and marjoram herbs.


This recipe is from CountryWoodSmokes very own Marcus Bawdon  and was kindly supplied by BBQ Magazine, the quarterly print magazine for everyone – beginners, enthusiasts and pit masters.
Check out their details below the recipe

Planked Salmon in a Wood-fired Oven

Ingredients

  • 1 fillet side of salmon
  • Salt and pepper to season
  • 1 lemon cut into thin slices
  • 1 handful of marjoram/oregano or lemon thyme
  • 3 tbsp maple syrup

Method

1

I set the wood fired oven for retained heat cooking at around 180°C and used the Meater+ to make sure the salmon fillet reached 55°C to ensure it was cooked perfectly moist.

2

Place the herbs and half the lemon slices on to the plank, followed by the salmon fillet. I went for simple salt and pepper on the salmon fillet, and brushed with a little maple syrup halfway through the cook.

3

Total cooking time is about 25 to 30 minutes.The resulting salmon is delicious, tender, juicy, smoky and slightly sweet.

BBQ is a magazine devoted to fire, food & outdoor living – a quarterly print publication for the global barbecue community. You’ll find us in butchers, farm shops and garden centres. We celebrate the best live fire restaurants, pubs and hotels and we’ll be there at festivals and events.
www.thebbqmag.com/

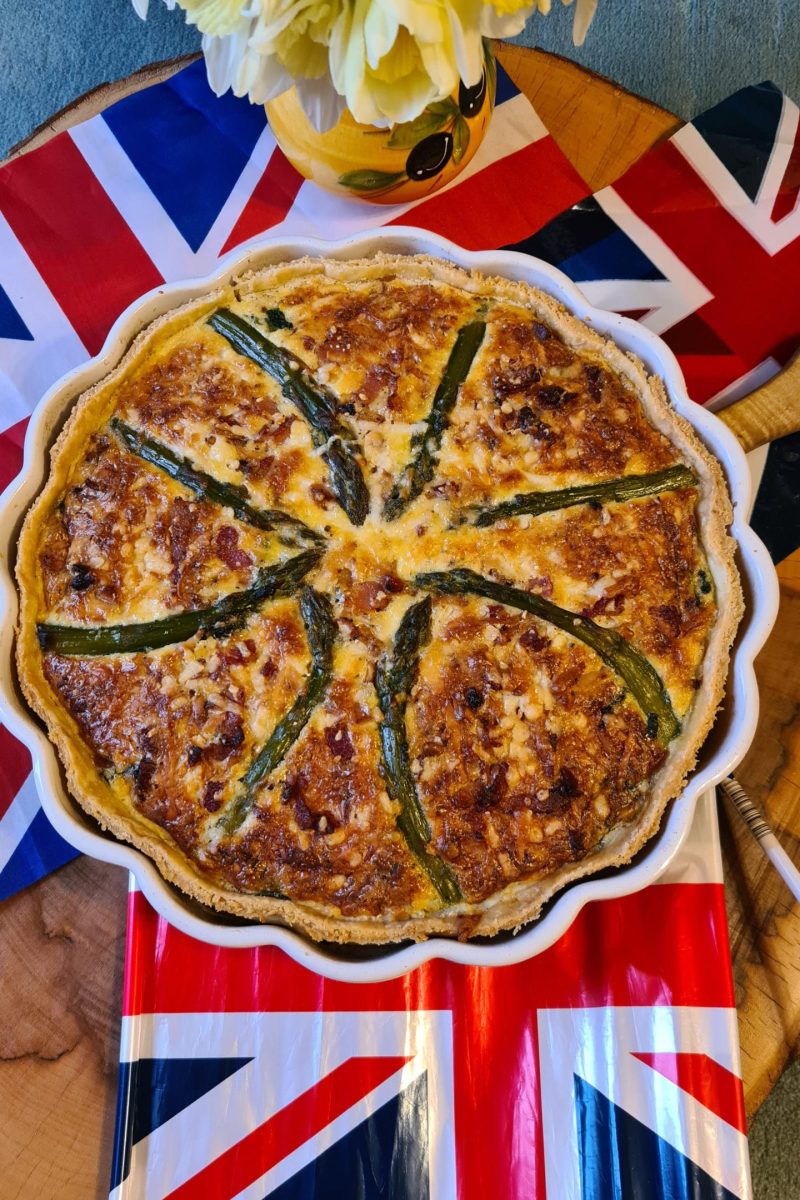
Coronation Quiche – A quiche fit for a King

Here’s Sue Stoneman’s recipe for a Quiche for Charlie.


I roughly followed the main ingredients for the Kings Quiche and a keen champion of supporting local produce, looked at the recipe on the Trewithen Dairy website as I had seen a lovely looking quiche on their social media. I used their butter and clotted cream but I couldn’t get my hands on broad beans, so substituted fresh asparagus from my local farm shop and some French beans.  You could use peas or any other green vegetable.  I also put in some local bacon from Darts Farm.  It was a right Royal Quiche for sure, rich, creamy, bursting with flavour and colours with a perfectly cooked pastry base. Hubby said it was the best quiche I’ve ever made and my son would like it as there were not any chillies in it!

I used a 23cm diameter pie dish

Coronation Quiche – A quiche fit for a King

  • Yield8 -10 Servings

Ingredients

  • Short crust pastry
  • 300g plain flour
  • 150g unsalted butter
  • Pinch salt
  • Cold water

For the Filling

  • 4 Eggs
  • Ten slices unsmoked streaky bacon
  • Fools Gold seasoning Angus & Oink
  • 200ml Double Cream
  • 100g Trewithen Dairy Cornish Clotted Cream
  • Knob of Butter
  • 240g Spinach, washed and roughly chopped
  • 5 sprigs fresh asparagus
  • Handful of French Beans, topped, tailed and cut into small pieces.
  • 100g Mature Cheddar, grated (I used my own apple smoked cheddar)
  • Salt & Pepper
  • Italian Stallion Seasoning Angus & Oink

Method

1
If using your BBQ, set it up for indirect cooking at a temperature of 180°C. 
Make the pastry and leave in the fridge to chill while you prepare the filling.
2

Fry the bacon in a hot pan, adding in a tablespoon of Fools Gold seasoning. Cook til coloured and crispy. Remove with a slotted spoon and place onto a plate with kitchen paper on it to soak up any excess fat.

3

Add a little butter to the same pan and add the spinach beans and asparagus.  Saute for 5 minutes until the spinach has wilted and the beans and asparagus are still crunchy to bite. Season with salt and pepper

4

In a jug, mix the eggs and both creams until thoroughly combined.  Add in a tablespoon of Italian Stallion.

5
Bake blind the pastry base – line your baking dish with parchment paper, followed by the rolled out pastry, leaving an overhang at the sides.  Line with parchment paper and ceramic beads.  Bake for 15 minutes til lightly browned.  Remove the parchment paper and beans and place the dish back in the BBQ for ten minutes.  Remove from the bbq and carefully trim the edges of the pastry with a bread knife
6

When the spinach mixture has cooled, spread it over the pastry base evenly. Sprinkle over pieces of bacon and the grated cheese, before pouring over the egg mixture. Use a fork to carefully work the egg mixture into all the gaps.

7

Bake for 25 – 40 minutes at 180°C until the egg is just set and the top is lightly browned. Serve warm, with a colourful salad.

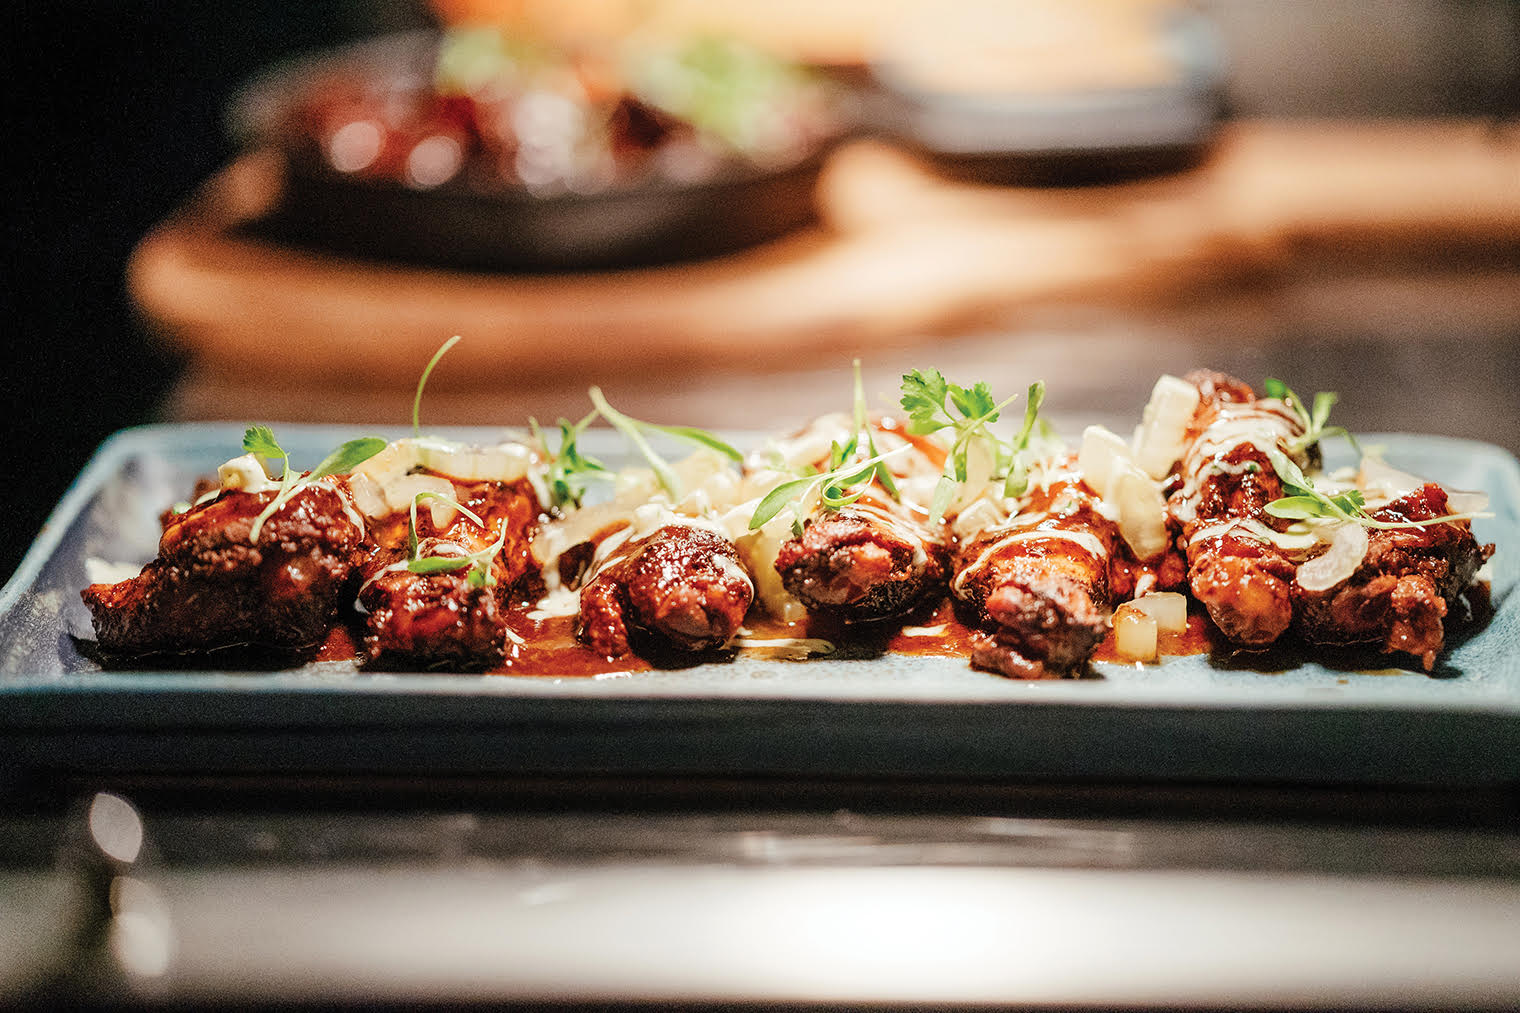
Dr Pepper BBQ Wings

This recipe is by Phil Yeomans, Lainston House & Season Cookery School and was kindly supplied by BBQ Magazine, the quarterly print magazine for everyone – beginners, enthusiasts and pit masters.
Check out their details below the recipe

Dr Pepper BBQ Wings

  • Cuisine
    • American
  • Course
    • Appetizer
  • Cooking Method

Ingredients

  • 24 chicken wings
  • Sprigs of coriander

DRY RUB FOR WINGS

  • 1 tbsp sumac
  • 1 tsp pepper
  • 1 tsp thyme
  • ½ tsp chilli
  • ½ tsp garlic powder
  • 1 tsp salt
  • Mix all rub ingredients in bowl.

DR PEPPER SAUCE

  • 128g ketchup
  • 3 tbsp tomato paste
  • 340ml Dr Pepper
  • 64g cider vinegar
  • 43g Worcestershire sauce
  • 64g brown sugar
  • 2 tsp chilli powder
  • 1 tsp pepper
  • 1 tsp salt
  • Mix all ingredients together in a bowl. Check seasoning.

BLUE CHEESE DRESSING

  • 240g Greek yoghurt
  • 70g blue cheese
  • 2 tbsp coriander
  • Salt & pepper (to taste)
  • Place all items in a blender and blitz. Adjust seasoning accordingly.
  • 1 tsp salt

PICKLED CELERY

  • Peel the celery and slice on the angle
  • 100ml sugar
  • 100ml water
  • 100ml cider vinegar
  • Boil all together, add the celery and allow to cool.

Method

1

Place the chicken wings in a tray, sprinkle with the dry rub. I normally leave them overnight in the fridge.

2

Set the BBQ up indirect to smoke. Heat the BBQ to 125°C using the vents accordingly.

3

Place a chunk of cherry wood on the charcoal; place the wings on the grill, smoke for an hour.

4

Remove your wings from your grill

5

Open up the vents and preheat the BBQ to 250°C. Place the grill back on the BBQ and cook the wings until crispy and above 75°C.

6

Once the wings have crisped and are at temperature, glaze with Dr Pepper BBQ sauce.

7

Leave for 5 minutes for the sauce to set and move to your desired plate.

8

Garnish with blue cheese dressing, pickled celery and chopped coriander.

BBQ is a magazine devoted to fire, food & outdoor living – a quarterly print publication for the global barbecue community. You’ll find us in butchers, farm shops and garden centres. We celebrate the best live fire restaurants, pubs and hotels and we’ll be there at festivals and events.
www.thebbqmag.com/

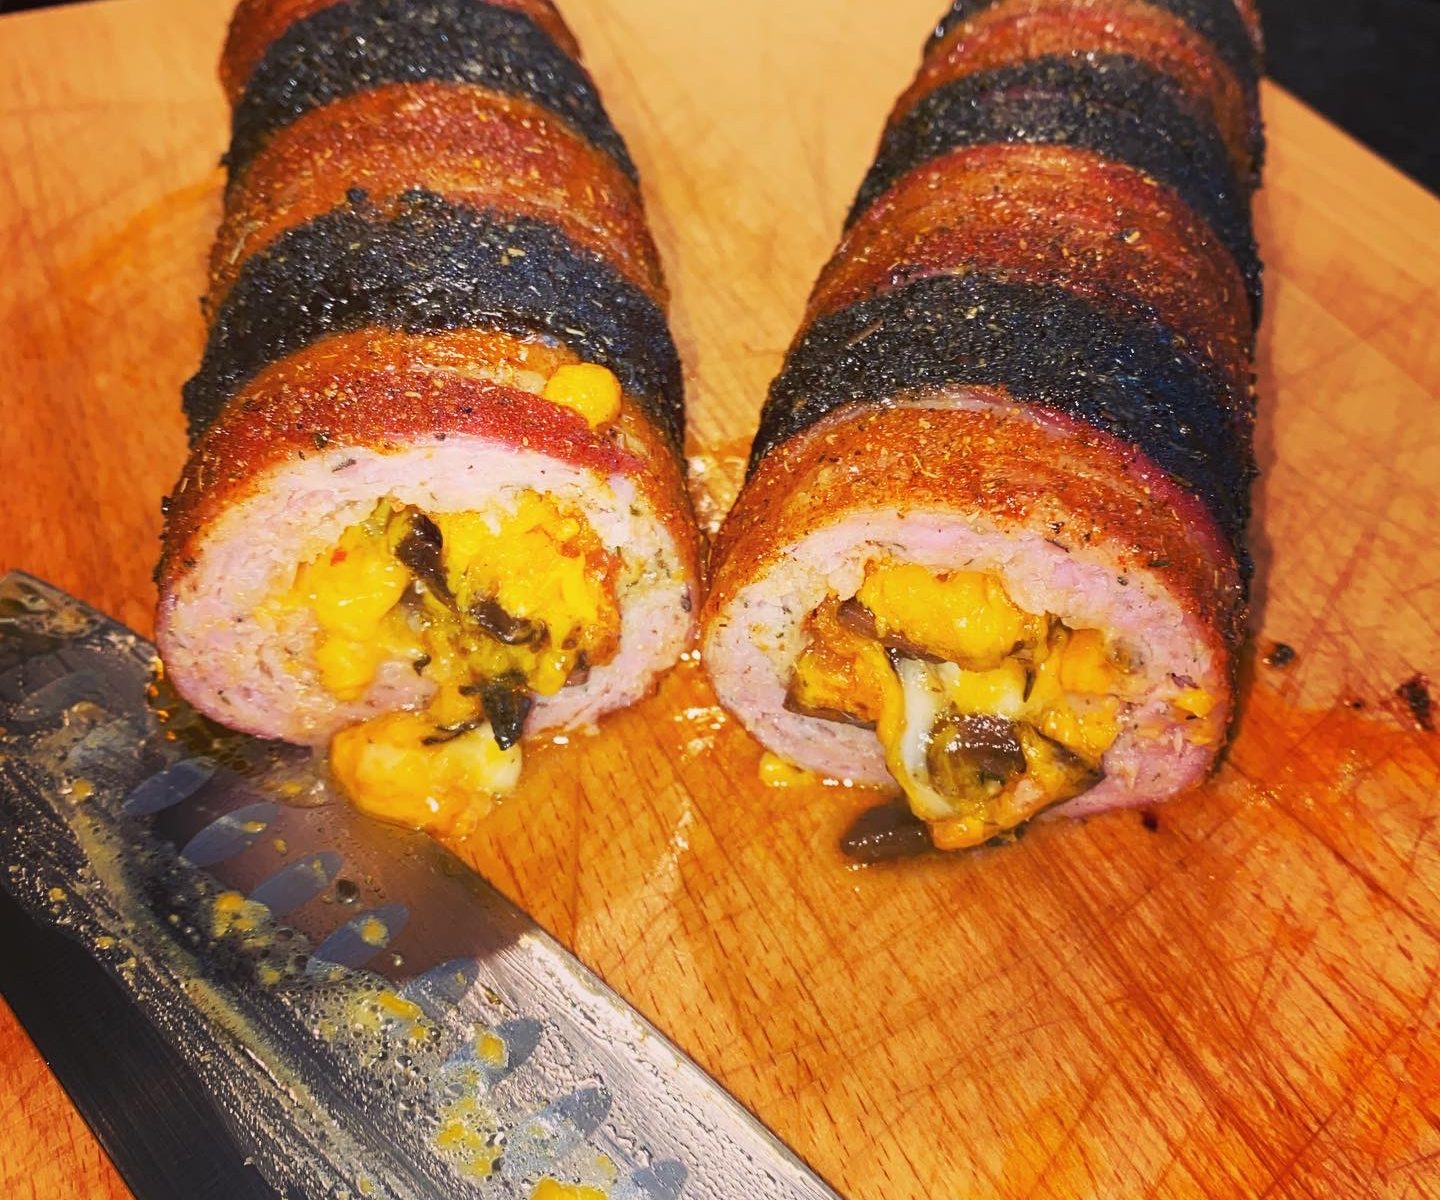
Ben’s Tiger Tail Fatty

Here’s Ben’s recipe for his Tiger Tail Fatty which he cooked  and posted the photos last year for one of the themed days. We think its great to see the BBQ Kids grilling outdoors.

Ben’s Tiger Tail Fatty

  • Yield4 Servings

Ingredients

  • Streaky Bacon (approx 10 rashers)
  • 10 Pork Sausages
  • BBQ Sauce to glaze
  • 4Tbs BBQ Rub, divided - half coloured black with activated charcoal powder, half coloured yellow with ground turmeric
  • Fillings of your choice
  • (We used all my favourite things: Red Leicester Cheese, Nduja, fried mushrooms and sliced mozzarella. Other good ideas are sundried tomatoes, fresh herbs, chorizo - the sky is the limit! Dad wouldn’t let me put chocolate in it though… 😩)

Method

1

 Lay out your bacon on a sheet of cling film in a slightly overlapping pattern. A handy tip: Use the blade of a sharp knife (get an adult to help you!) in a butter-spreading motion to stretch out your bacon rashers – it helps them cover a larger area and will also make them nice and crispy!

2

 Slice down the length of the pork sausages and remove the skins. Spread the sausage meat evenly across the bacon layer.

3

 Lay your filling ingredients lengthwise across the middle of the sausage layer, leaving a small gap on either end to be able to seal the fatty when rolling up.

4

 Use the cling film to roll the sausage and bacon layers around the filling, pinch the ends to seal in the filling and tuck the ends of the bacon layer underneath.

5

 Use your 2 coloured rubs to add alternating stripes around the outside of the fatty (like a tiger’s tail!), then stick it in the fridge until you’re ready to cook.

6

 Light your BBQ and add a chunk of smoking wood to the coals if you like – we used oak wood and it was delicious! Smoke your fatty at around 180°C until the internal temperature hits 70°C, then glaze with BBQ sauce and leave to set for the last few minutes in the BBQ until the internal temperature hits 74°C.

7

 Remove from the BBQ to rest for a few minutes, then slice and serve – we like ours with a soft fried egg and a slice of toast!

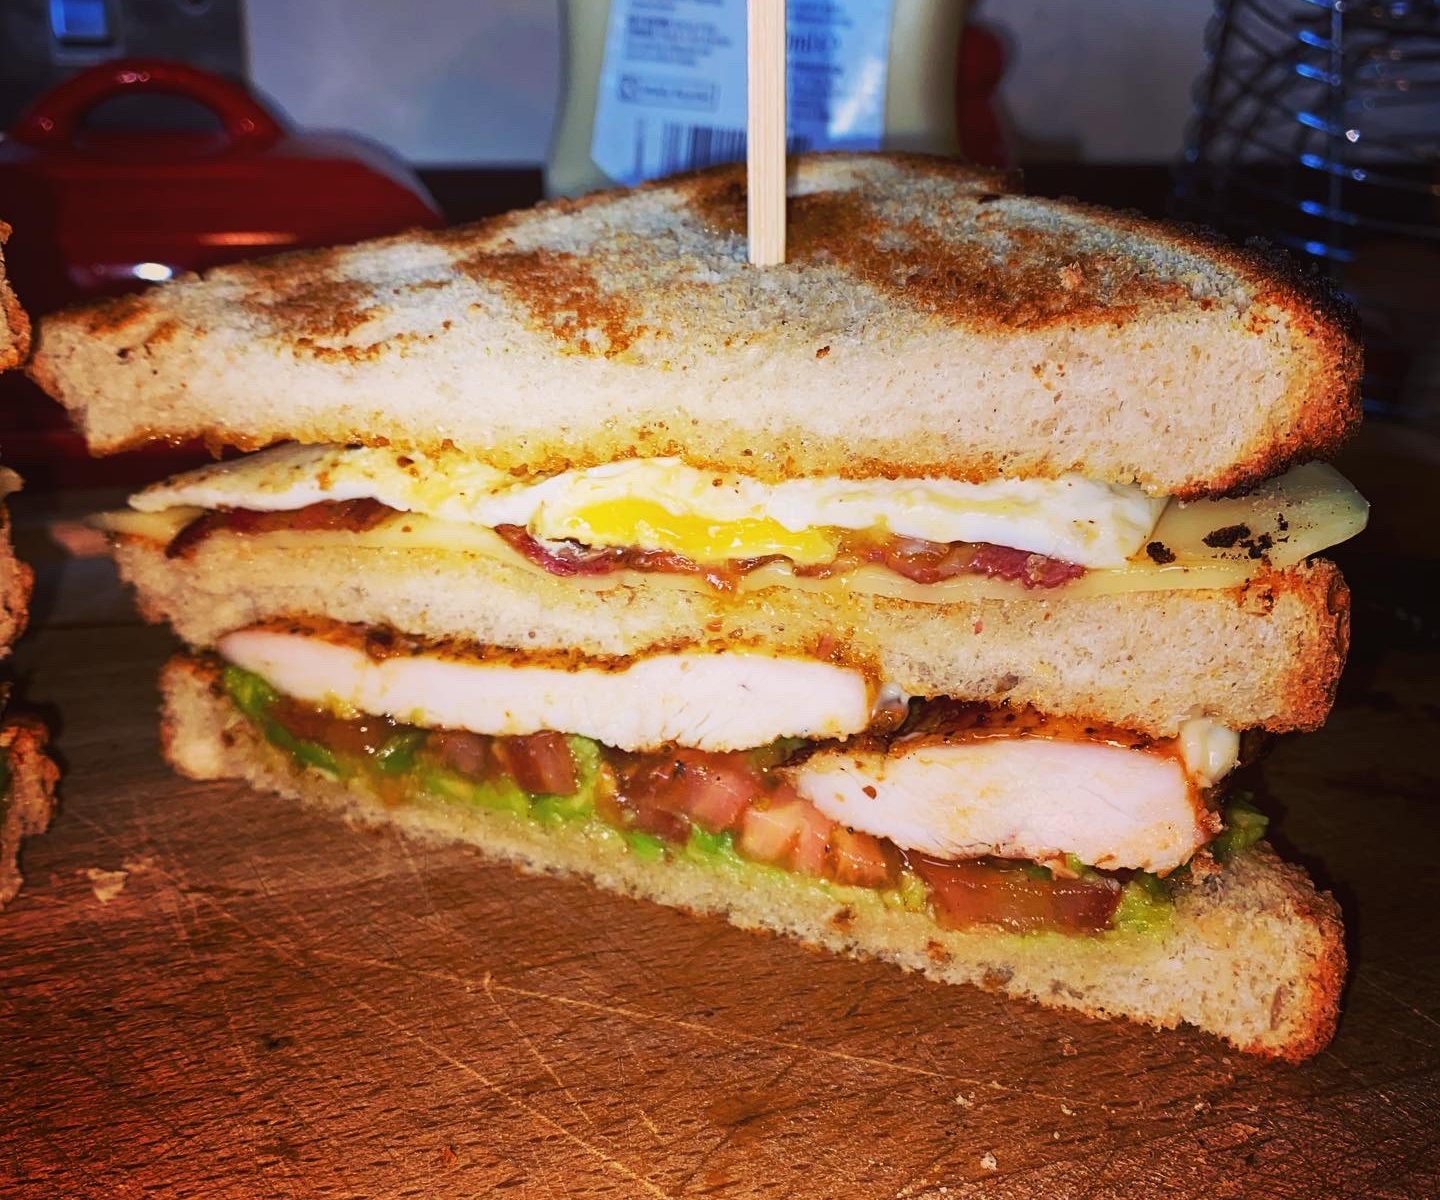
Liam’s Large and Luscious Chicken Club Sandwich

More from our ‘BBQ Kids’. This time its Liam’s turn to show his skills with a lovely BBQ Chicken Club Sandwich.
We hope that Liam and his brother Ben keep BBQ-ing and continue to show us their skills.

Liam’s Large and Luscious Chicken Club Sandwich

  • Yield3 Large Servings

Ingredients

  • 3 Large Chicken Breasts
  • 9 Rashers Streaky Bacon
  • 1 Large Tomato, sliced
  • 1 Large Avocado, smashed with a pinch of salt and pepper
  • 9 Slices Bread (we used a tiger bloomer)
  • 3 Slices Cheese (we used Gouda)
  • 3 Eggs
  • Mayonnaise
  • Your favourite rub(s)

Method

1

Butterfly the chicken breasts and coat with a drizzle of oil and your favourite BBQ rubs – we used a mix of Angus & Oink’s Garlic Butter and Peri Peri rubs. Leave to marinate for a little while, or even overnight.

2

Light your BBQ, and when it’s ready for grilling, get your chicken and bacon on to cook. Once the chicken is cooked (74°C / 165°F) and the bacon is crispy, remove them and keep warm.

3

Get your bread onto the grill to toast – watch it carefully though, it can burn quickly!

4

Once your toast is done, it’s time fry your eggs to your liking and then…
Assemble! Stack your ingredients in the following order, starting at the bottom:
Toast Slice #1 (buttered if you prefer), Smashed avocado, Sliced tomato, Grilled chicken, A squirt of mayonnaise, Toast Slice #2, Cheese slice, Crispy bacon, Fried egg, Toast slice #3

5

Skewer your sandwich to keep it all together, slice into halves/quarters, serve and enjoy – preferably with plenty of napkins! 😁

Show Buttons
Hide Buttons