Barbecue all year round with Napoleon Grills

Barbecue all year round with Napoleon Grills

Everyone loves a good barbecue in the summer, great food, family and friends plus the sunny weather makes it the perfect time to get your grill on and impress. But barbecuing doesn’t have to be left for those brighter months and special occasions – use your grill throughout the year with some top tips from Napoleon Grills national sales manager, Martin Sobey.

Too many cooks in the kitchen

“If the kitchen is the social hub of your household, you might not want to cook indoors whilst you’re entertaining. Bring the party with you and grill outdoors for a fantastic meal that keeps the smells out of your home too.

Cold weather? No problem!

“Summer never seems long enough and with the unpredictable British weather, who knows when you’ll next get a chance to have that barbecue? Grilling outdoors is possible all year round, even if the weather is cold and snowy. Napoleon barbecues are built with high quality 304 stainless steel, meaning that not only will your grill last for years, but it can withstand both high heat and extreme cold.

“It’s important in colder weather not to open your grill too often whilst cooking and to keep a timer close so you can pop inside if the temperature drops. Foods that cook faster, like burgers and chicken breasts, will minimise the time spent outside but are still great meal options, and what better way to add flavour than roasting on the barbecue?

Every day is an occasion

“Birthdays, Father’s Day, even Christmas, there’s always an occasion for you to show off your culinary skills, but does the barbecue always have to be limited to special events? Why not expand your kitchen and try making your family meals on the grill?

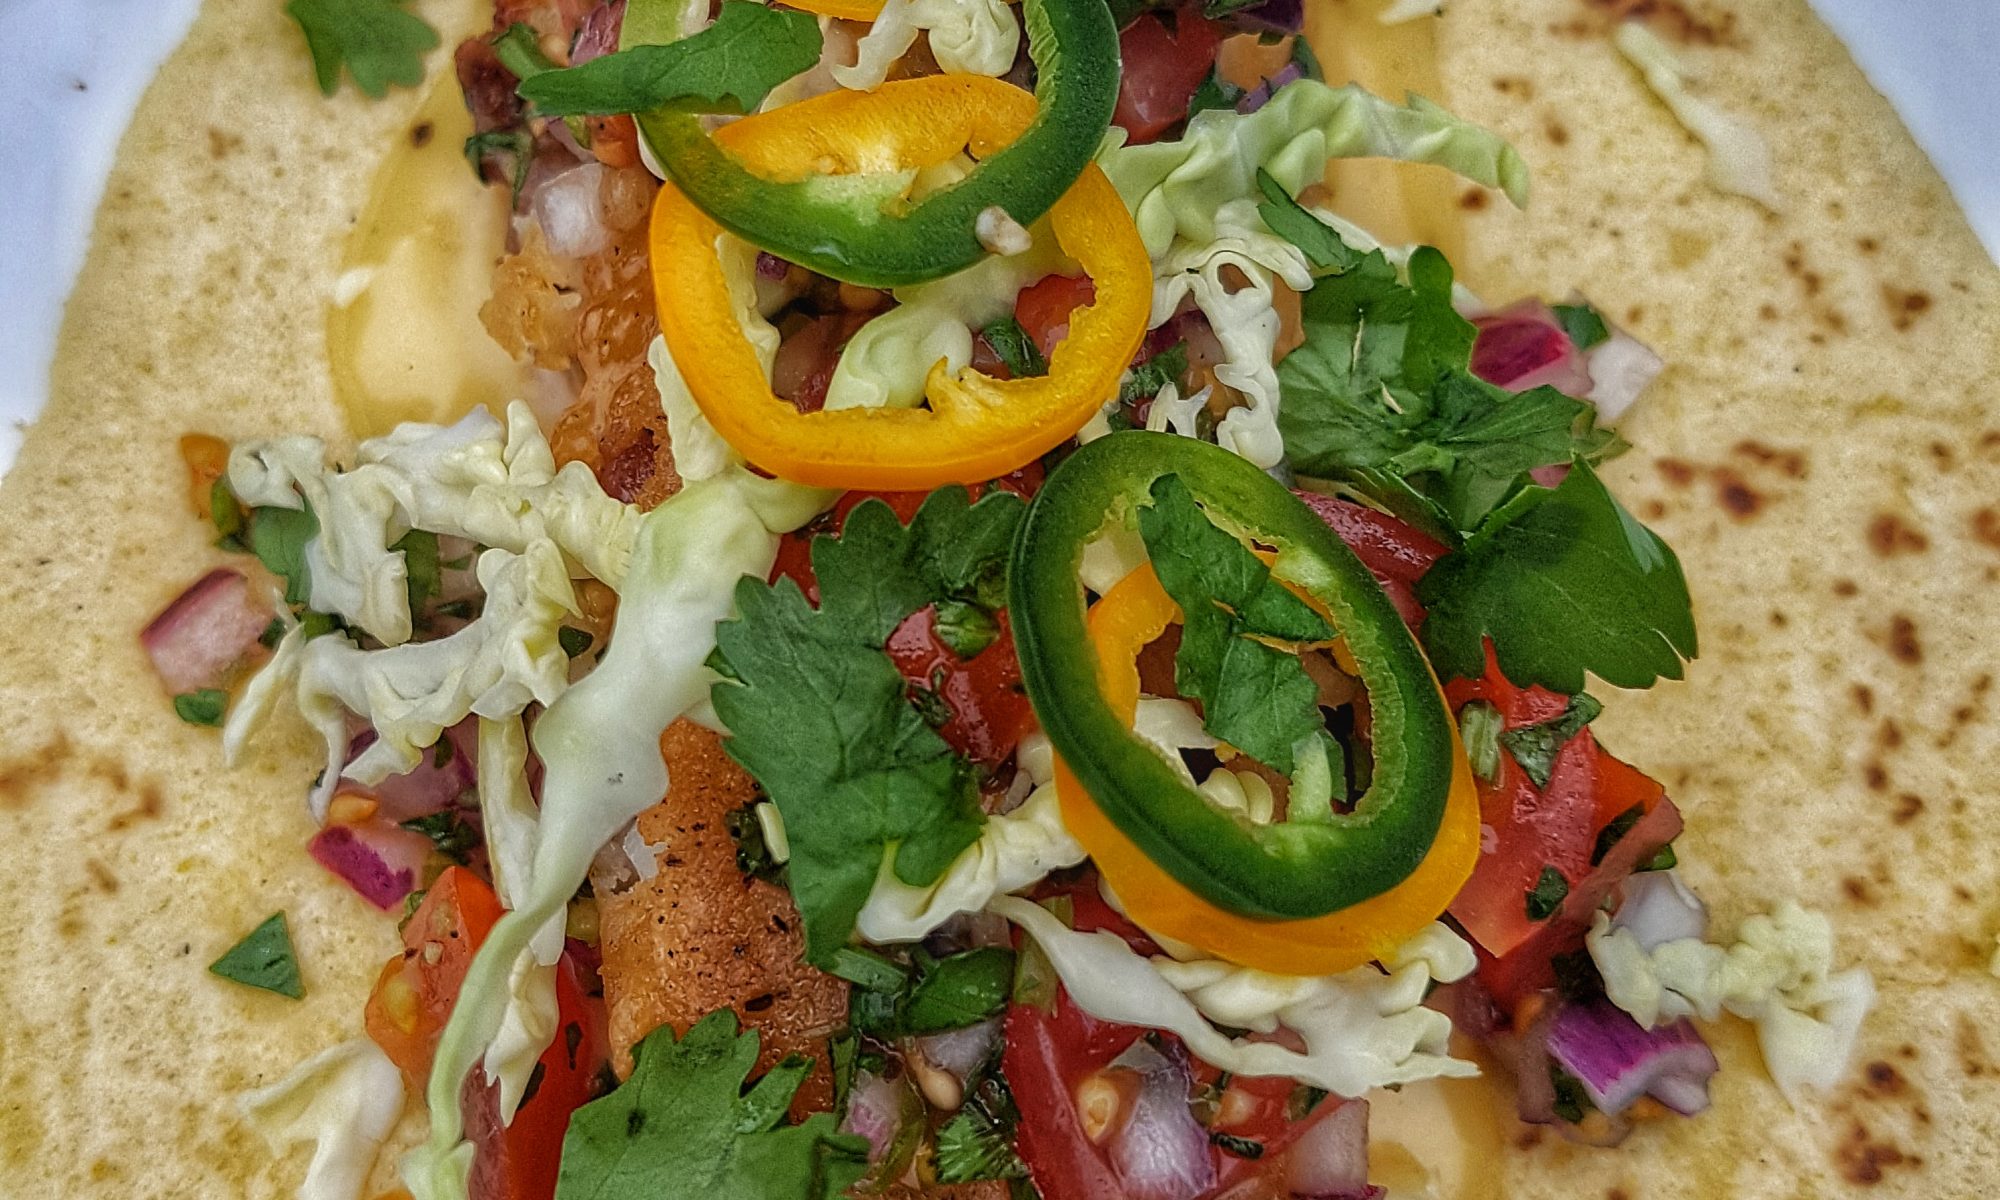
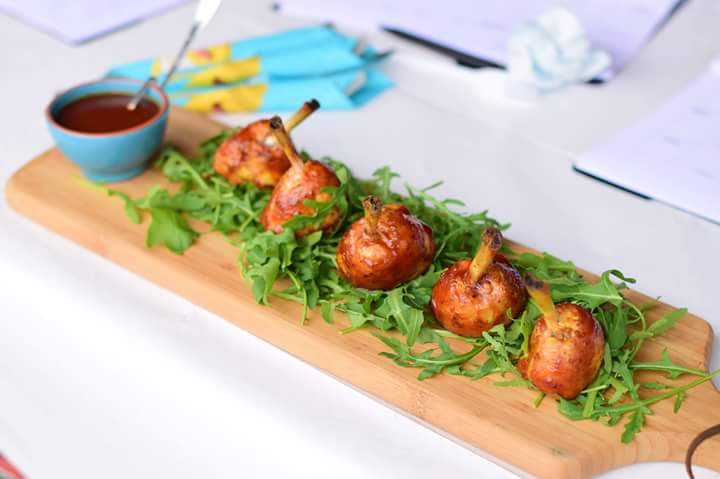
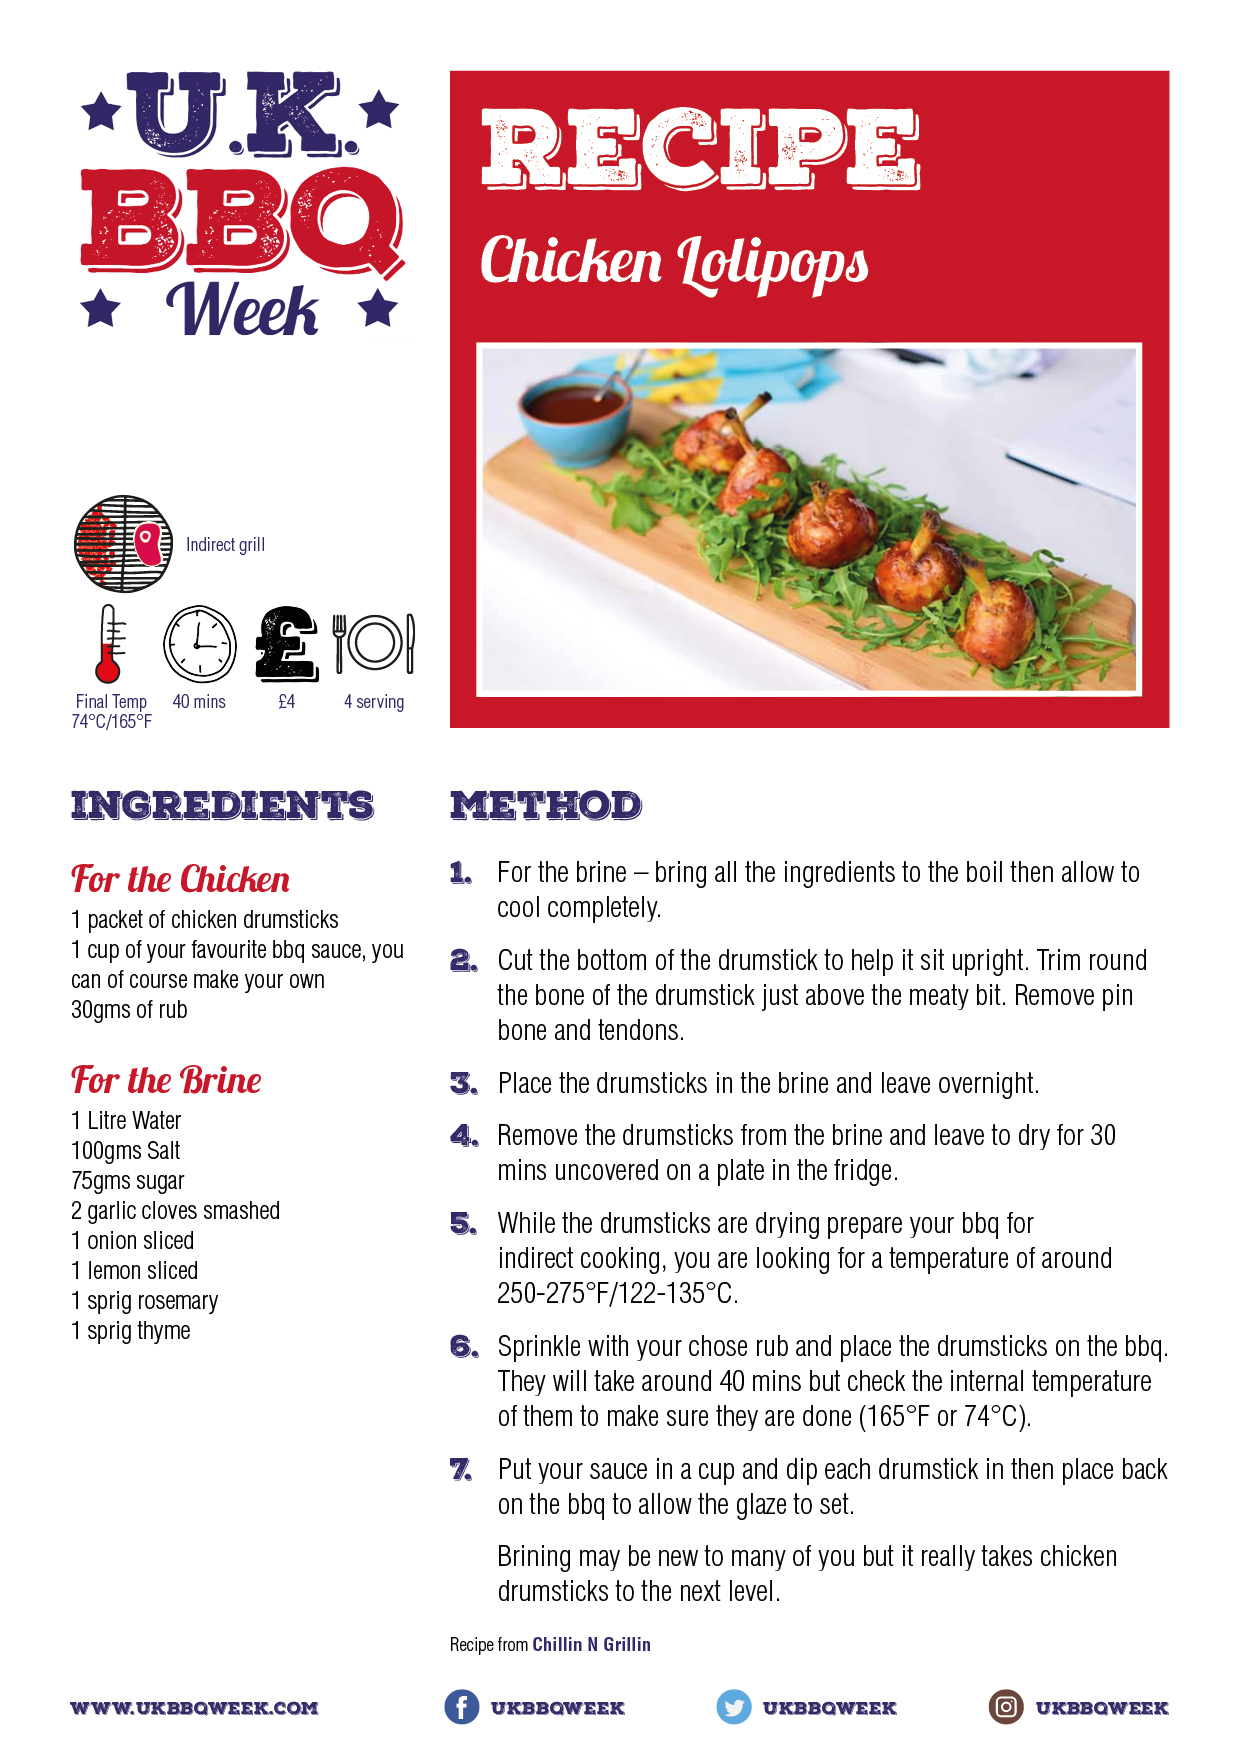
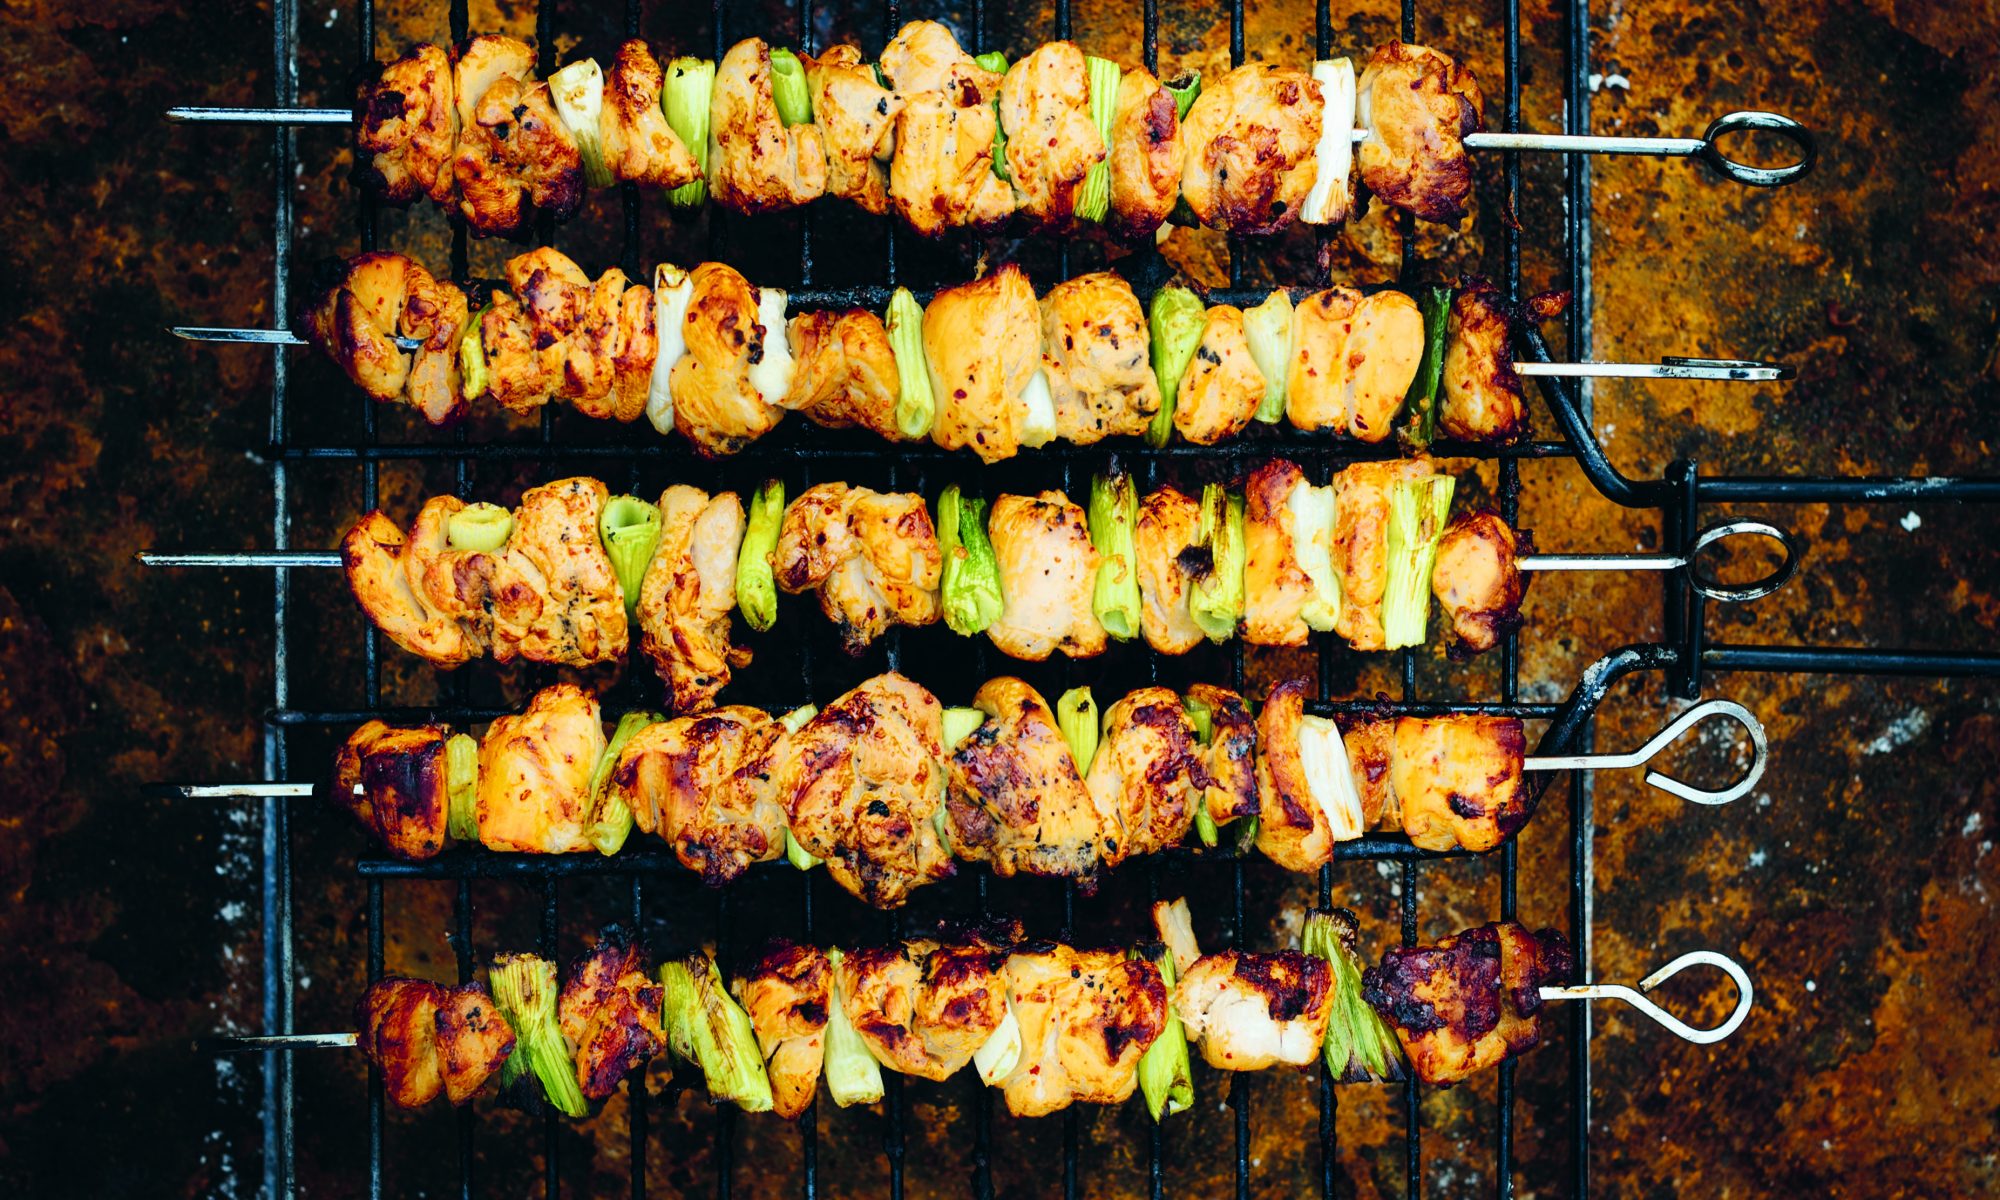
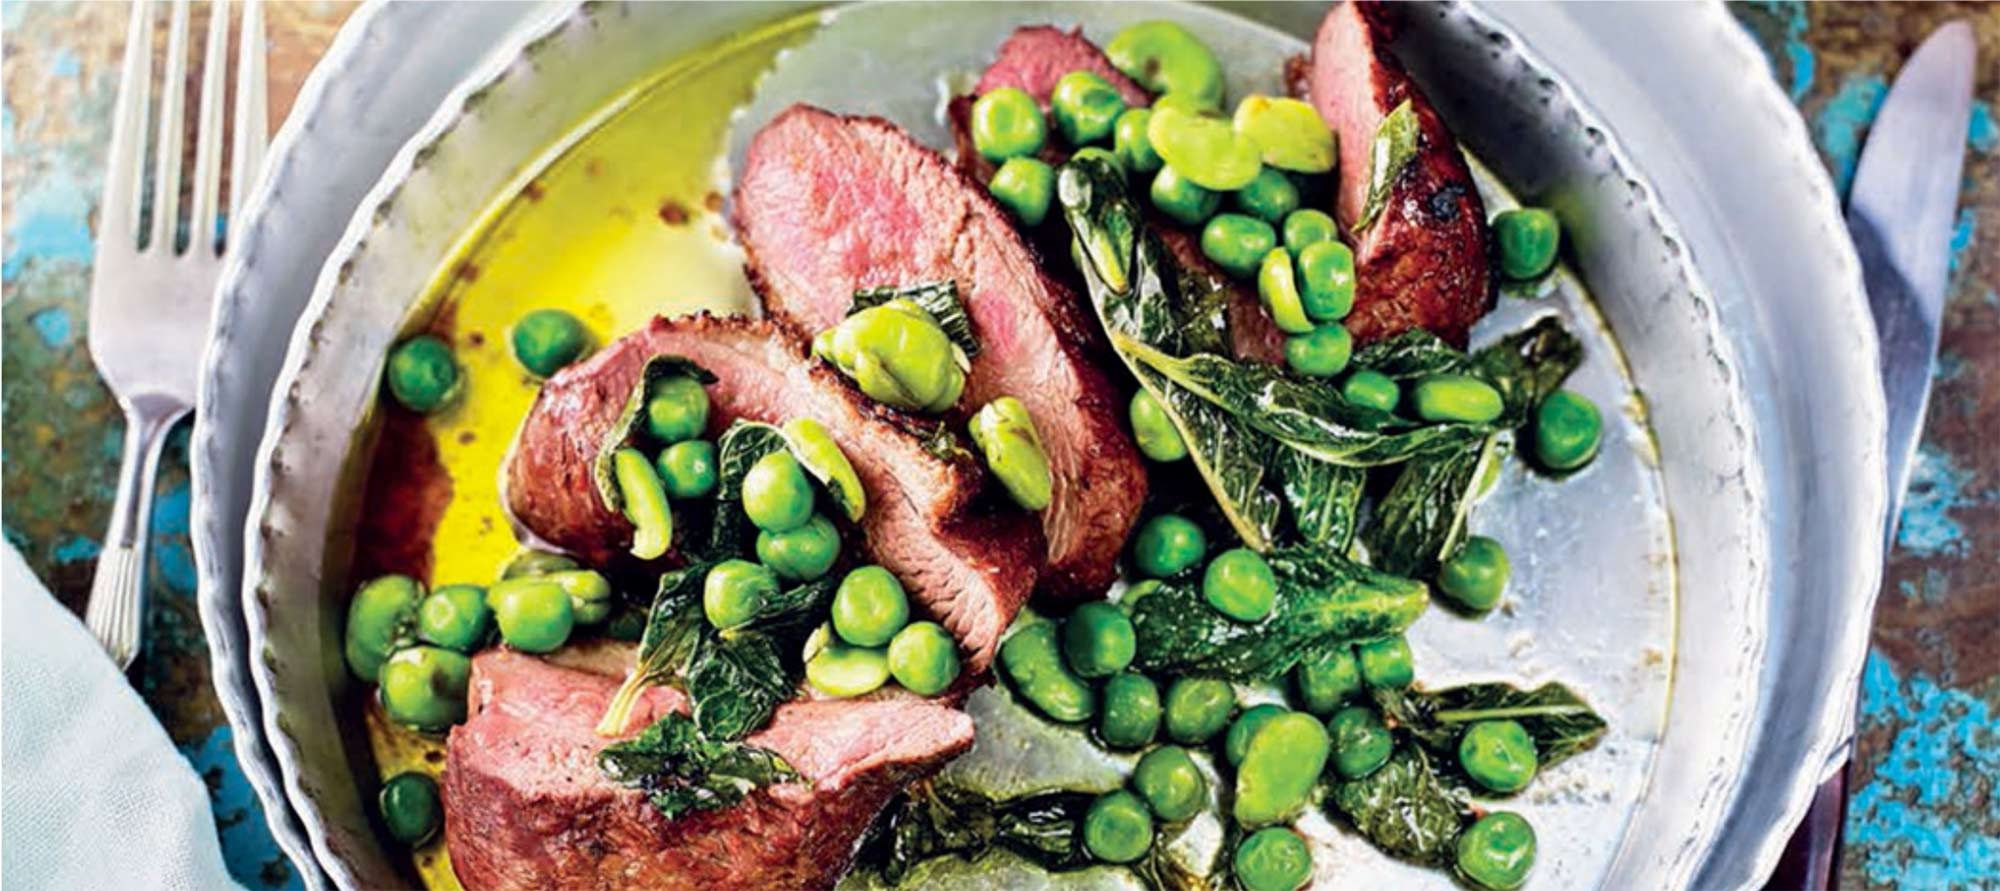
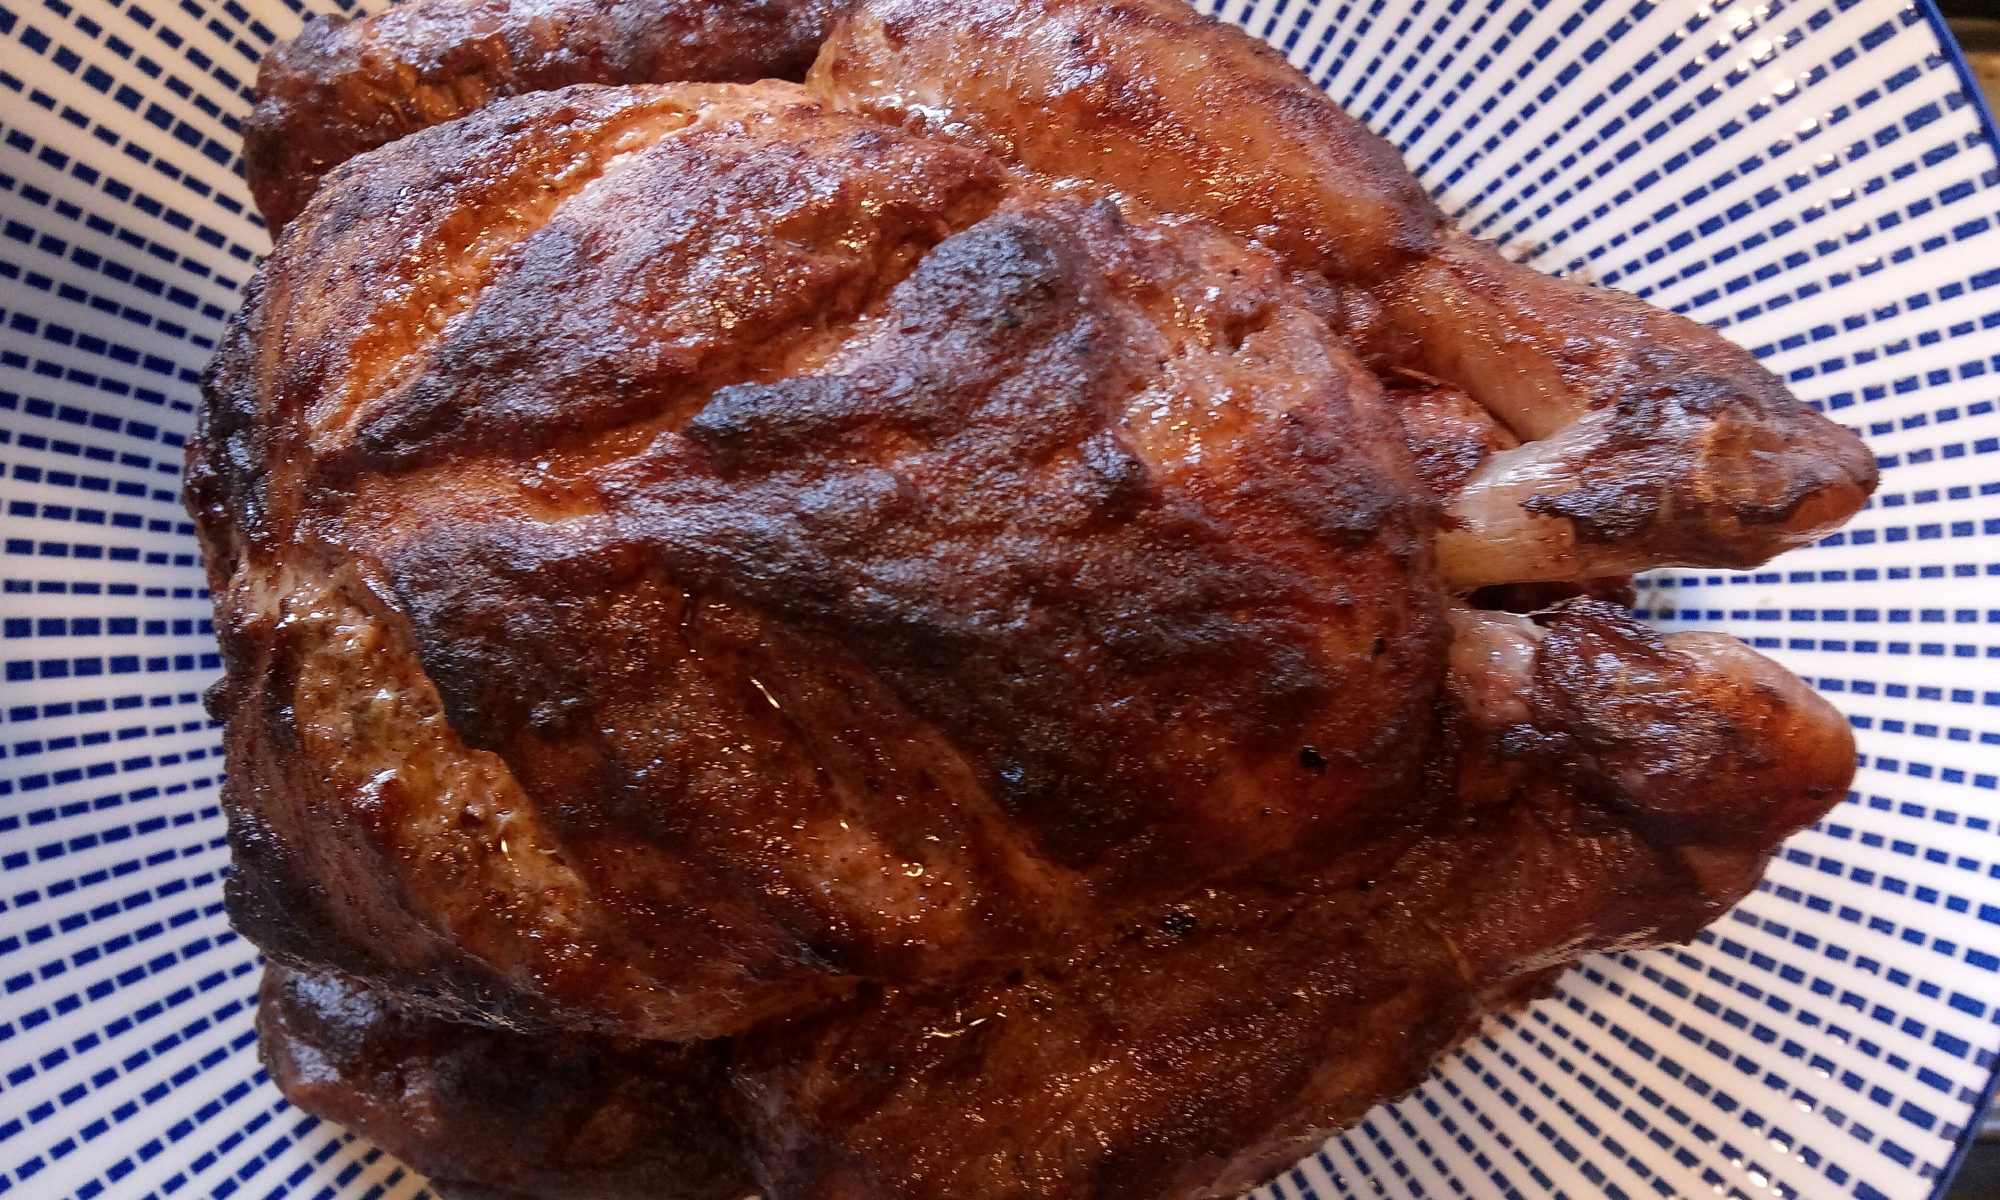
“Barbecue food doesn’t have to stop at burgers and hot dogs, you can create many tasty and adventurous dinner options using your grill. Genevieve Taylor, Napoleon’s food ambassador, provides plenty of inspiration and ideas, from traditional barbecue dishes like Spatchcock Piri Piri chicken to wonderful desserts such as sweet pizza’s.”

For product information or to discover an abundance of delicious recipes, visit www.napoleongrills.co.uk

Baja Fish Tacos

Baja Fish Tacos

  • Prep Time1 hr
  • Cook Time20 min
  • Total Time1 hr 20 min
  • Yield4 Servings

Ingredients

For the batter

  • 200g rice flour
  • 100g plain flour
  • 1 egg, beaten
  • 1tsp baking powder
  • 1 teaspoon fine salt
  • 1 tsp chilli powder
  • ½ tsp dried oregano
  • 200ml sparkling water or light beer

For the fish

  • 500ml rapeseed oil, for frying
  • 1 large Pollack fillet, skinned and pin boned, cut into 8 evenly sized rectangular pieces
  • 100g rice flour

For the Lime aioli

  • 1 small cloves garlic, peeled
  • sea salt and freshly ground black pepper
  • 1 lge free-range egg yolks
  • ½ tsp English or Dijon mustard
  • 1 tbsp lime juice
  • 125ml sunflower or rapeseed oil

For the pico de gallo

  • 300g ripe vine tomatoes
  • 2 med. red onions diced
  • ½ bunch of coriander
  • 1tsp sea salt
  • 1tsp freshly ground black pepper
  • 1tsp sugar
  • juice of 2-3 limes
  • 1 tsp rape seed oil

Method

1

Make the pico de gallo and lime aioli in advance.

2

For the Pico de Gallo
– Quarter the tomatoes. Remove the cores and dice in to 5mm
– Add the diced red onions, coriander and jalapeno. Add salt and pepper to taste
– Once you’re happy with the flavour, mix in the sugar. Add lime juice to taste and the oil. The mixture should be salty, sweet, zingy and slightly spicy

3

For the Lime Aioli
– Crush the garlic mix in the salt and then thoroughly combine with the egg yolk. Mustard, lime juice and pepper. In a slow steady stream, whisk the oil in to the egg mix, a few drops at a time to start, then in small dashes, whisking in each addition to properly emulsify before adding more. By the time you have added all the oil, you should have a thick glossy, wobbly aioli.
– add more salt, pepper, mustard or lime juice to taste.

4

Make the batter by mixing the flours, egg, baking powder, salt, chilli powder and oregano.
– Slowly add the sparkling water or beer and whisk until you have a batter-like consistency – ignore any lumps.

5

Heat oil in a suitable pan on the bbq for shallow frying.

6

Dip one piece of fish at a time in to the rice flour. Using tongs, dip the fish in to the batterand place the fish in the hot oil. Keep well away from your body.
– cook in batches of four for approx. 4 minutes. Repeat with the other pieces.

7

Assemble your tacos by warming the tortillas, place a dollop of aioli on them, followed by the fish, cabbage, pico de gallo, a couple of slices of jalapeno and some corriander. Add a squeeze of lime juice.

Recipe from Breddos Tacos copyright Nud Dudhia & Chris Whitney 2016. Cooked by Tim Donald from the BBQ Team Silverback Grillers

Free Recipe Card

Baja Fish Tacos

Download the free PDF Recipe Card

Brined Chicken Lollipops

Brined Chicken Lollipops

  • Cook Time40 min
  • Yield4 Servings

Ingredients

For the Brine

  • 1 Litre Water
  • 100gms Salt
  • 75gms sugar
  • 2 garlic cloves smashed
  • 1 onion sliced
  • 1 lemon sliced
  • 1 sprig rosemary
  • 1 sprig thyme

For the Chicken

  • 1 packet of chicken drumsticks
  • 1 cup of your favourite bbq sauce, you can of course make your own
  • 30gms of rub

Method

Preparing the Brine for the Chicken

1

Prepare the brine by bringing all the ingredients to the boil and allow to cool

2

Cut the bottom of the drumstick to help it sit upright. Trim round the bone of the drumstick just above the meaty bit (see pic) Remove pin bone and tendons.

3

Place the drumsticks in the brine and leave overnight

4

Remove the drumsticks from the brine and leave to dry for 30 mins uncovered on a plate in the fridge.

5

While the drumsticks are drying prepare your bbq for indirect cooking, you are looking for a temperature of around 250-275f/122-135c

6

Sprinkle with your chosen rub and place the drumsticks on the bbq. They will take around 40 mins but check the internal temperature of them to make sure they are done. (165f or 74c)

7

 Put your sauce in a cup and dip each drumstick in then place back on the bbq to allow the glaze to set.

Brining may be new to many of you but it really takes chicken drumsticks to the next level

Recipe from Chillin N Grillin NI.
Check us out on Facebook: Chillin N Grillin NI or Twitter @grillin_ni

Free Recipe Card

Brined Chicken Lollipops

Download the free PDF Recipe Card

Genevieve Taylor Korean-Style chicken skewers with sticky ginger and garlic rice

Genevieve Taylor Korean-Style chicken skewers with sticky ginger and garlic rice

  • Cook Time30 min
  • Yield4 Servings

Ingredients

For the Kebabs

  • MAKES 8 KEBABS, SERVING 4–6
  • Ingredients
  • 650–700g (1lb 7oz–1lb 9oz) chicken thigh fillets, diced into 2cm/1¼in cubes
  • a bunch of spring onions (scallions), cut into 2cm (¾in) lengths
  • For the marinade
  • 3 tbsp soy sauce
  • 3 tbsp rice wine vinegar
  • 2 cloves of garlic, crushed
  • a thumb-size piece of ginger, grated
  • 1–2 tsp gochugaru chilli flakes, to taste

For the Rice

  • 1 large onion, finely chopped
  • 3 tbsp toasted sesame oil
  • 3 cloves of garlic, crushed
  • a thumb-size piece of ginger, grated
  • 500g (2½ cups) sushi rice
  • 750ml (3¼ cups) cold water

Method

Preparing the Kebabs

1

I love gochugaru chilli, a Korean spice found in Asian shops or online, as it adds a citrusy warmth but not masses of heat, making it a good chilli for introducing kids to a bit of spice. The sticky rice is made with sushi rice, which is pretty easy to find in large supermarkets or Asian shops. If you can’t get it, you can substitute Arborio risotto rice or even short-grain pudding rice, but rinse them well under cold water first – these types of rice have a higher starch content, which is perfect for risotto or rice pudding but less so for this dish.

Method

2

Begin by marinating the chicken – do this a few hours or even the day before you want to eat. Put the chicken into a bowl and stir through the soy sauce, rice wine vinegar, garlic, ginger and gochugaru chilli. Alternatively, put everything into a food bag and squish about well to mix. Marinate in the fridge until you are ready to cook.

3

Thread the meat on to kebab skewers, adding a few pieces of spring onion widthways as you go. Set aside while you begin the rice.

4

Set up a charcoal chimney starter 3/4 full with lumpwood charcoal, and start it going with a sheet of lit crumpled newspaper underneath (or use parrafin-free fire lighters). Wait 10-15 minutes until the BBQ is fired up to a hot grilling temperature of about 280-300c with a deep bed of glowing embers.

5

Take a large deep frying pan, or an even a heavy-bottomed small roasting tin, add the onion, sesame oil, garlic and ginger and season with salt and pepper

6

Fry over the coals for about 10 minutes, stirring often to prevent catching, until the mixture is softened and starting to caramelize. Add the rice and water to the pan, stirring well. Cover with a tight-fitting lid or a piece of foil. Continue to cook indirect for 20 minutes.

7

Grill the kebabs directly for about 15-20 minutes, the grill should be hot 280–300°C (535–570°F). Turn the kebabs frequently.

8

Serve the kebabs on top of the rice.

The Ultimate Wood-Fired Oven Cookbook by Genevieve Taylor (Quadrille, £15) Photography ©Jason Ingram

Free Recipe Card

Korean-Style Chicken Skewers

Download the free PDF Recipe Card

Genevieve Taylor Chicken, Chorizo & Halloumi Kebabs with Buttered Spinach Couscous

Genevieve Taylor Chicken, Chorizo & Halloumi Kebabs with Buttered Spinach Couscous

  • Cook Time30 min
  • Yield4 Servings

Ingredients

For the Kebabs

  • MAKES 8 KEBABS, SERVING 4–6
  • Ingredients
  • 400g (14oz) chicken thigh fillets, cut into bite-sized pieces
  • 2 x 250g (9oz) packs of halloumi, each chopped into 8 cubes
  • 1 x 225g (8oz) spicy chorizo ring, sliced into thin (5–7mm/¼–in) rings
  • For the marinade
  • a bunch of fresh mint, finely chopped
  • zest and juice of 1 lemon
  • 2 cloves of garlic, crushed
  • 2 tbsp olive oil
  • salt and freshly ground black pepper

For the Cous Cous

  • 200g (1¼ cup) couscous
  • 300ml (1¼ cups) hot chicken or vegetable stock
  • 3 handfuls of baby spinach leaves, roughly chopped
  • 25g (2 tbsp) butter, diced
  • salt and freshly ground black pepper

Method

Preparing the Kebabs

1

Chicken, chorizo and halloumi, all my kids’ favourite barbecued foods stuffed on to one skewer – this recipe was always going to be a winner in our house. The buttery couscous is given a good hit of healthy green with leafy spinach

Method

2

Mix the marinade in a small bowl by stirring together the mint, lemon zest and juice, garlic and olive oil in a bowl. Season well with black pepper.

3

Put the chicken into one bowl and the halloumi into another, then divide the marinade between them, tossing together to coat well. Cover with clingfilm and leave to marinate in the fridge for a few hours or overnight.

4

Set up a charcoal chimney starter 3/4 full with lumpwood charcoal, and start it going with a sheet of lit crumpled newspaper underneath (or use parrafin-free fire lighters). Wait 10-15 minutes until the BBQ is fired up to a hot grilling temperature of about 280-300c with a deep bed of glowing embers.

5

Thread the halloumi and chicken on to skewers along with the chorizo slices. For structural integrity (very important with kebabs!), start with a slice of chorizo, then follow each piece of meat or cheese with more chorizo – its nice solid texture helps keep everything snugly and firmly together. Also, halloumi tends to have a rather irritating crack running through the centre of each block, which means that when cubed it can fall off skewers easily – the best thing is to work out which way the crack runs and make sure you thread the pieces with any cracks at right angles to the skewer, giving them the most chance of staying intact on the stick. Keep chilled until you are ready to cook.

6

Grill the kebabs directly for about 15-20 minutes, the grill should be hot 280–300°C (535–570°F). Turn the kebabs frequently.

7

Once the kebabs begin cooking, get the couscous ready for baking. Take a deep terracotta dish, or an ovenproof deep frying pan, and sprinkle the couscous over the base. Pour in the hot stock and season with a little salt and pepper. Top with the chopped spinach and dot with the butter. Top with a lid or a snug-fitting piece of foil and slide into a cooler corner of the bbq, away from the fire and embers..

8

The couscous will take around 15 minutes to steam to perfection, but the exact time will depend on the temperature of the BBQ

9

Check after 10 minutes – it is done when the couscous has absorbed all the stock, the spinach has wilted and the butter has melted on top. If it’s not ready, re-cover and slide back in. If it is, fork through lightly, re-cover and leave to keep warm. If your BBQ isn’t big enough to cook both kebabs and couscous at the same time, begin with the couscous, and keep warm while you cook the kebabs. Serve the kebabs on top of the couscous.

The Ultimate Wood-Fired Oven Cookbook by Genevieve Taylor (Quadrille, £15) Photography ©Jason Ingram

Free Recipe Card

Chicken, Chorizo & Halloumi Kebabs with Buttered Spinach Couscous

Download the free PDF Recipe Card

Genevieve Taylor Tikka-Style Lamb and Aubergine Kebabs

Genevieve Taylor Tikka-Style Lamb and Aubergine Kebabs

  • Cook Time30 min
  • Yield4 Servings

Ingredients

For the Lamb Tikka

  • MAKES 8 KEBABS,
  • 700g (1lb 9oz) lamb leg steaks, cut into 2cm (¾in) cubes
  • 2 medium aubergines (eggplants), cut into 1cm (½in) thick slices
  • For the marinade
  • 4 tbsp natural yoghurt
  • 3cm (1¼in) piece of fresh ginger, roughly chopped
  • 3 cloves of garlic, roughly chopped
  • 1–2 green chillies, roughly chopped, to taste
  • 25g (½ cup) fresh coriander (cilantro), roughly chopped
  • 2 tsp cumin seeds
  • 1 tsp fennel seeds
  • 1 tsp ground turmeric
  • salt and freshly ground black pepper

Method

Preparing the Lamb Tikka

1

The marinade for these gently spiced kebabs couldn’t be easier – you just bung it all in a jug and whizz it up. Do try to leave the meat marinating for a good few hours if you can, so that the yoghurt can perform its tenderizing magic. The aloo parathas, spiced potato stuffed flatbreads, also in Genevieve’s book, are th

Method

2

Put the yoghurt, ginger, garlic, chillies, coriander, cumin seeds, fennel seeds and turmeric into a deep jug. Season with a little salt and pepper and blitz to a smooth purée with a stick blender. Alternatively, whizz in a food processor.

3

Put the lamb and aubergines into a bowl and pour the marinade over
them, turning them to mix thoroughly. Cover with clingfilm and put into the fridge for a few hours, ideally overnight.

4

Set up a charcoal chimney starter 3/4 full with lumpwood charcoal, and start it going with a sheet of lit crumpled newspaper underneath (or use parrafin-free fire lighters). Wait 10-15 minutes until the BBQ is fired up to a hot grilling temperature of about 280-300c with a deep bed of glowing embers.

5

When you are ready to cook, thread the lamb and aubergine pieces
alternately on to skewers.

6

Grill the kebabs directly for about 20–25 minutes, the grill should be hot 280–300°C (535–570°F). Turn the kebabs frequently, until the meat is cooked and the aubergine is lightly charred at the edges and tender within.

The Ultimate Wood-Fired Oven Cookbook by Genevieve Taylor (Quadrille, £15) Photography ©Jason Ingram

Free Recipe Card

Tikka-style Lamb Kebabs

Download the free PDF Recipe Card

Ben Tish’s Chargrilled Duck Breast

Chargrilled Duck Breast

Ben Tish’s Chargrilled Duck Breast

  • Prep Time1 hr
  • Cook Time20 min
  • Total Time1 hr 20 min
  • Yield2 Servings
  • Cooking Method
    • Indirect/Direct

Ingredients

For the Chargrilled Duck Breast

  • 2 x 200g gressingham or barbary duck
  • breasts
  • 70g fresh or thawed frozen peas
  • 70g fresh or thawed frozen broad beans,
  • outer skins removed
  • Sea salt
  • Black pepper

For the Hot Mint Sauce

  • 75ml extra virgin olive oil
  • 1 large garlic clove, thinly sliced
  • 1 bunch mint, stalks and leaves separated
  • 1 tsp cumin seeds
  • 1 tsp coriander seeds, lightly crushed
  • 50ml cabernet sauvignon vinegar or other
  • red wine vinegar

Method

Preparing the Chargrilled Duck Breast

1

Trim the duck breasts of any excess fat and sinew, then use a very sharp knife to lightly score the skin in a criss-cross pattern, without cutting into the flesh. Put in a nonreactive bowl, pour over the brine and refrigerate to cure for 1 hour.

2

For the hot mint sauce, place the extra virgin olive oil, garlic, mint stalks and the cumin and coriander seeds in a small, non-reactive saucepan and place over medium heat on the stovetop. When the garlic starts to turn golden, remove the pan from the heat and carefully pour in the vinegar. Season well, then set aside for an hour or so to infuse.

3

If you are using fresh peas and beans, cook them in boiling salted water for 2 minutes. Refresh in iced water, then drain.

4

Light the barbecue and set for direct/indirect cooking.

5

Remove the duck breasts from the brine and pat dry with a paper towel. Place the duck, skin-side down, on the grill in the indirect heat zone and throw a small handful of cherry wood chips onto the charcoal. Close the lid of the barbecue and cook the duck for 4 minutes to render some of the fat and lightly caramelize the skin. Open the lid, transfer the duck to the direct cooking zone, throw another small handful of wood chips onto the charcoal and close the lid. Cook for 5–6 minutes, still skin-side down, then turn the duck breasts onto the flesh side and cook for 2 minutes or until cooked to medium (if you press your finger into the meat, it should bounce back); give it another 3–4 minutes if you want it well done. Move the duck to a warm spot to rest for 5 minutes.

6

Strain the infused mint sauce into a clean saucepan, then add the peas and broad beans and bring to the boil in the direct heat zone. Season the sauce well, throw in the mint leaves and remove from the heat as soon as the mint has wilted.

7

Spoon some of the peas and beans onto the plate, then thickly slice the duck breasts and place on top. Spoon over the rest of the peas and beans, drizzle over the hot mint sauce and serve.

Recipe kindly supplied by Ben Tish from Grill Smoke BBQ.

Photographer Kris Kirkham

Purchase the book from Amazon: http://amzn.eu/2Wv0RAn

Free Recipe Card

Chargrilled Duck Breast

Download the free PDF Recipe Card

James Whetlor (Cabrito Goat) BBQ Goat Sharwarma

Goat Sharwarma

James Whetlor (Cabrito Goat) BBQ Goat Sharwarma

  • Prep Time25 min
  • Cook Time2 hr
  • Total Time2 hr 25 min
  • Yield4 Servings

Ingredients

For the Goat

  • 1 x each kid shoulder, kid leg, kid saddle
  • (including breast) – boned and sliced into
  • 1cm thick pieces roughly 10-15cm

For the Spice Mixture

  • ½ tsp ground black pepper
  • ½ tsp ground cardamom
  • ½ tsp ground fennel
  • ½ tsp ground cinnamon
  • ½ tsp ground allspice
  • ½ tsp ground ginger
  • ½ tsp sweet paprika
  • 1 tsp ground cumin
  • 1 tsp ground coriander
  • 1 tsp ground turmeric
  • 1 tsp Turkish chilli flakes
  • 2 tsp sea salt
  • 150ml olive oil

For the Wet Marinade

  • 8 cloves garlic, peeled & crushed
  • 3 lemons, zest & juice
  • 250g Yoghurt
  • 3 tsp maldon sea salt

For the Baste

  • Suet fat from 1 kid
  • Juice 1 lemon
  • Sea Salt
  • 4 cloves garlic, whole
  • 1 tbsp Turkish chilli flakes

Method

Preparing the BBQ Goat Sharwarma

1

Up to 48 hours before cooking shawarma mix all spice ingredients and rub into kid meat slices.

2

Mix all wet marinade ingredients and rub into kid meat slices.

3

Thread the meat onto a rotisserie skewer and cook the shawarma over indirect heat for 2 hours.

4

To baste: melt the fat and add rest of ingredients. Use a basting mop to baste while shawarma is cooking.

5

Serve with: Flatbread, Sweet cabbage, Onion, Parsley, Seasoning, Cooking juice/lemon dressing, Pickled chilli (optional)

Recipe from James Whetlor at Cabrito
Find out more on Cabrito.co.uk, Twitter: @CabritoGoatMeat, Facebook: @cabritogoatmeat and
Instagram: @cabritogoatmeatnk

Free Recipe Card

BBQ Goat Sharwarma

Download the free PDF Recipe Card

Smokey Cookie Dough Brownies

Smokey Cookie Dough Brownies

  • Prep Time20 min
  • Cook Time45 min
  • Total Time1 hr 5 min
  • Yield9 Servings

Ingredients

For the brownie mix

  • 225g plain chocolate (35–45 % cocoa solids)
  • 225g unsalted butter
  • 3 large eggs
  • 225g caster sugar
  • 75g self-raising flour
  • 1/2 tsp salt
  • 225g plain chocolate – chopped into small chunks
  • 1 tsp vanilla extract

For the cookie dough balls

  • 110g unsalted butter
  • 75g caster sugar
  • 1 egg yolk
  • ½ tsp vanilla extract
  • 150g plain flour
  • 30g dark chocolate chips

Method

Preparing the Smokey Cookie Dough Brownies

1

Grease and line a brownie tin 22x29cm, 8 ½” X 11” with baking parchment. Heat your BBQ to as near to 180c as you can get, a little over or under won’t make too much difference. If possible, achieve the heat using an indirect method.

(Optional)

You can add a small amount of smoking wood to smoulder using your cook in the BBQ to add a further smokey flavour. Stick to light woods such as apple or cherry.

2

To make the brownie mix, break 225g of chocolate into small chunks and place in a heatproof bowl with the butter. Place over a pan of simmering water and heat until melted. Leave to cool.

3

Beat the eggs and sugar together until pale and the mixture has thickened. Add the melted chocolate and butter mixture to the eggs and stir until thoroughly combined. Fold in the flour, salt, chocolate chunks and vanilla extract.

4

Pour brownie mix into your lined pan.

5

To make the cookie mix, cream the butter and sugar together until light and fluffy. Add the egg yolk, vanilla extract and stir. Add the flour & chocolate chips and combine until you have a dough. Knead gently to bring it all together.

6

Use an ice cream scoop or tablespoon to drop the cookie mixture in balls evenly across the brownie mixture.

7

Bake time will vary depending on heat in your BBQ and you may also need to turn the pan every 10 minutes or so. After 20 minutes keep checking the brownies for doneness. A little mixture should still stick to a skewer when inserted in the middle of the brownie. Overall cook time can be between 25 and 45 minutes dependent on BBQ heat. We like them gooey so less time is better.

8

Remove from the pan and cool on a wire rack till them firm and are ready to cut.

9

Cut into portions and serve how you wish but a nice scoop of ice cream on warm brownie is always a winner.

Recipe from Artust BBQ
Find him on Twitter @ArtustBBQ

Smokey Cookie Dough Brownies

Download the free PDF Recipe Card

Tandoori Whole Chicken

Tandoori Whole Chicken

  • Prep Time20 min
  • Cook Time4 hr
  • Total Time4 hr 20 min
  • Yield4 Servings

Ingredients

For the Marinade

  • 4tbsp Greek yoghurt
  • 2tbsp mixed garlic and ginger paste
  • 2tsp paprika
  • 1 heaped tbsp. tandoori masala

For the Chicken

  • 1 chicken
  • Melted butter plus a knob of butter
  • 1 lemon

Method

Preparing the Tandoori Whole Chicken

1

Mix the ingredients for the marinade together

2

Place 2tbs of marinade inside the chicken along with the lemon halved and a knob of butter

3

Make incisions in the chicken to allow the marinade to penetrate

4

Rub the marinade all over, cover and refrigerate over night

5

Prepare your BBQ for an indirect cooking for 350f

6

Place the chicken on BBQ and roast for approx. 1h 15

Basting with the melted butter regularly. The internal temperature of the chicken should reach 165f or 74c when ready

Recipe from Chillin N Grillin NI.
Check us out on Facebook: Chillin N Grillin NI or Twitter @grillin_ni

Free Recipe Card

BBQ Chicken Tandoori

Download the free PDF Recipe Card