How to setup your BBQ for Direct Cooking

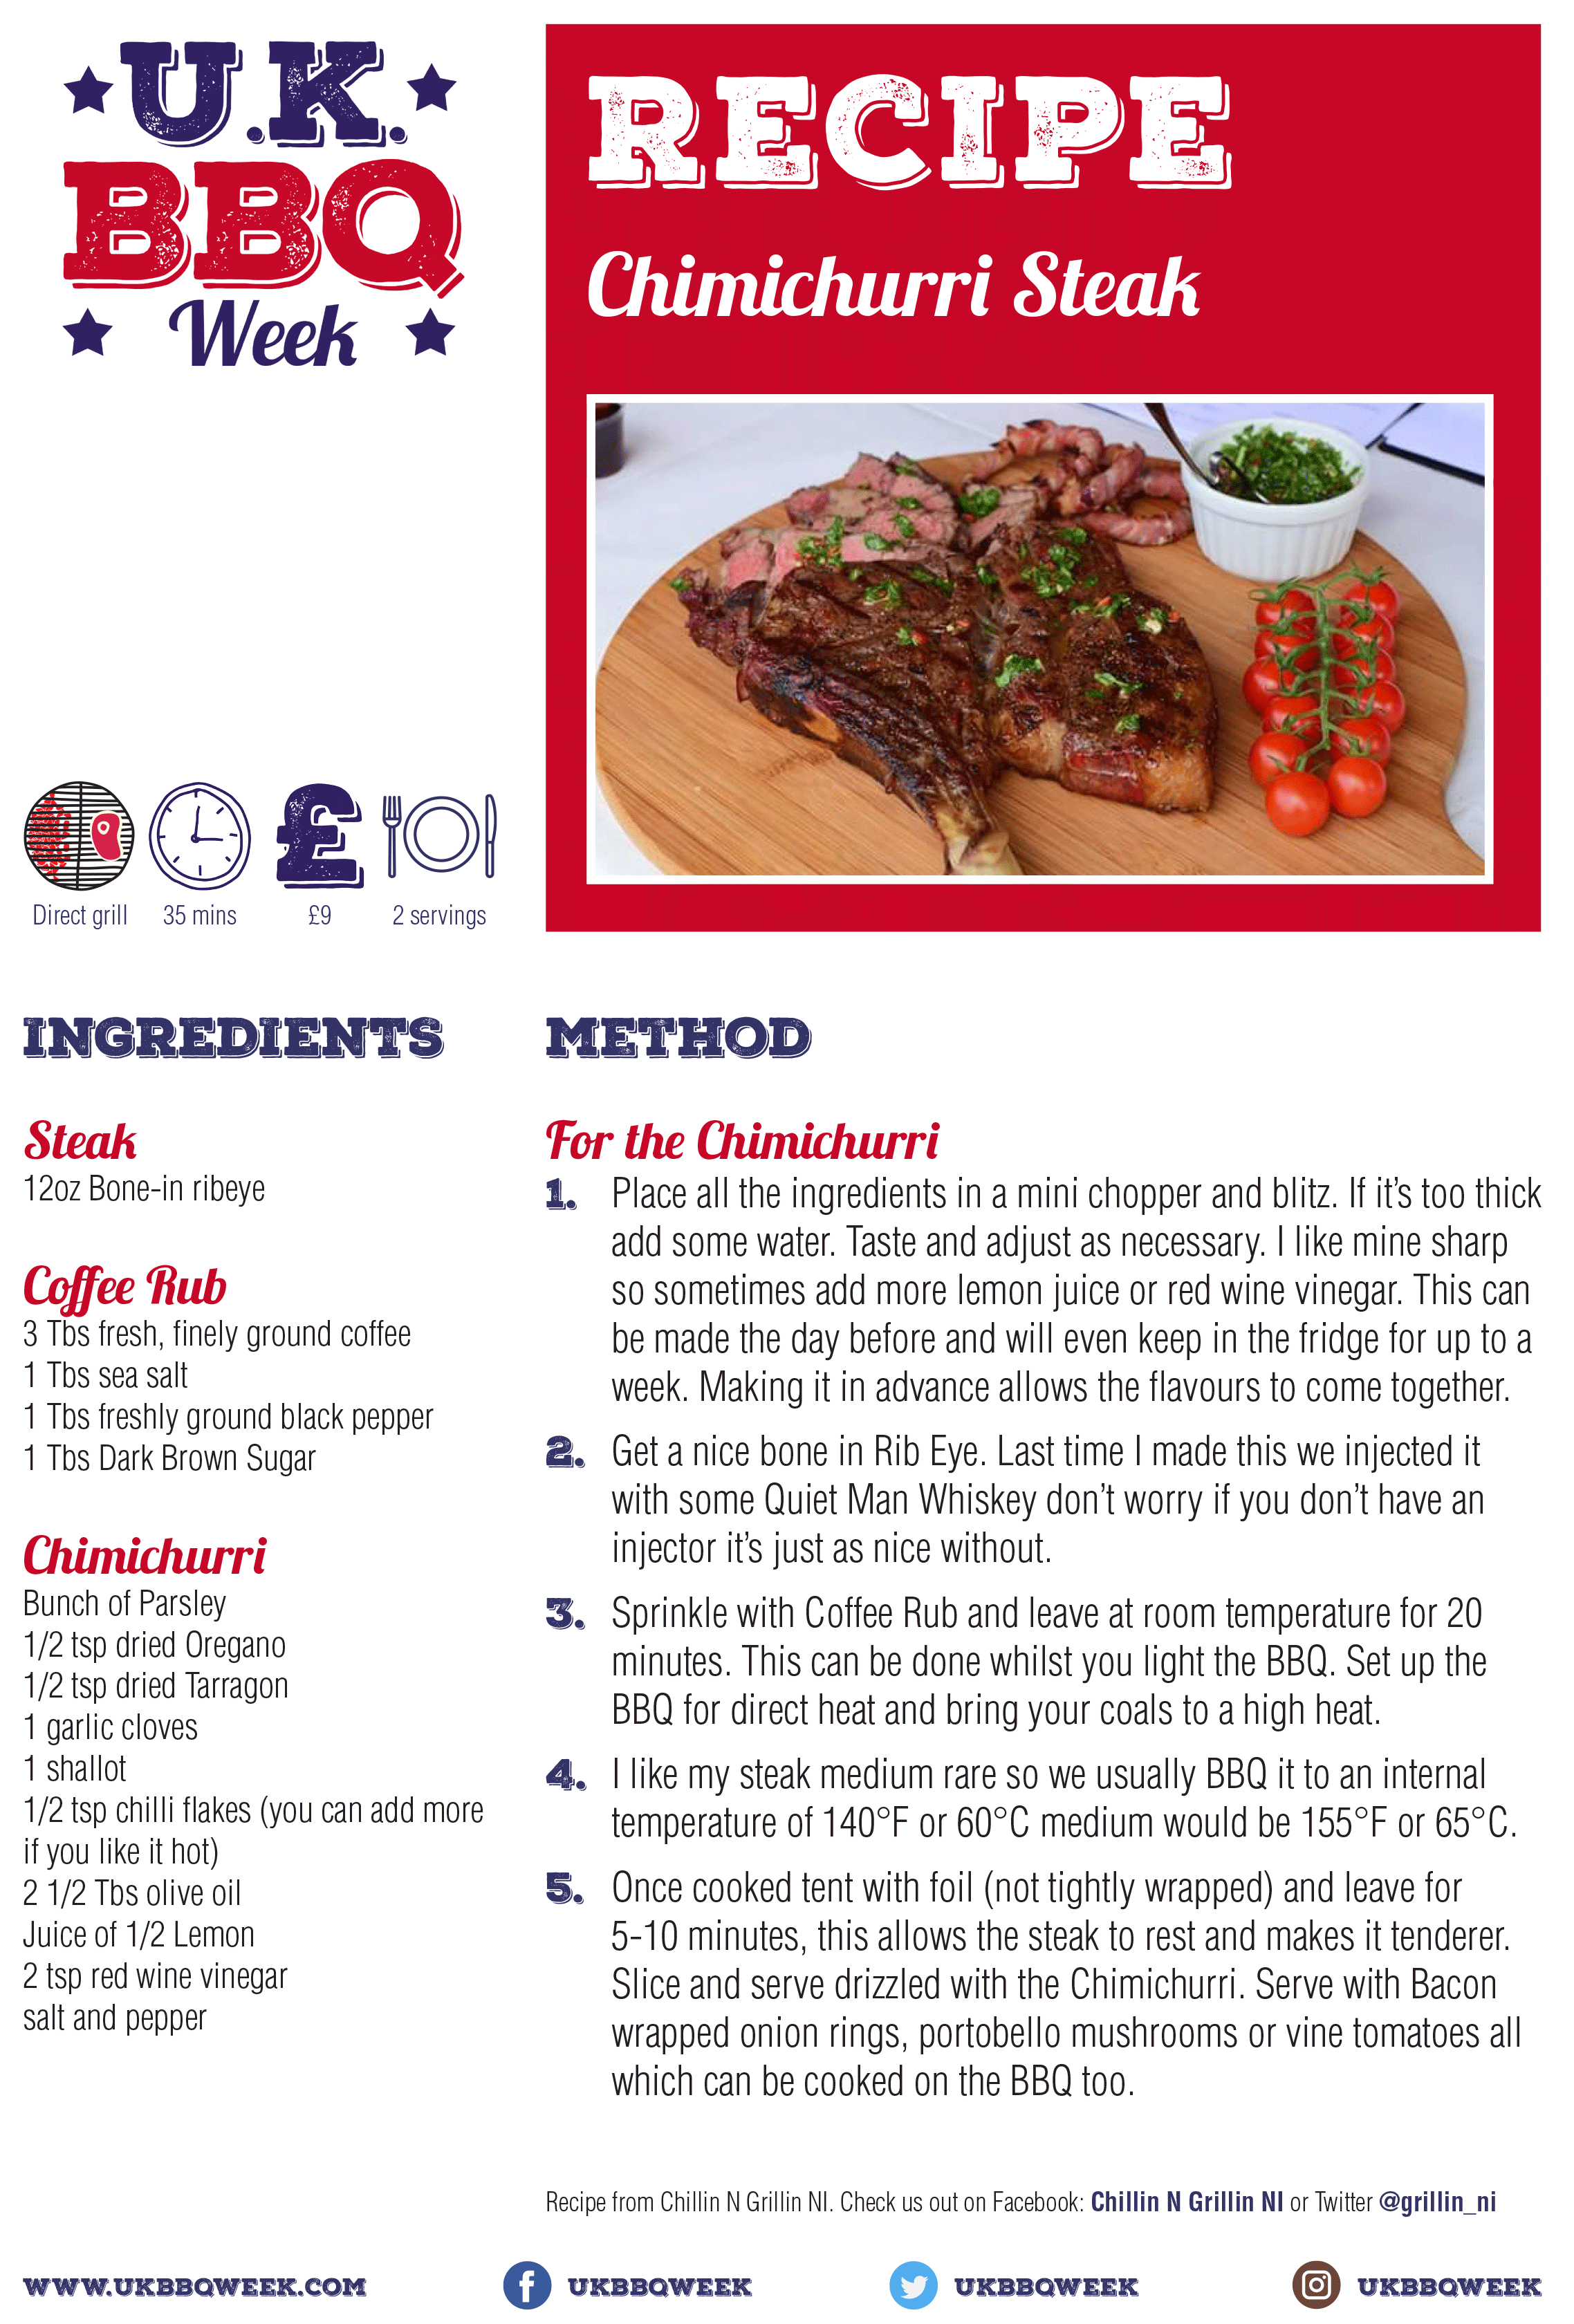
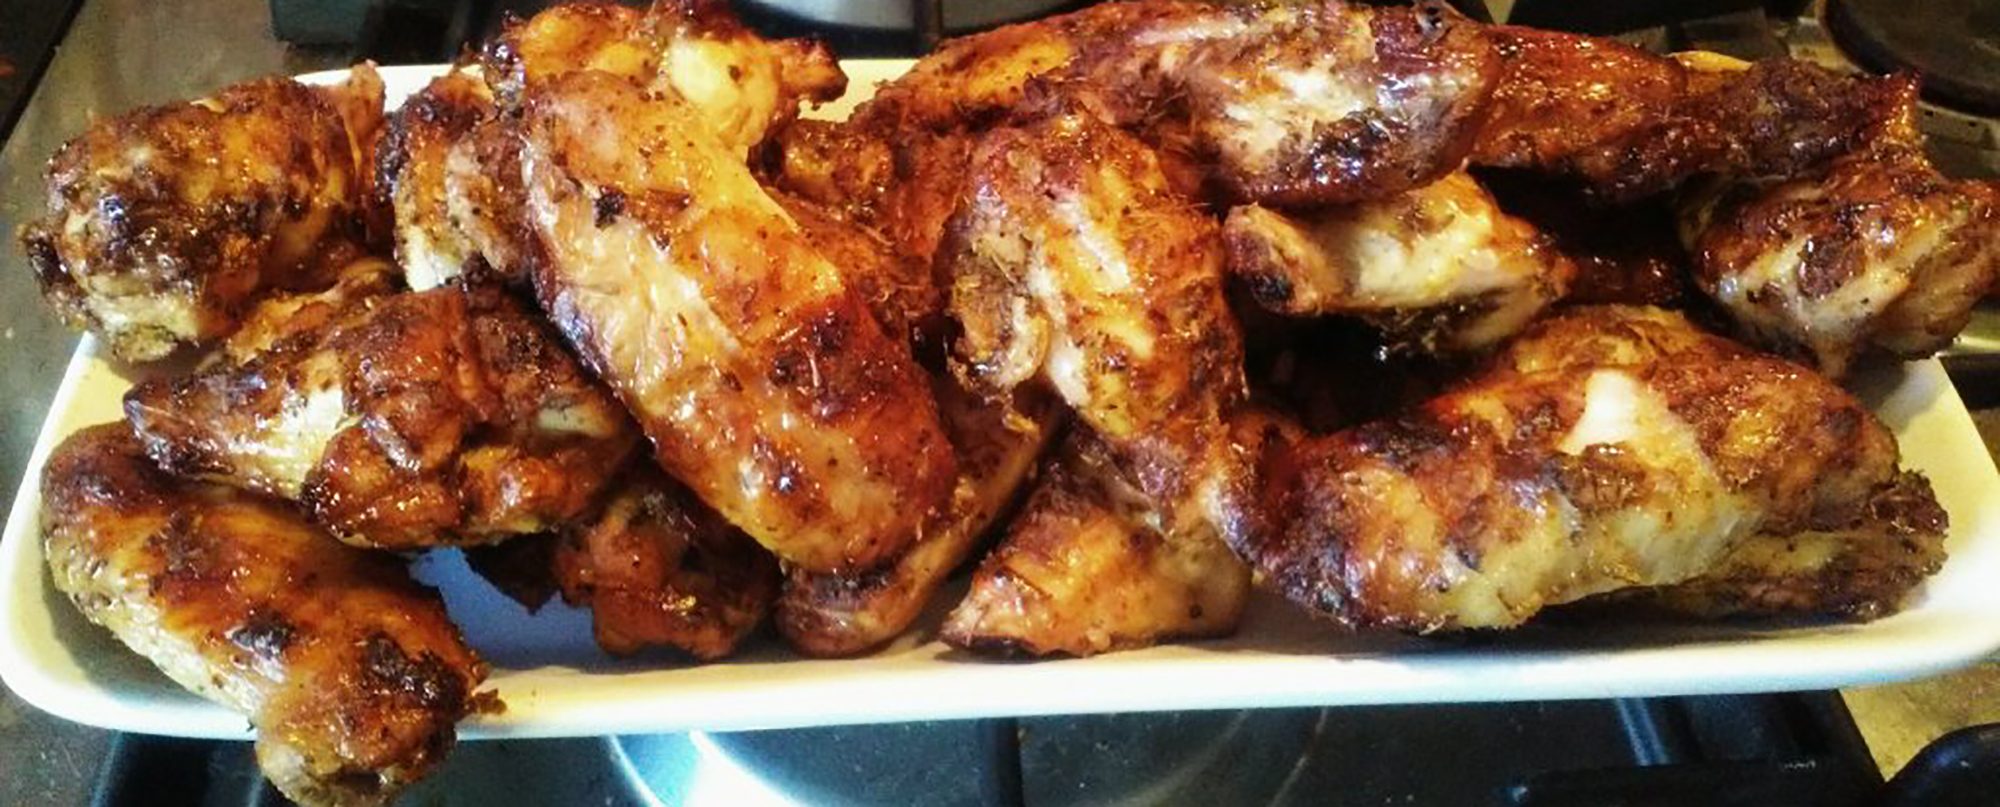
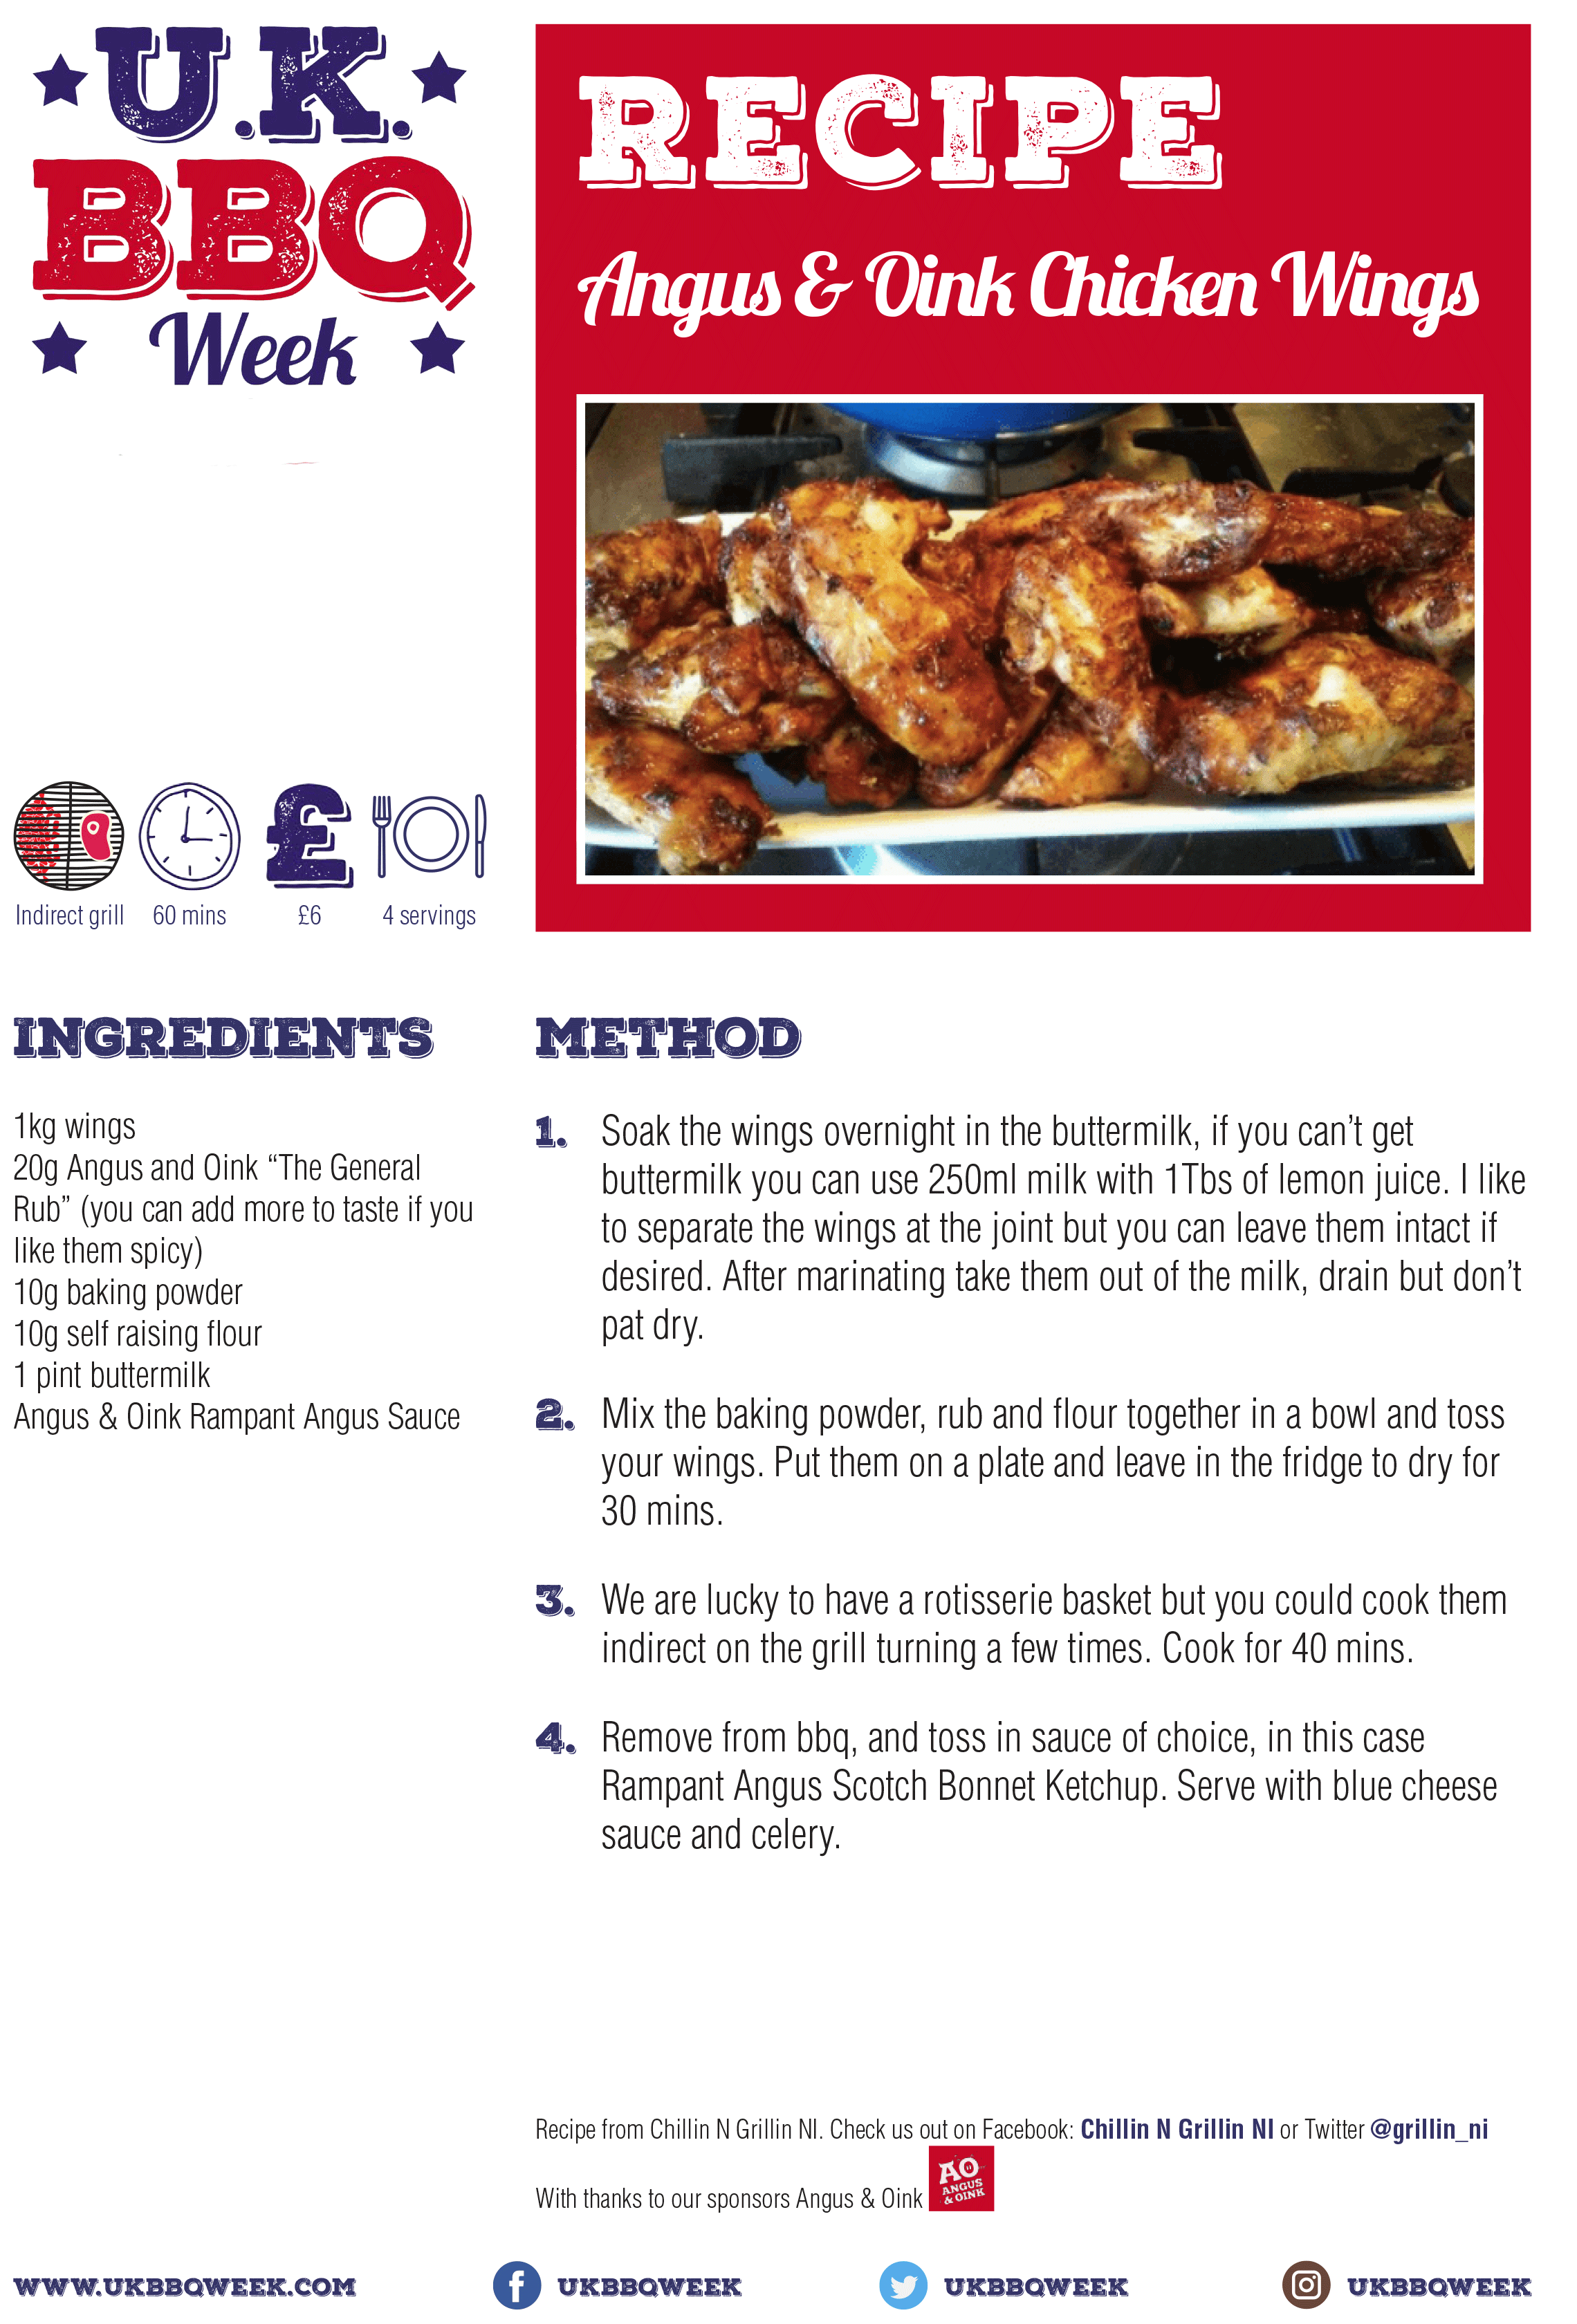
Direct cooking is often known as grilling and it involves placing your food directly over the heat source. You can achieve different temperatures by controlling your heat source but generally, direct cooking is used to cook thinner cuts of meat such as steaks, burgers, sausages and chicken.

With larger cuts of meat, there is a risk that the outside of the meat will be overcooked before the middle of the meat reaches a safe internal temperature and so it is easier to use the indirect method for these cuts.

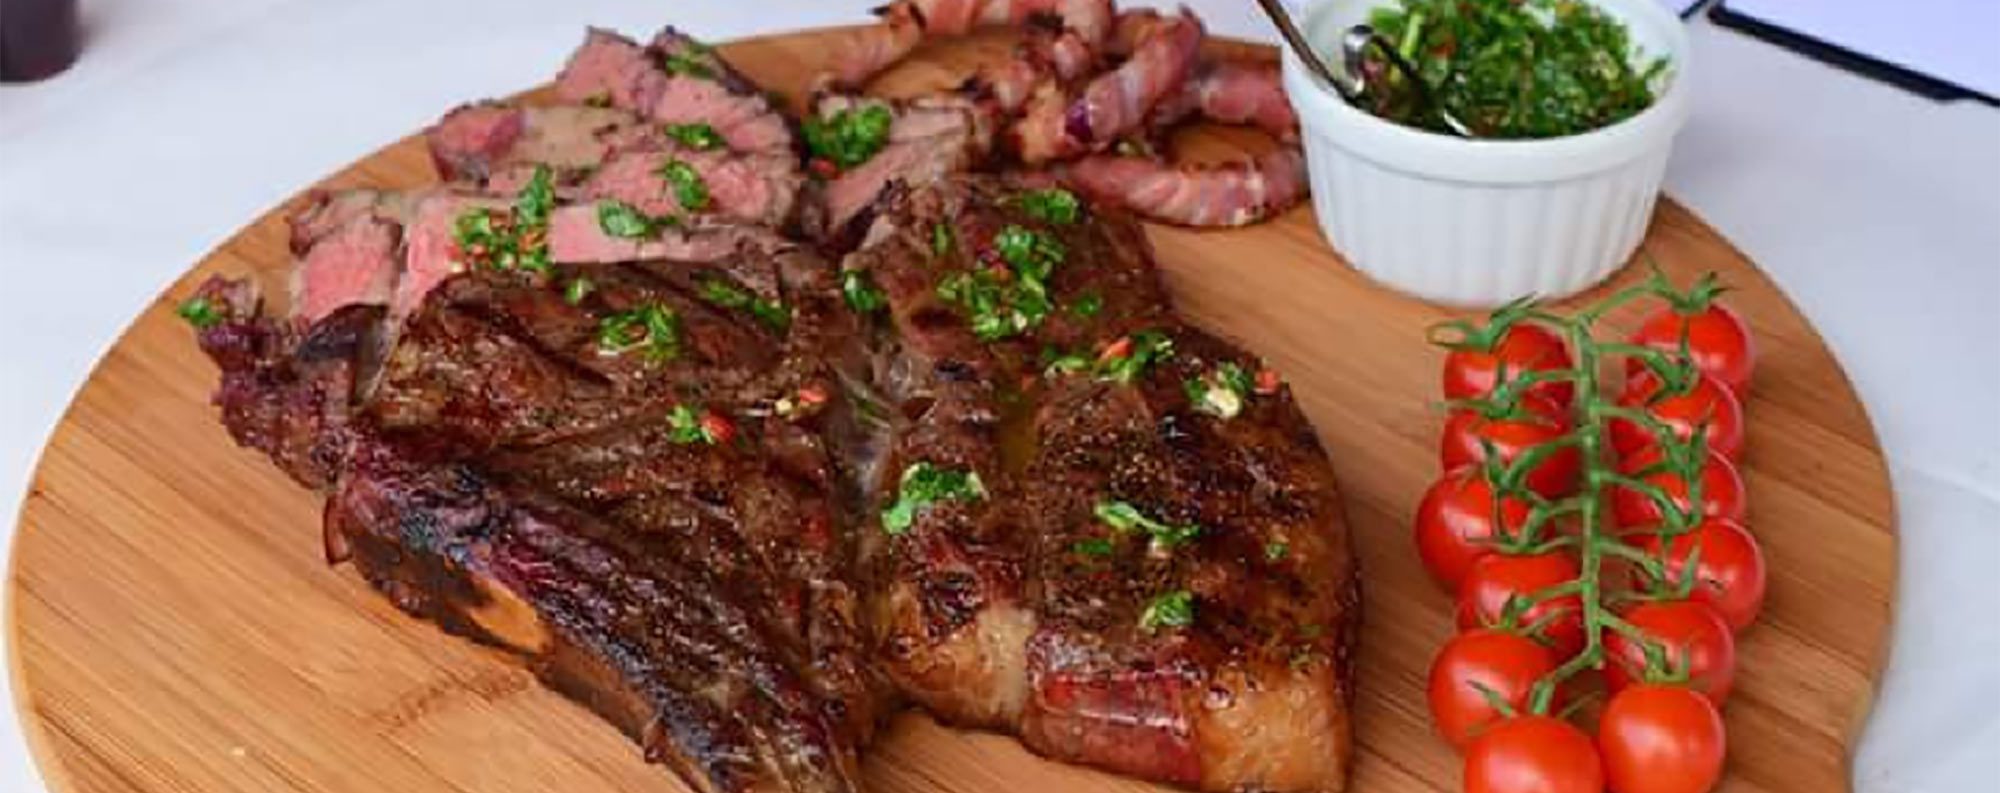
The Full Grill Setup

The most traditional set up for direct cooking is simply to have the entire BBQ setup for direct heat. If you are using a gas BBQ you will have all your burners on or on a charcoal BBQ, your charcoal will be spread evenly across the entire charcoal grate.

Setting your BBQ up this way means that anywhere you place food on the cooking grate it will receive direct heat from underneath.

This isn’t to say that the heat will be even across your entire cooking grate. Even with a gas BBQ, when the heat source is a little easier to control, you will still get hot and cold spots on the cooking grate. Typically the outer edges of the cooking grate will be a little cooler than the centre.

The same can be said for charcoal BBQ’s. Even if you spend time spreading the charcoal evenly, there will still be some spots that are hotter. This isn’t necessarily a bad thing but as long as you are aware of it, you can move your food around to account for this.

The Safe Zone

Gas BBQ Setup with Safe Zone
Gas BBQ setup with safe zone
When cooking direct I rarely use the full grill setup. Instead I like to set up my BBQ so that 60% of the cooking grate has direct heat and the remaining 40% is left with no heat source under it. This part of the cooking grate the safe zone.

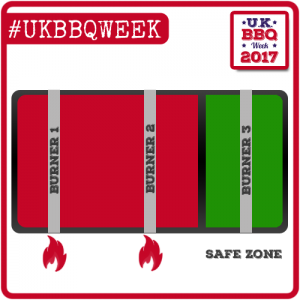
On my 3 burner gas BBQ, I cook with the left and middle burner on and the right burner off. On my Weber Kettle I will spread the charcoal over 60% of the charcoal grate.

You might be asking why you would only use a portion of your cooking grate rather than the entire area?

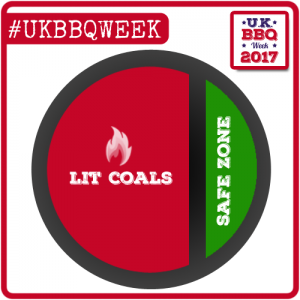
The closer your food is to the heat source, the faster it will cook. Having an area with no coals gives you complete control over how quickly your food cooks. Food that is cooking too quickly can be moved into the safe zone. The food will still continue to cook but at a slower rate.

This is a great setup for beginners to master direct cooking on their BBQ’s.

Tips for cooking over Direct Heat

Keep the lid closed

Keeping the lid of your BBQ closed will not only help your food cook faster but it reduces flare ups. All Good BBQ’s are designed with vents to allow the optimal amount of air to flow through them with the lid closed. Fat dripping from your meat onto the coals or burners will result in a flame. If you have the lid open, you are feeding those flames with an abundance of oxygen and that never ends well!

Don’t turn your food too often

I sometimes think this is a manly thing. We love nothing more than to stand around the BBQ, tongs in hand just waiting to turn something or move it around the grill. It gives us a sense of purpose but we’re really doing more harm than good.

For one, if we’re constantly turning the food it means the lid is open (see the tip above). The main reason that most people feel they need to keep turning their food is due to flare ups from the fat dripping onto the coals which can sometimes get out of control. A momentary flare up will not burn your food however persistent flame will cause your food to burn. Keeping the lid on your BBQ will keep the flare ups under control.

The second benefit to not turning your food too often is to help retain the natural juices in your meat. Constantly flipping your food can squeeze the natural juices out. When cooking over a direct heat, try to turn your food no more than once or twice.

Keep your temperature under control

When cooking at a very high temperature using the direct method, things can become a little frantic if you have a full grate of meat to deal with. I’ve found that dialling the temperature back a little makes everything easier to manage.

If you put the first two tips into practice then a lower temperature will not affect your cook time. It simply allows your food to cook in a more controlled way.

My tendency, when I was learning to BBQ, was to turn all the burners on my gas BBQ to 11 or to fill my chimney starter as high as I could. The temperature would be sitting around 230-240 C. Add into the equation that I didn’t know anything about safe zones at the beginning and you can imagine a grill full of burgers and sausages got a little hard to handle!

Now I prefer to grill at around 200 C which is still a high temperature but more manageable. Cooking ‘hot and fast’ doesn’t always have to mean as hot and as fast as possible.

Hopefully these simple tips will help you get to grips will cooking over a direct heat. With time you will gain the confidence leave your lid on and walk away, leaving your BBQ to do the work for you.

Sign up for our FREE Newsletter

Keep up to date with all the latest news on UK BBQ Week by entering your name and email address below. We will send you our latest recipes, helpful articles and details on our latest competitions.


The ‘Classic Burger’

The Classic Burger

The ‘Classic Burger’

  • Prep Time15 min
  • Cook Time15 min
  • Total Time30 min
  • Yield4 Servings

Ingredients

For the Classic Burger

  • 500g steak mince
  • 150g minced streaky bacon
  • 2 Tbs Worcestershire sauce
  • 2 Tbs Angus & Oink “The General” rub

Method

Preparing the Classic Burger

1

Combine the steak mince and minced bacon in a large bowl. Add the Worcestershire sauce and rub and continue to combine until the rub is evenly spread throughout the mixture.

2

Split the mixture into 4 equal parts and form the burger patties with your hands. Remember not to press the mixture together to hard.

3

Set up your BBQ for 2 zone cooking. This will give you an area of direct heat and an area of indirect heat. Place the burgers on the cooking grate directly over the coals and close the lid.

4

When the burgers have seared nicely on the bottom (a few minutes), flip them over and add the cheese to the top. Add a few slices of streaky bacon to the grill to top the burger. Close the lid again and leave the burgers to finish cooking.

5

When your burgers hit an internal temperature of 75C, move to the indirect side of the BBQ to keep warm while the bacon finishes. Toast your burger buns over the coals for a few seconds to crisp them up.

6

To build the burgers add salad leaves, sliced red onion and some Angus & Oink Pitboss BBQ sauce to finish it all off. The toppings are entirely up to you, make it your own. You can also play around with the seasonings inside the burger to find your own secret recipe.

Recipe from Barbechoo.com, you can also find James on Twitter: Barbechoo_James,
Facebook: lettherebebarbechoo and Instagram: barbechoo

Free Recipe Card

The Classic Burger

Download the free PDF Recipe Card

MOINKs (where moo meets oink)

Moink Balls

MOINKs (where moo meets oink)

  • Prep Time25 min
  • Cook Time45 min
  • Total Time1 hr 10 min
  • Yield4 Servings

Ingredients

For the MOINKs

  • 400g beef mince
  • 12 streaky bacon rashers
  • 1 egg
  • 1 Tbs Worcestershire sauce
  • 50g fresh breadcrumbs
  • 60ml whole milk
  • 1/2 tsp sea salt
  • 1 Tbs dried oregano
  • 1/2 tsp garlic powder
  • 1/2 tsp ground black pepper
  • A pinch of bbq – rub we used “The General” from Angus & Oink
  • BBQ Sauce of your choice

Method

Preparing the Moinks

1

To make the meatballs combine all the ingredients apart from the bacon and BBQ sauce, make into 12 golf-ball sized meatballs.

2

Wrap a rasher of bacon round each meatball and secure with a cocktail stick. Dust with the rub.

3

Set up the BBQ to cook indirectly at around 250°F (120°C), these can be done on a tray in the oven.

4

Put the moinks on the BBQ and cook for 45 minutes (or until internal temperature is 160°F or 70°C).

5

Brush with BBQ sauce and cook for a further 10 minutes to set the glaze.

Recipe from Chillin N Grillin NI. Check us out on Facebook: Chillin N Grillin NI or Twitter @grillin_ni With thanks to our sponsors Angus & Oink

Free Recipe Card

MOINKs (where moo meets oink)

Download the free PDF Recipe Card

Barbecue Jerk Chicken

BBQ Jerk Chicken

Barbecue Jerk Chicken

  • Prep Time3 hr
  • Cook Time15 min
  • Total Time3 hr 15 min
  • Yield4 Servings

Ingredients

For the Jerk Chicken

  • 4-6 chicken breasts (you can also use thighs or drumsticks)
  • 1 tsp ground allspice
  • 1 Tbs black peppercorns (ground)
  • ½ tsp cinnamon
  • ½ tsp ground nutmeg
  • 1 Tbs fresh thyme leaves, chopped
  • 4 spring onions, chopped (use the white part and most of the green)
  • 1 tsp freshly grated ginger
  • 2-3 chillies depending on how hot you like it
  • 1 Tbs dark brown sugar
  • 1 tsp salt
  • 2 Tbs dark soy sauce
  • Juice of 1 lime

Method

Preparing the BBQ Jerk Chicken

1

Put all the ingredients (except chicken) in a mini chopper and finely chop.

2

Marinade your chicken in the mix for up to three hours in the fridge.

3

Set up your BBQ for direct grilling and cook the chicken over a hot grill until it reaches an internal temperature of 165°F or 74°C, turn when necessary to prevent burning.

4

Serve with Watermelon and Strawberry Salsa or some hot sauce.

Recipe from Chillin N Grillin NI. Check us out on Facebook: Chillin N Grillin NI or Twitter @grillin_ni With thanks to our sponsors Angus & Oink

Free Recipe Card

BBQ Jerk Chicken

Download the free PDF Recipe Card

BBQ Grilled Sardines

BBQ Grilled Sardines

BBQ Grilled Sardines

  • Prep Time35 min
  • Cook Time5 min
  • Total Time40 min
  • Yield2 Servings

Ingredients

For the BBQ Grilled Sardines

  • 8 whole sardines de-scaled & gutted
  • 1 lemon
  • 1 tsp salt
  • 4 Tbs Harissa paste
  • Moroccan style Couscous
  • 400ml extra virgin olive oil
  • 2 Tbs balsamic vinegar
  • 1 Tbs Olive oil
  • Wholemeal bread (uncut loaf)
  • 1 x small Red chilli thinly sliced
  • 1 Tbs coriander leaves finely chopped
  • Mixed Salad leaves
  • 5 Tbs Greek style yoghurt

Method

Preparing the BBQ Grilled Sardines

1

Start the BBQ and setup for direct cook. About ¾ chimney of briquettes or charcoal. A gas BBQ can also be used here cooking direct over the burner.

2

In a small bowl add 2 Tbs Harissa paste and a 1 tsp of olive oil, give it a mix. Coat each side of the sardines.

3

In two small ramekins split the Greek style yoghurt and add a Tbs of harissa paste on top of each. Start preparing the couscous.

4

Using two tapas style ramekins (or whatever you have to hand), add the balsamic vinegar then add the extra virgin olive oil. Cut the wholemeal bread into chunky batons.

5

Place the sardines in a fish rack if you have one (helps to turn the fish without sticking to the grates), or place direct on the grates. Lightly grease the grates with a little oil if not using a fish rack. Sprinkle a little salt over the sardines.

6

Cook the sardines over direct heat for 2-3 minutes per side or until cooked through. Internal temperature should be 60°C/140°F.

7

Cut the lemon in half and grill direct for a few minutes until lightly charred.

8

Place the couscous on a serving platter, top with 4 sardines, add some chopped red chilli and coriander, add some salad leaves and the bread.

9

Finally place the dipping harissa/yoghurt combo and the extra virgin olive oil /balsamic vinegar dipping oil for the bread onto the platter.

10

Squeeze the grilled lemon over the sardines and enjoy!

Recipe from BBQ Stu follow him on Twitter @Graboid456

Free Recipe Card

BBQ Sardines

Download the free PDF Recipe Card

Chimichurri Steak with a Coffee Rub

Chimichurri Steak

Chimichurri Steak with a Coffee Rub

  • Prep Time20 min
  • Cook Time15 min
  • Total Time35 min
  • Yield2 Servings

Ingredients

For the Steak

  • 12oz Bone-in ribeye

For the Coffee Rub

  • 3 Tbs fresh, finely ground coffee
  • 1 Tbs sea salt
  • 1 Tbs freshly ground black pepper
  • 1 Tbs Dark Brown Sugar

For the Chimichurri

  • Bunch of Parsley
  • 1/2 tsp dried Oregano
  • 1/2 tsp dried Tarragon
  • 1 garlic cloves
  • 1 shallot
  • 1/2 tsp chilli flakes (you can add more if you like it hot)
  • 2 1/2 Tbs olive oil
  • Juice of 1/2 Lemon
  • 2 tsp red wine vinegar
  • salt and pepper

Method

Preparing the Chimichurri Steak

1

Place all the ingredients in a mini chopper and blitz. If it’s too thick add some water. Taste and adjust as necessary. I like mine sharp so sometimes add more lemon juice or red wine vinegar. This can be made the day before and will even keep in the fridge for up to a week. Making it in advance allows the flavours to come together.

2

Get a nice bone in Rib Eye. Last time I made this we injected it with some Quiet Man Whiskey don’t worry if you don’t have an injector it’s just as nice without.

3

Sprinkle with Coffee Rub and leave at room temperature for 20 minutes. This can be done whilst you light the BBQ. Set up the BBQ for direct heat and bring your coals to a high heat.

4

I like my steak medium rare so we usually BBQ it to an internal temperature of 140°F or 60°C medium would be 155°F or 65°C.

5

Once cooked tent with foil (not tightly wrapped) and leave for 5-10 minutes, this allows the steak to rest and makes it tenderer. Slice and serve drizzled with the Chimichurri. Serve with Bacon wrapped onion rings, portobello mushrooms or vine tomatoes all which can be cooked on the BBQ too.

Recipe from Chillin N Grillin NI. Check us out on Facebook: Chillin N Grillin NI or Twitter @grillin_ni With thanks to our sponsors Angus & Oink

Free Recipe Card

Chimichurri Steak

Download the free PDF Recipe Card

Angus & Oink Chicken Wings

Chicken Wings

Angus & Oink Chicken Wings

  • Prep Time30 min
  • Cook Time40 min
  • Total Time1 hr 10 min
  • Yield4 Servings

Ingredients

For the Chicken Wings

  • 1kg wings
  • 20g Angus and Oink “The General Rub” (you can add more to taste if you like them spicy)
  • 10g baking powder
  • 10g self raising flour
  • 1 pint buttermilk
  • Angus & Oink Rampant Angus Sauce

Method

Preparing the Chicken Wings

1

Soak the wings overnight in the buttermilk, if you can’t get buttermilk you can use 250ml milk with 1Tbs of lemon juice. I like to separate the wings at the joint but you can leave them intact if desired. After marinating take them out of the milk, drain but don’t pat dry.

2

Mix the baking powder, rub and flour together in a bowl and toss your wings. Put them on a plate and leave in the fridge to dry for 30 mins.

3

We are lucky to have a rotisserie basket but you could cook them indirect on the grill turning a few times. Cook for 40 mins.

4

Remove from bbq, and toss in sauce of choice, in this case Rampant Angus Scotch Bonnet Ketchup. Serve with blue cheese sauce and celery.

Recipe from Chillin N Grillin NI. Check us out on Facebook: Chillin N Grillin NI or Twitter @grillin_ni With thanks to our sponsors Angus & Oink

Free Recipe Card

Angus & Oink Chicken Wings

Download the free PDF Recipe Card