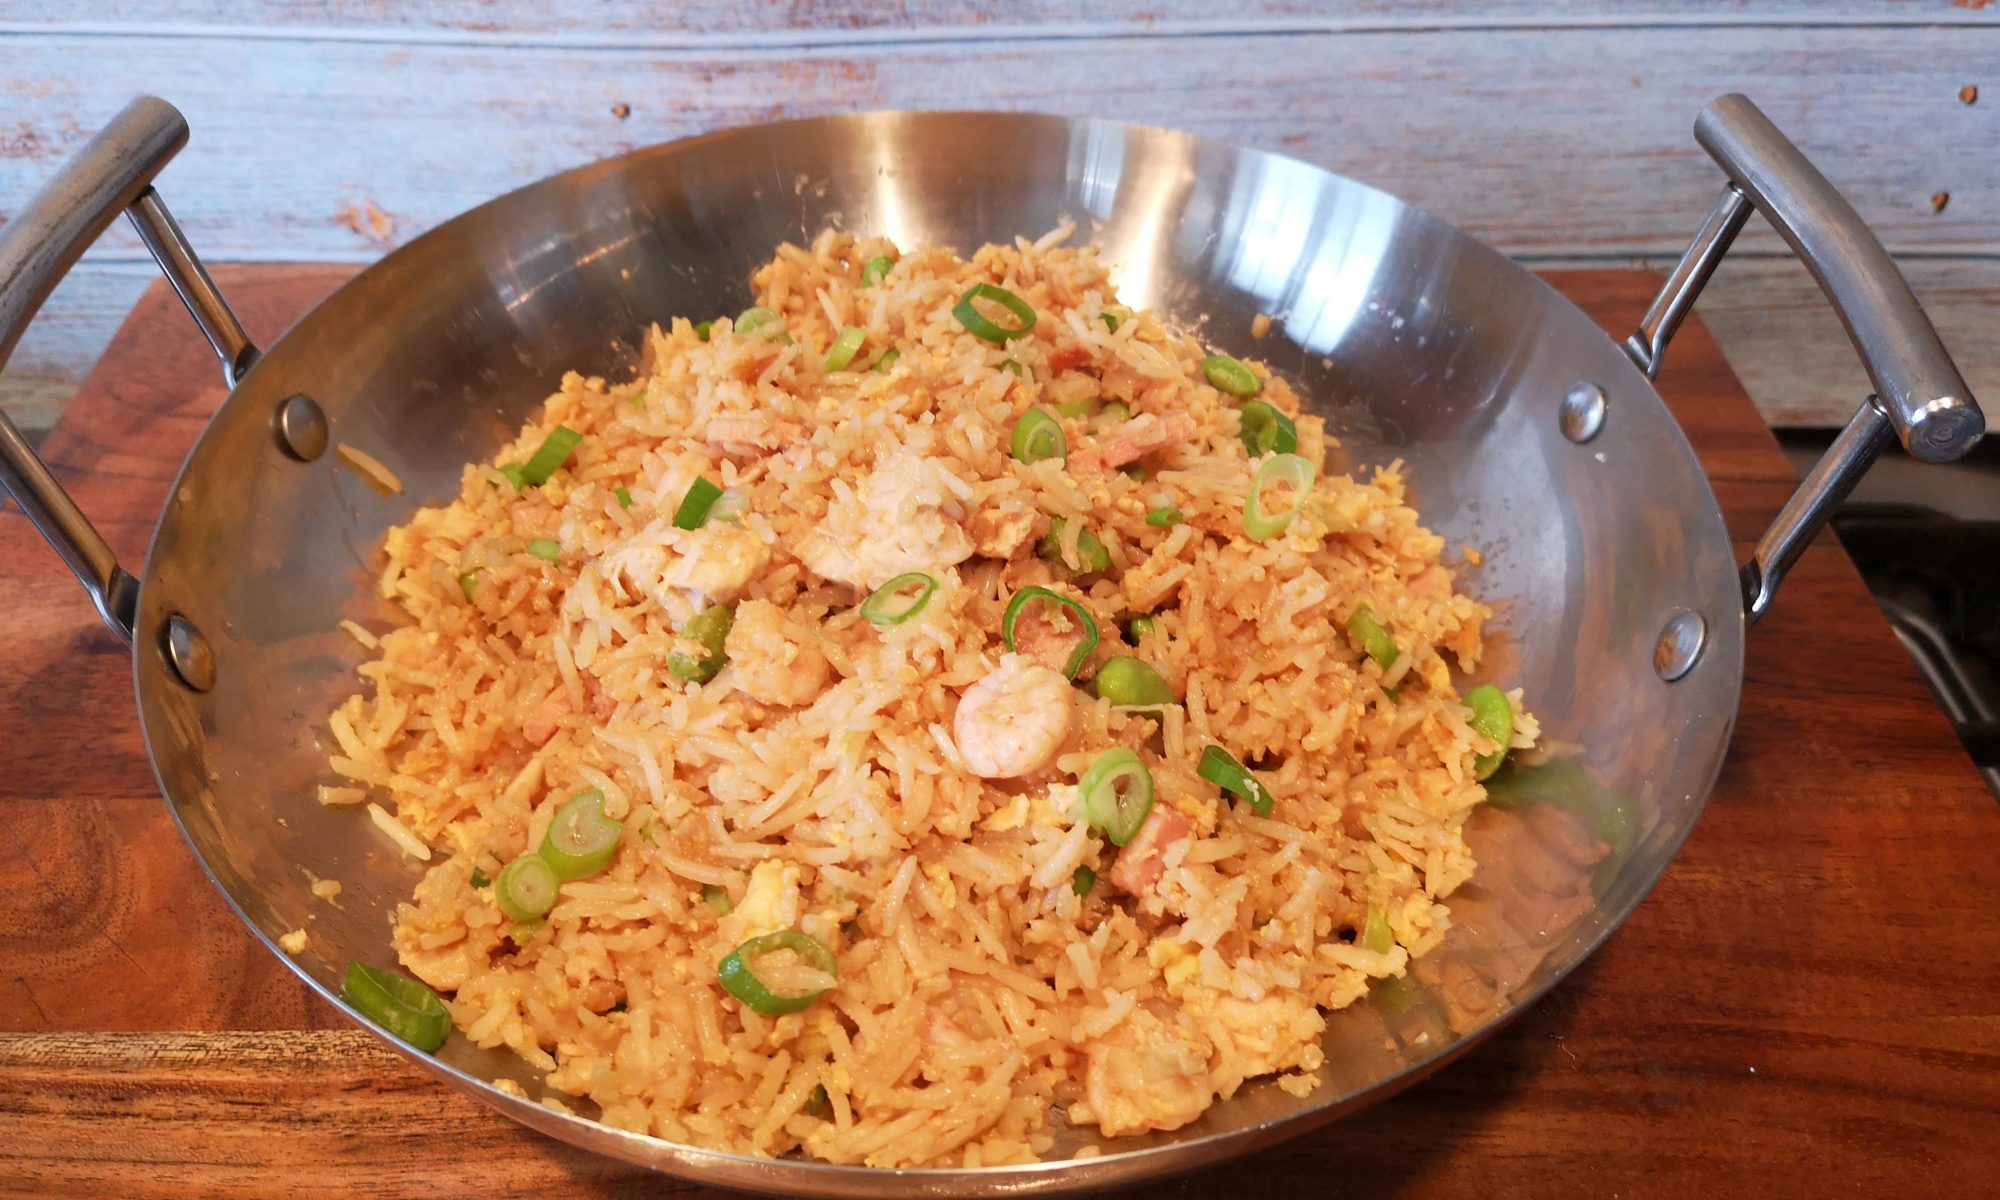
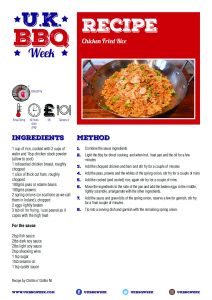
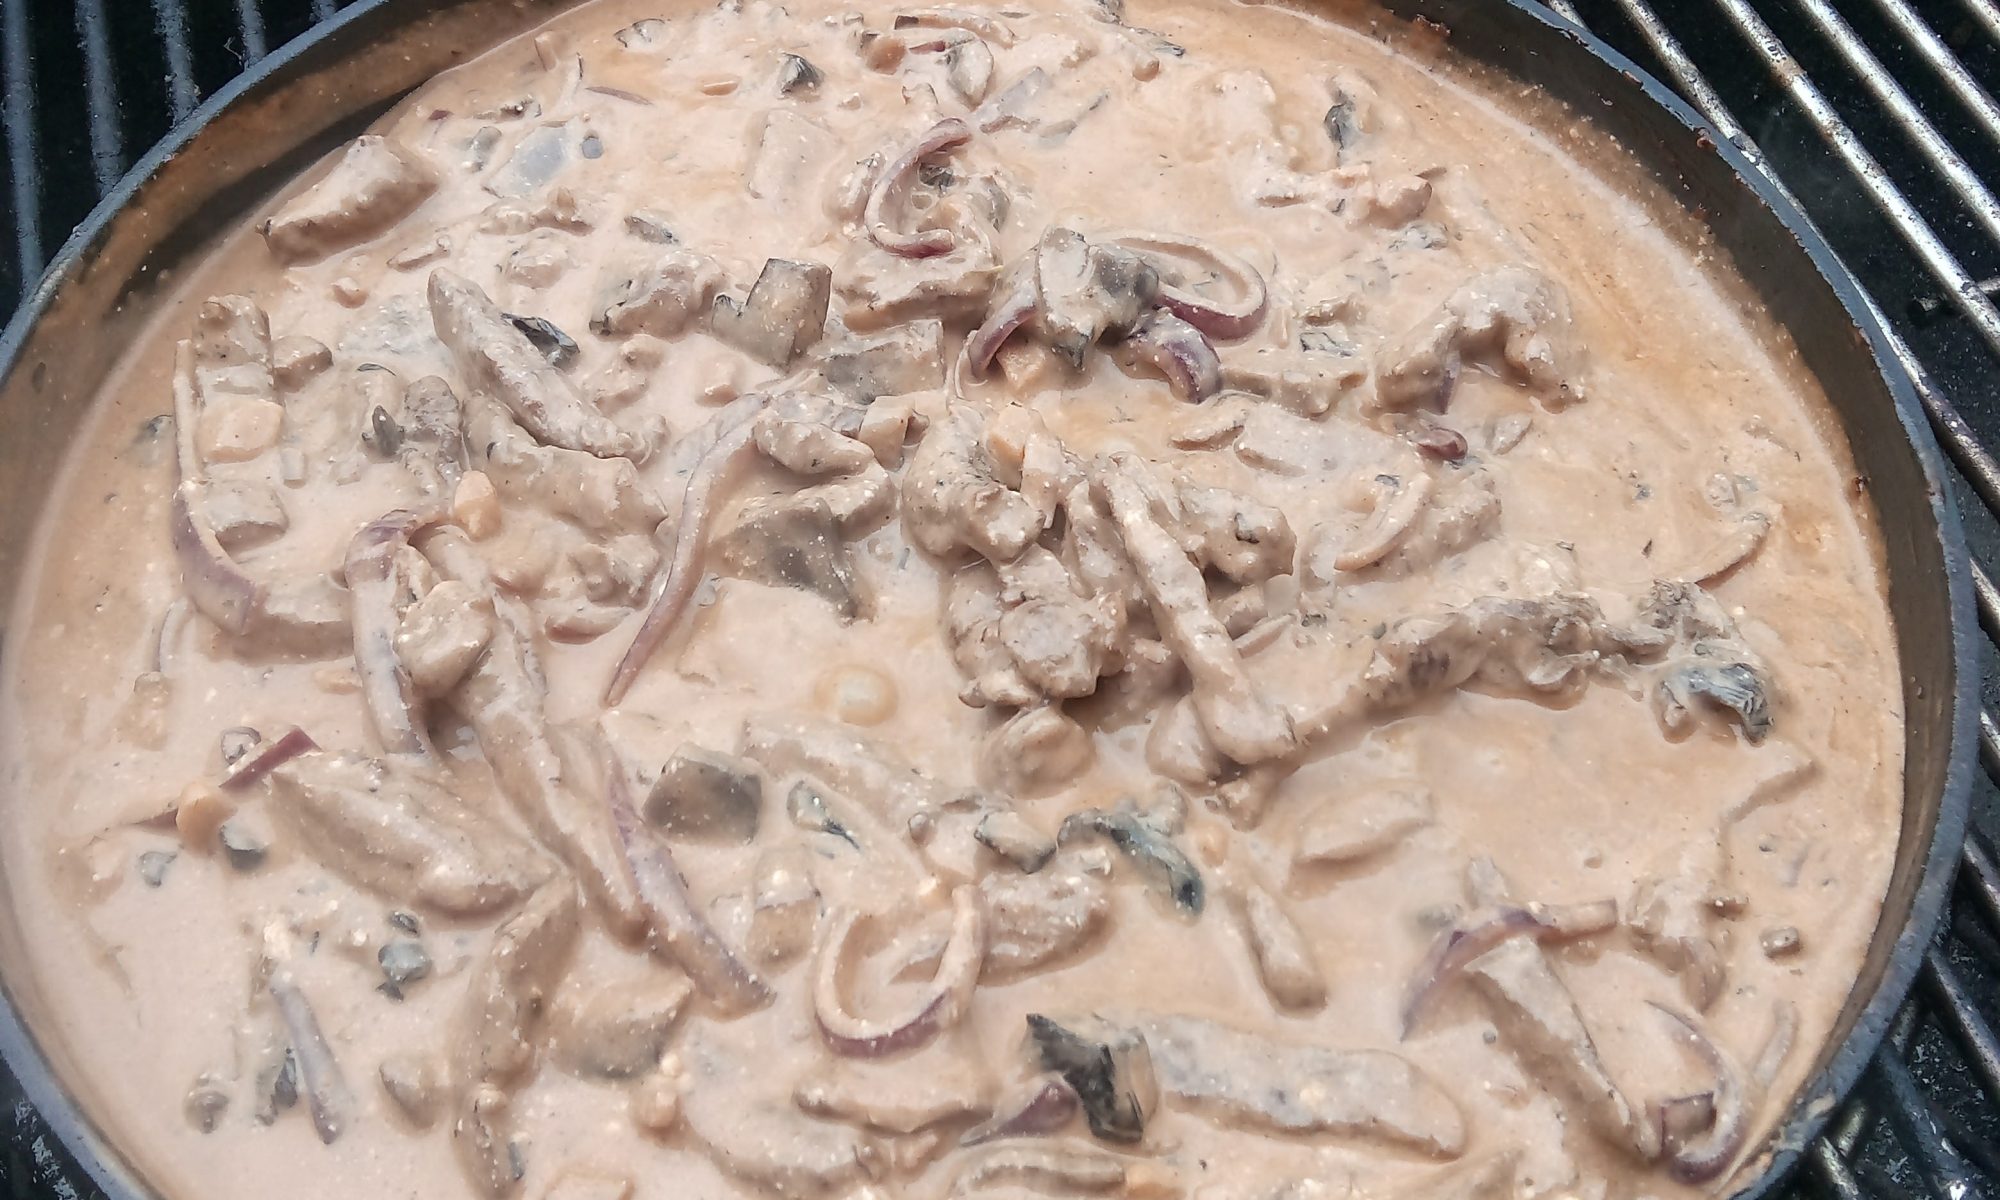
This is an excellent dish for using up left overs and bits from the freezer. This was cooked on a Monolith Ceramic with the Wok holder and Wok but can easily be cooked on a bbq in a skillet.
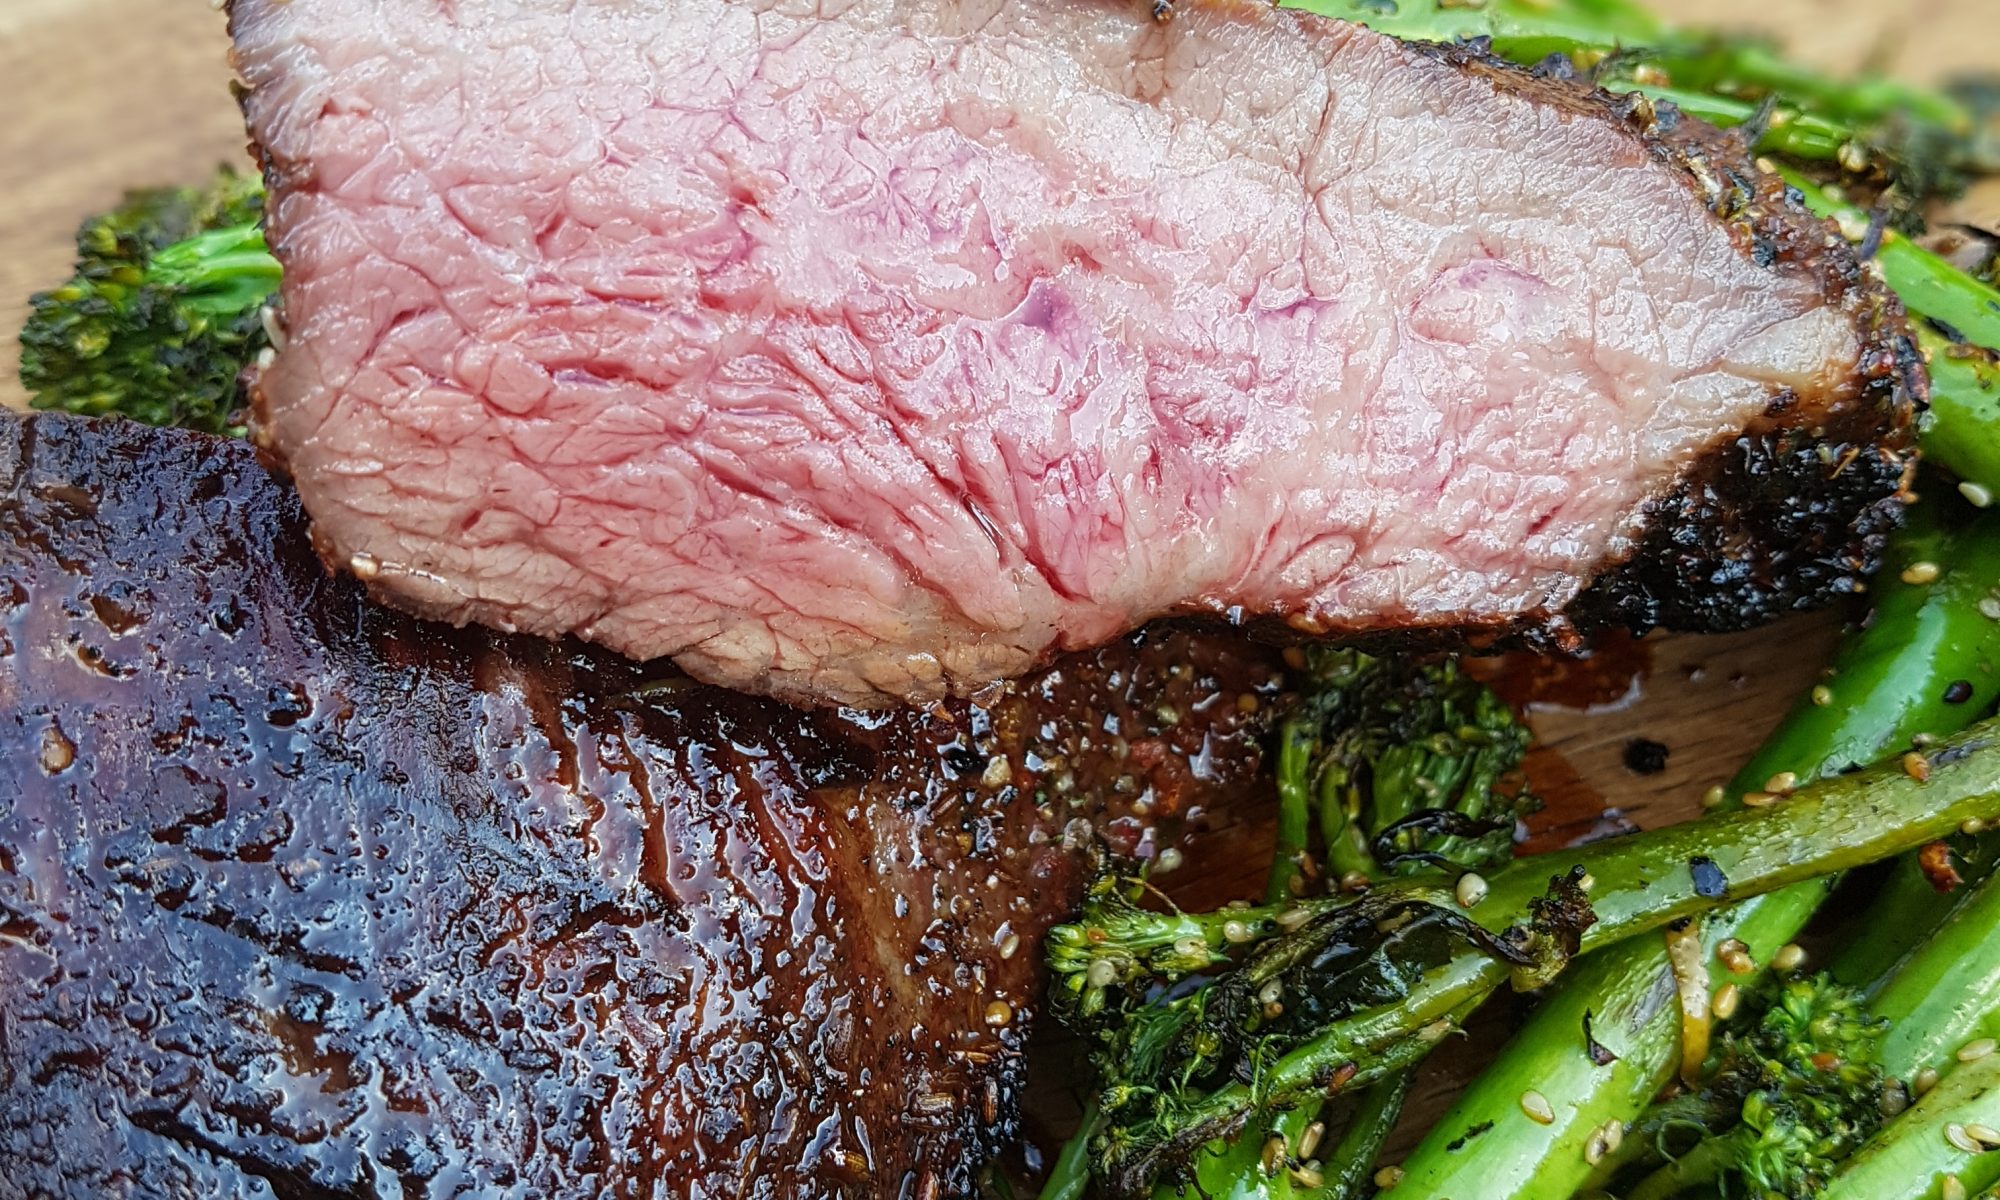
Tri Tip is a great bit of beef and only really needs salt and pepper, although you can add anything you would normally add to beef. Apply this an hour in advance of cooking.
2
Prepare you barbecue with the coals on one side and a medium heat.
3
Cook the beef indirectly until an internal temp(IT) of approximately 42c/105f. This will give you some room to grill up the outside and generally take 25/30 minutes.
4
Put the beef directly over the coals turning every 2 minutes replacing the lid in between to avoid flare ups. Once the IT is at 52c/125f take of the heat as it will continue to creep up during resting.
5
Tri Tip has two muscles. For Best results cut between the muscles and then cut across the grain of each.
3 baby fennel bulbs, outer layers peeled and finely sliced
sea salt
4 spring onions (scallions), finely chopped
100 ml (3½ fl oz) olive oil, plus extra to drizzle
½ bunch fennel fronds, picked
1 head fennel flowers
Method
1
The grill should be hot around 250°C/480°F+
2
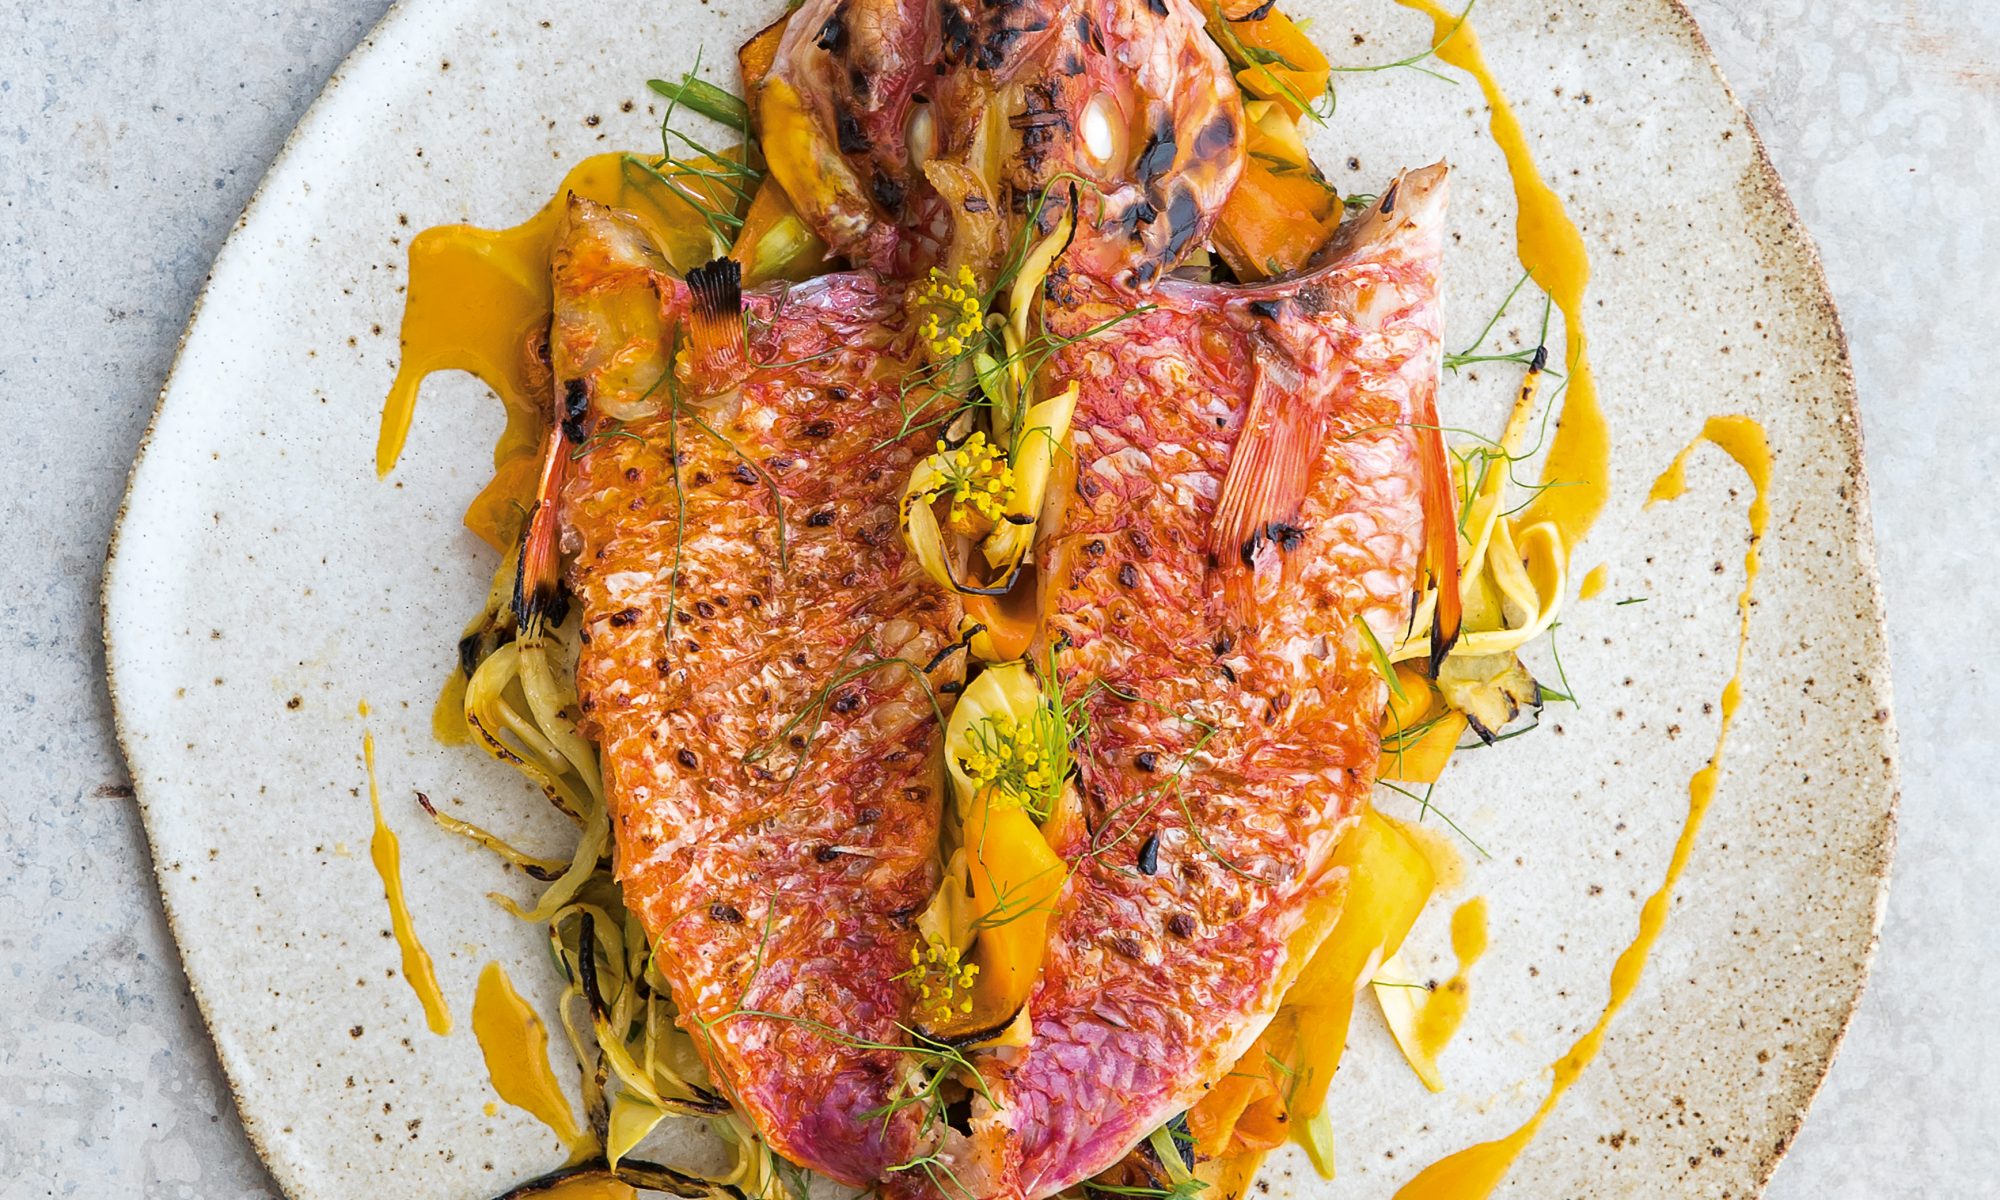
Scale and gut the fish, and remove the gills. Rinse quickly and dry well.
3
Butterfly the fish. Use a sharp knife to make an incision along the skin on the back of the fish to one side of the dorsal fin. Following this line, run the knife horizontally from the head to the tail, going halfway to the backbone. Move the knife through to the underside of the fish, then run the knife along the whole fillet. Turn the fish over and repeat on the other side.
4
With a pair of scissors, carefully cut the backbone free behind the head and in front of the tail. This will enable you to easily remove the backbone while retaining the head and tail, which hold the fish together during grilling.
5
Trim the belly. Locate the bones running along the middle of the top half of the fillet and carefully remove them using tweezers.
6
Prepare the escabeche vegetables. In a small saucepan, combine the zest and juice of the oranges and limes, the lemongrass and the fennel seeds. Bring to the boil and simmer until reduced to approximately 200 ml (7 fl oz) of liquid. Pass through a fine-mesh sieve and, while warm, pour over the sliced carrots and fennel. Leave for 40 minutes to macerate.
7
Season the flesh of the fish with sea salt, and grill in an enclosed grill rack over intense embers for 2 minutes, skin side down, until beautifully caramelised.
8
Meanwhile, drain the carrot and fennel (reserving the liquid) and grill for 2 minutes with the spring onions until lightly charred. Season, drizzle with olive oil and garnish with half of the fresh fennel fronds.
9
Transfer the fish to a clean tray, add the reserved escabeche liquid and allow to rest for 1 minute, during which time the acidity will finish cooking the fish.
10
Gently heat the olive oil in a small saucepan and pour it over the red mullet. Strain all the liquid back into the saucepan, whisking continuously and allowing a light emulsion to form.
11
Place the pickled and grilled vegetables on a plate, top with the fish and pour the emulsion over. Finish with the remaining fresh fennel fronds and the flowers. Serve immediately.
Incorrectly classed in the UK as mullet, red mullet is actually a member of the goatfish family and a favoured part of the Mediterranean diet. I worked with red mullet for years in Europe and it was only when I came to Australia, where they are often sold under the Greek nomenclature barbounia, that I realised the fish was not a true mullet. They were so valued in ancient Rome that they sold for their weight in silver. Though small, red mullet has a sweet and delicately flavoured flesh, and fine oil running under the skin that crisps up beautifully on the grill. In this recipe, the escabeche refers to the pickled vegetables; the acidity completes the cooking of the mullet as it comes off the grill. The vibrant combination provides a taste of sunshine no matter what the weather.
Recipe kindly supplied by Lennox Hastie from Finding Fire: Cooking at its most elemental (Hardie and Grant £30)
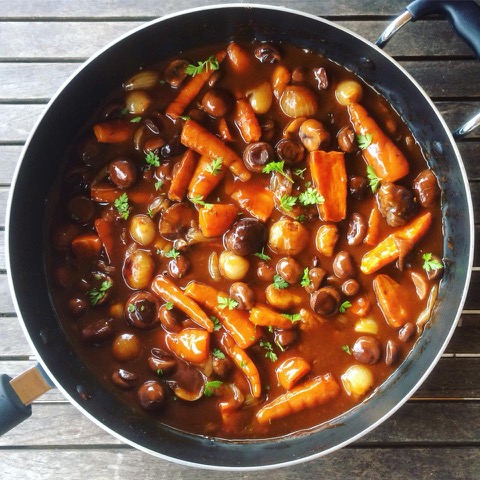
450g small chestnut mushrooms or button mushrooms, left whole
175 g cooked chestnuts, sliced in half
300g Chantonnay carrots (or regular carrots chopped into large chunks)
24 small shallots, peeled and left whole
2 cloves of garlic, minced
1/2 tsp caraway seeds
300 ml hot vegetable stock
1 tsp Marmite (or Vegemite).
1/2 tsp brown miso paste
400ml red burgundy wine (you can substitute another red wine)
2 heaped tbsp tomato purée
4 tbsp brandy
2-3 tsp unrefined sugar
4 heaped tsp cornflour mixed to a slurry with a few drops of water
A bunch of thyme tied with string
Salt and pepper to taste
Method
1
Clean the mushrooms and place in a bowl. Pour over the wine and leave to stand overnight or for a few hours, giving them a stir once or twice (marinating the mushrooms is optional).
2
Set up your BBQ to have direct and indirect zones. Prepare your carrots and pop them in a bowl. Add a tiny bit of oil, salt and pepper and massage the carrots to coat. Place on a baking tray and roast indirectly in the BBQ using some fruit wood chips or chunks for smoke for 20-25 minutes until cooked and set aside.
3
Using the Weber GBS Dutch Oven or a heatproof saucepan suitable for the BBQ, brown the shallots over a high heat (direct zone) using a little oil. You’re just looking for colour on them here, you don’t need to cook them through. Remove them from the pan and set aside.
4
Remove the mushrooms from the wine (reserve the wine for later), pat them dry with kitchen paper and then add to the hot pan. Fry off the mushrooms for a few minutes and while this is happening dissolve the marmite and miso paste in the hot stock.
5
Add the shallots to the mushrooms along with the garlic and caraway seeds and fry gently for another minute. Now add the chestnuts, stock, brandy, thyme and 200ml of the wine marinade. Bring to the boil and then move to the indirect side of the BBQ, close the lid and simmer until the shallots are tender. You can cover the pan or leave it uncovered if you want to infuse more smoke into the casserole.
6
Add more of the wine and a little water if you think it needs it, but remember that the wine will need to cook out, so check this early on.
7
Add the carrots to the pan and taste for seasoning, adding a good grinding of black pepper and salt if needed. Stir in the cornflour slurry and simmer until the sauce has thickened.
Direct cooking is often known as grilling and it involves placing your food directly over the heat source. You can achieve different temperatures by controlling your heat source but generally, direct cooking is used to cook thinner cuts of meat such as steaks, burgers, sausages and chicken.
With larger cuts of meat, there is a risk that the outside of the meat will be overcooked before the middle of the meat reaches a safe internal temperature and so it is easier to use the indirect method for these cuts.
The Full Grill Setup
The most traditional set up for direct cooking is simply to have the entire BBQ setup for direct heat. If you are using a gas BBQ you will have all your burners on or on a charcoal BBQ, your charcoal will be spread evenly across the entire charcoal grate.
Setting your BBQ up this way means that anywhere you place food on the cooking grate it will receive direct heat from underneath.
This isn’t to say that the heat will be even across your entire cooking grate. Even with a gas BBQ, when the heat source is a little easier to control, you will still get hot and cold spots on the cooking grate. Typically the outer edges of the cooking grate will be a little cooler than the centre.
The same can be said for charcoal BBQ’s. Even if you spend time spreading the charcoal evenly, there will still be some spots that are hotter. This isn’t necessarily a bad thing but as long as you are aware of it, you can move your food around to account for this.
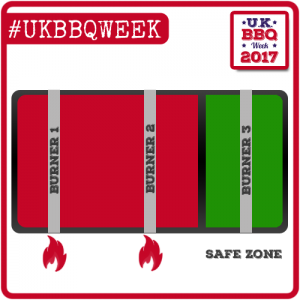
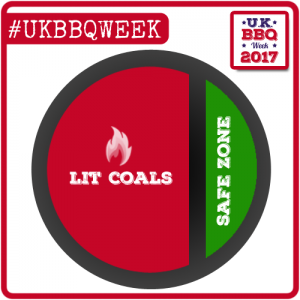
The Safe Zone
Gas BBQ setup with safe zoneWhen cooking direct I rarely use the full grill setup. Instead I like to set up my BBQ so that 60% of the cooking grate has direct heat and the remaining 40% is left with no heat source under it. This part of the cooking grate the safe zone.
On my 3 burner gas BBQ, I cook with the left and middle burner on and the right burner off. On my Weber Kettle I will spread the charcoal over 60% of the charcoal grate.
You might be asking why you would only use a portion of your cooking grate rather than the entire area?
The closer your food is to the heat source, the faster it will cook. Having an area with no coals gives you complete control over how quickly your food cooks. Food that is cooking too quickly can be moved into the safe zone. The food will still continue to cook but at a slower rate.
This is a great setup for beginners to master direct cooking on their BBQ’s.
Tips for cooking over Direct Heat
Keep the lid closed
Keeping the lid of your BBQ closed will not only help your food cook faster but it reduces flare ups. All Good BBQ’s are designed with vents to allow the optimal amount of air to flow through them with the lid closed. Fat dripping from your meat onto the coals or burners will result in a flame. If you have the lid open, you are feeding those flames with an abundance of oxygen and that never ends well!
Don’t turn your food too often
I sometimes think this is a manly thing. We love nothing more than to stand around the BBQ, tongs in hand just waiting to turn something or move it around the grill. It gives us a sense of purpose but we’re really doing more harm than good.
For one, if we’re constantly turning the food it means the lid is open (see the tip above). The main reason that most people feel they need to keep turning their food is due to flare ups from the fat dripping onto the coals which can sometimes get out of control. A momentary flare up will not burn your food however persistent flame will cause your food to burn. Keeping the lid on your BBQ will keep the flare ups under control.
The second benefit to not turning your food too often is to help retain the natural juices in your meat. Constantly flipping your food can squeeze the natural juices out. When cooking over a direct heat, try to turn your food no more than once or twice.
Keep your temperature under control
When cooking at a very high temperature using the direct method, things can become a little frantic if you have a full grate of meat to deal with. I’ve found that dialling the temperature back a little makes everything easier to manage.
If you put the first two tips into practice then a lower temperature will not affect your cook time. It simply allows your food to cook in a more controlled way.
My tendency, when I was learning to BBQ, was to turn all the burners on my gas BBQ to 11 or to fill my chimney starter as high as I could. The temperature would be sitting around 230-240 C. Add into the equation that I didn’t know anything about safe zones at the beginning and you can imagine a grill full of burgers and sausages got a little hard to handle!
Now I prefer to grill at around 200 C which is still a high temperature but more manageable. Cooking ‘hot and fast’ doesn’t always have to mean as hot and as fast as possible.
Hopefully these simple tips will help you get to grips will cooking over a direct heat. With time you will gain the confidence leave your lid on and walk away, leaving your BBQ to do the work for you.
Sign up for our FREE Newsletter
Keep up to date with all the latest news on UK BBQ Week by entering your name and email address below. We will send you our latest recipes, helpful articles and details on our latest competitions.