Learning to cook different food on your BBQ means controlling the temperature is key so we’ve put together some tips to help you add the right amount of fuel and maintain that temperature using your vents.
Why controlling the temperature of your BBQ is important
It may be easy to fall under the illusion that cooking at a higher temperature will result in your food being cooked faster and as long as you turn it regularly it will be fine however this isn’t the case.
By dialing your temperature back a little and cooking over a controlled heat, the experience is a little more relaxed, your food will cook more evenly and you won’t have to turn or move your food around so much to avoid it burning. Every time you turn or move your food, you will lose a little bit of the natural juices. Turning something like a burger once or twice during cooking will avoid this however turning it 10-15 times to avoid it burning on the outside will result in them drying out.
I’m not going to pretend that temperature control is easy to master, it can take some practice to get right, however there are a few simple principles that will make it easier for you.
Controlling the temperature on your gas BBQ
Controlling the temperature on your Gas BBQ is simple as it is similar to the conventional oven in your kitchen. You can easily control the amount of gas being supplied to each burner using the controls on the front of your BBQ and therefore decide how high or low the temperature is. After pre-heating your BBQ, you can adjust the valves up or down to increase or reduce the temperature.
The basic principle of controlling heat is this:
More fuel = More heat
It is really easy to demonstrate this on a gas BBQ. Opening the valve more provides more gas to the the burner giving you more heat. Opening the valve less will provide less gas to the burner and therefore less heat.
These same rules apply to a charcoal BBQ. The key to hitting the right temperature is by using the correct amount of fuel.
Using the right amount of fuel in your charcoal BBQ
A charcoal BBQ can be a little intimidating when it comes to temperature control as there can be a lot of guess work involved when you are getting started. A recipe will always give you a guide temperature to cook your food at but converting that over to the right amount of charcoal to add can be tricky so here I’ve always found that this is a great place to start.
If you are using a Weber chimney starter to light your coals, and using a long lasting briquette, the following measurements should allow you to hit some key target temperatures. These measurements are based on a 47cm and 57cm kettle BBQ.
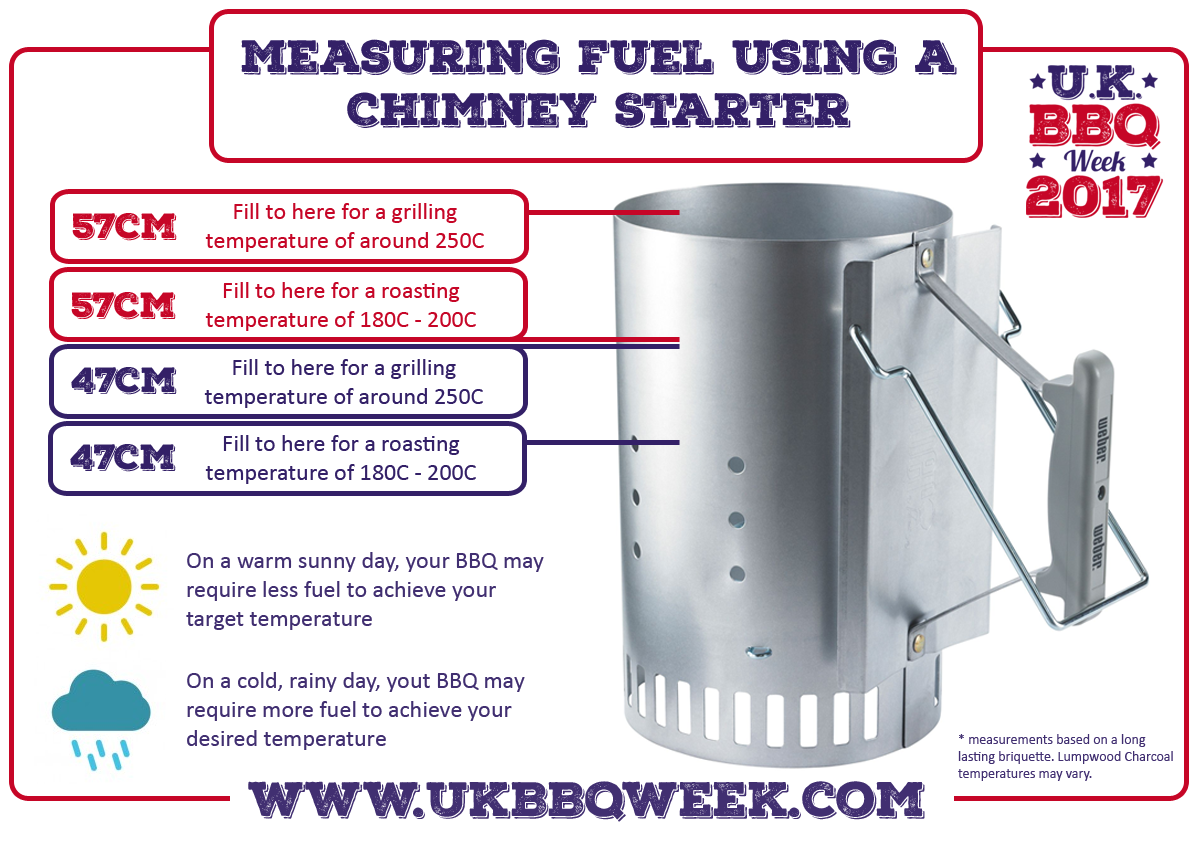
Lumpwood Charcoal can vary due to it’s irregular size but keeping notes on measurements and the resulting temperature will soon give you your go to levels.
Controlling the temperature on your BBQ can be a stumbling point for beginners so here are some tips to help you get to grips with it.
Hitting the exact temperature isn’t essential
One of the first hurdles I had to overcome was to think of BBQ temperatures in ranges rather than an exact temperature. I wasted a lot of time agonising over getting the temperature to exactly what the recipe stated but the great thing about BBQ is that it isn’t an exact science. Let me give you an example.
If I was setting my BBQ up for low and slow cooking and the recipe stated that I should be cooking at 110 C, I would light the charcoal and bring the BBQ up to temperature. I would adjust the vents, remove a few coals or add a few more until the temperature was exactly 110C. It took a lot of time to get this just right and I now realise that it wasn’t completely necessary.
Getting your temperature within a range is absolutely fine, the important thing is to maintain a consistent temperature. So if a recipe states 110C, as long as you are in the range of 105C to 120C then you won’t go far wrong.
Allow the temperature to settle before putting your food on the grill.
After you have lit your coals in your chimney starter and poured them into the BBQ, put the lid on and leave the temperature to settle. It can take a little time for the coals to finish lighting and reach their peak temperature. If your temperature is running a little high, you can remove some of the charcoal or adjust your vents a little (which we will discuss in the second half of this article) to even out your temperature. Once your temperature is sitting steady, you can add your food.
Keep a note of how much charcoal you are adding each time you cook and what temperature it resulted in.
You don’t have to count the number of briquettes or weigh your lumpwood but simply keeping a note of ‘½ Chimney starter, ⅓ Chimney starter’ etc and the resulting temperature will allow you to refer back to it at a later date.
Controlling the temperature using your vents
Airflow through your BBQ is important to keep your coals burning and your vents can be used to control the heat being produced by your coals. With the lid closed and both top and bottom vents fully open, air will be drawn through the bottom vent and exhausted through the top vent creating an airflow through your BBQ.
Closing both vents completely will result in your charcoal extinguishing as you have removed the oxygen supply needed for fire to burn. Using this theory, it is possible to restrict the amount of air flowing through your BBQ by adjusting the top and bottom vents.
I highly recommend adjusting the amount of fuel added to achieve your desired temperature rather than relying on the vents to manage your temperature. Vents are great for fine tuning your temperature and finding the ideal vent setup will allow you to maintain a steady temperature however if you have added too much fuel you will struggle to keep the temperature down using vents alone.
The smallest of adjustments to your vents can have a dramatic impact on the temperature of your BBQ but remember that closing them off too much can result in your coals going out. If you find your temperature is running a little high or is starting to climb, closing the top and bottom vents by a few millimetres can be enough to steady the temperature. If your temperature is well above your target range, I would remove some of the lit coals to bring it down then fine tune with the vents.
While you are recording the amount of charcoal used in your BBQ journal, make a few notes about the final vent setup used to achieve your temperature. You will then begin to learn your go to vent settings for specific temperature zones.
Fire management can be tricky to master and maintaining a steady temperature for the duration of a long cook is something that will get easier with experience so don’t be disheartened if you struggle the first few times you do it.
Remember that it is easier to add a little charcoal to your BBQ if your temperature is low than to bring down a high temperature. Having the right size of fire at the start will make keeping the temperature consistent a lot easier with your vents.
Sign up for our FREE Newsletter
Keep up to date with all the latest news on UK BBQ Week by entering your name and email address below. We will send you our latest recipes, helpful articles and details on our latest competitions.
