ProQ Digital Probe Thermometer

If you are in the market for an instant read thermometer then there is a new option to consider from the team at ProQ. Speak to most people in the BBQ world and they will say a thermometer is one piece of equipment they would recommend again and again. And forget the old school analogue ones your parents may have used to check a turkey once a year, these are the new school digital versions giving you an accurate read out in seconds. So, whether you are grilling steaks and looking for that pink perfection or smoking a brisket and looking for that finishing temperature as well as probe tenderness, the ProQ digital probe thermometer may well be the tool you need.

Coming in at a price point of £25.99, the ProQ model lands itself in a very competitive place in the market for this type of device. Especially considering the 2 year limited warranty they are offering too.

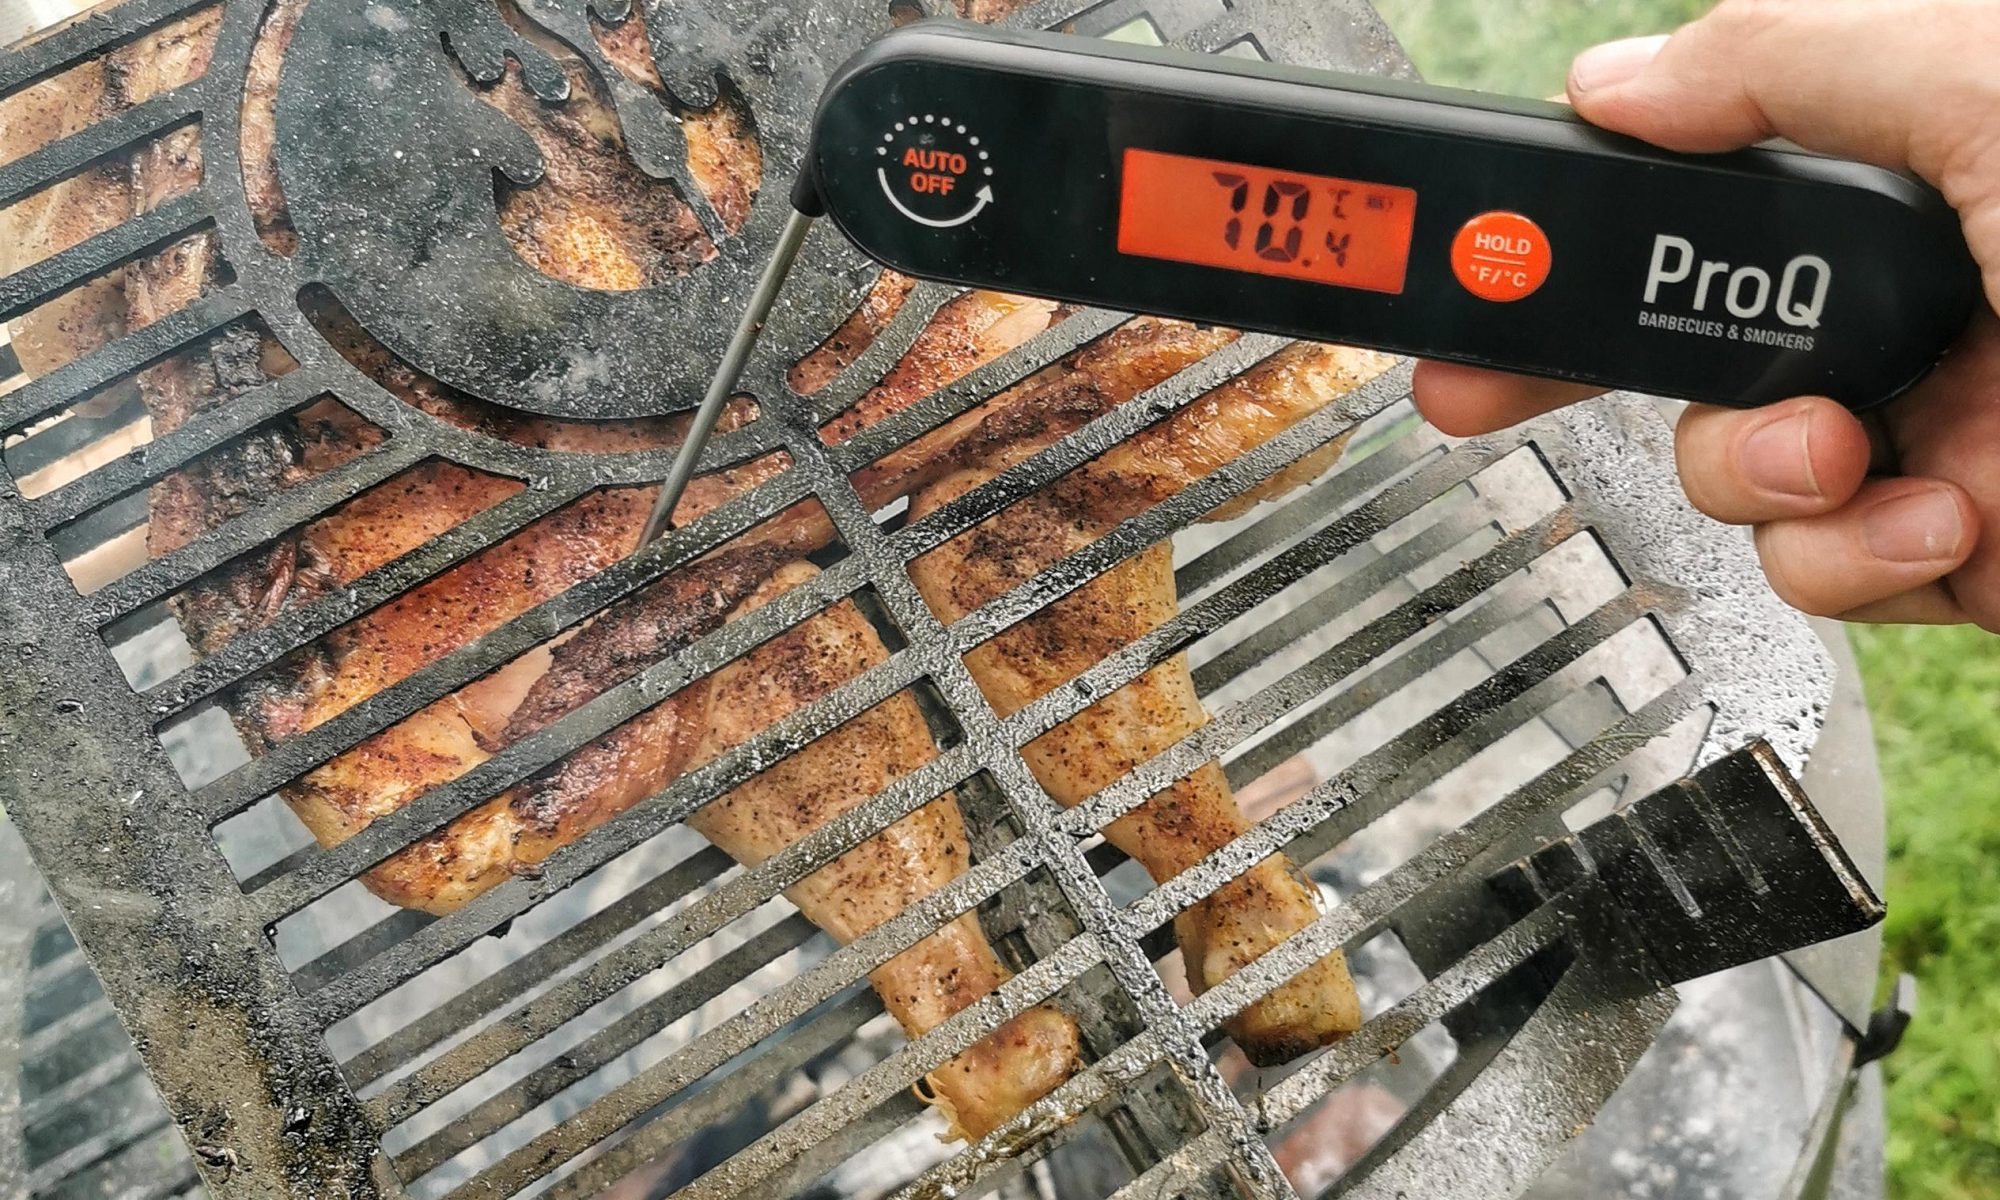
I have been using my ProQ model for the last few months before writing this review and have to say, for the cost of the unit I have been very impressed. Straight off the top, the feature I like most is being able to easily switch between Celsius and Fahrenheit on the display by simply holding down a button. Being from an age where I learnt all my recipes and cooks from American BBQ books, I am more familiar with Fahrenheit as a measurement than Celsius. But I appreciate that some people are the opposite way so it’s easy on this unit to switch between both. The actual probe section you use for checking temperatures folds away into the handheld section, keeping it safe and out of the way; and the very tip of the of the probe narrows, meaning the holes left in your food, when checking temps, can be kept to a minimum. The thin, tip end also means the unit reads temperatures very quickly, giving you an accurate reading in around 3-5 seconds; meaning the food does not have to be kept out of the cooker any longer than necessary when making those checks. Handily, the device is also IPX5 waterproof which certainly helps with the always changing UK weather, wiping it clean or spills from cooks etc. The screen is backlit, so can be used at night or in darker places too. And another handy feature is a USB charge cable is supplied in the box, so you can always keep it topped up as it has a lithium-ion. And finally, the unit has a magnet on the back to help you keep it somewhere safe, just not somewhere hot!

At this price, the unit is definitely worth a look and will help you to know exactly what the temps are, of whatever you are cooking, meaning you know you are at a safe temperature; so you don’t need to overcook food and dry it out, and overall you will be making more enjoyable meals.

I was gifted this unit to test, but am entitled to write my own opinions on the device. The link to the product on the ProQ website is noted below.

If you have used and have any feedback on one of these units or have any questions, let us know in the comments.

https://proqsmokers.co.uk/products/proq-instant-read-thermometer

Thermaworks Smoke – Review by Marcus Bawdon

The Thermoworks Smoke is recently available in the UK. It is a definite upgrade for those looking for something a bit more substantial and easier to use than a maverick.

The main screen is a great size with large numbers…meaning a glance at the temperatures are often enough. But if you are moving further away from the bbq…then the range is impressive…easily a few hundred feet. The length of our garden and inside the kitchen. At £78 delivered it’s a real contender.

The portable receiver unit is well designed easy to read and solid. The whole thing reeks of reliability and long use. It’s a 2 probe thermometer. Ideally the option for a third or fourth probe would make a good upgrade. The probes themselves are robust and come with one ambient and one for the food. Alarms are easy to set and very loud.

This is my favourite thermometer at the moment and has been well thought through for the bbq market. A WiFi bridge is soon to be available here in the UK which will mean you’ll be able to monitor your cooking from down the pub…

Meater Wireless Thermometer – Review by Paul Niland

When Matt from Meater approached UK BBQ week and asked if anyone would like to try the product I wanted to give it a go.

With the rotisserie, consistency in the setup; the fuel and the weather conditions are all factors that can make or break your Sunday roast or your game changing Turkey during the holidays. When you first start using the rotisserie you tend to increase your cook times or affect the temperature by lifting the lid of your BBQ. What I really needed was a probe with no wires! In comes the Meater “The First Wireless Smart Meat Thermometer”

So how did I get on with it? Overall I liked the product. I have been watching it for a while with anticipation that it would be great for the rotisserie and it was. I found the temperature accuracy to be good, sometimes the same as my Thermapen or 1-2 degrees different. The app was very clear and simple to use and consistent between Apple and Android devices. I found the setup simple (maybe because I work in technology) and using the combination of Bluetooth, WIFI and the Meater Cloud Feature, I found syncing devices worked very well. I did see a few tweets about range so for my setup I used an old IPAD approx. 2m away from the BBQ. My shack is more than 10m from my house, so I knew it would be outside of the Bluetooth range and may have problems if I tried without it. In the future, the mini block should certainly act as the bridge.

Setting up the cooks was very good and simple, though the presets were aimed towards the US market based on USDA guidelines. There were a great deal of support videos on their youtube channel that helped you get started with examples of how to use the product. Being from the UK, I did find these quite Americanised. Also as a BBQ fanatic, I tend to avoid using the oven at all costs so some of these videos did not appeal to me.

Monitoring the cook was very good, I tried a combination of Apple and Android devices and found them to be consistent. Randomly the connection would drop, I could not explain this though it was not frequent enough to affect my cook.

The bit that let me down was the battery, I cooked a whole chicken with some serious smoke and after washing the probe it did not charge too well. You have to give it a serious scrub between cooks to get enough contact for it to charge. There is a little LED battery indicator though I think this was just for the batteries in the block and not relevant to the probe. Also the app does not currently give an indication of how much life is left so if you like your low and slow it can be quite worrying. This in fact did happen to me and I was surprised after a quick 30 min charge I could not resume where I left off.

There has been some concerns in the UK BBQ community regarding the range, and temperature accuracy. I did not see these problems during my cooks though knowing the people who had these problems I believe them to be genuine and I have discussed these with the Meater team.

Overall, would I buy the probe? The short answer is yes. Is it the finished product for the general BBQ market? I will let the community decide as Its possible there are some factors that may affect your experience of using the product. Will there be some improvements? Certainly, speaking with Matt at length about the team, their vision and their approach to improvement, I see this being very good in the future as more people start using it for BBQ and provide their feedback.

If you would like to know more, you can find more information about the probe from the official website https://meater.com

What’s Good

What could be improved

  • Estimated cook time feature – A game changer

  • Temperature accuracy is good

  • Meater Cloud option for syncing devices and viewing temps on the move works well

  • Support for Apple/Android devices

  • Presentation of the app looks great and is simple to use.

  • Combination of Bluetooth and WIFI setup is simple to do.

  • Setting up the cook, naming them and changing temps during was easy to do

  • Customising your preferred settings such as C/F was easy to do.

  • The email, asking for your feedback after each cook is very innovative and great service.

  • Need for an intermediate device for this to be great for BBQ. – This should be the small block.

  • Connections to the device can drop intermittently.

  • If smoke is not scrubbed of the end it does not change too well.

  • The LED Charge light not relevant to the probe, so your not sure if it is charged well enough

  • With no battery life indicator in the app, long cooks are also a bit worrying.

  • When the battery runs out it does not preserve progress especially when the cook was on the cloud.

  • App use quite a lot of battery

  • Although I really like it, the estimated cook time takes a while to show. So you cant really leave a short cook.

  • Alerts can be annoying and re-appear after acknowledging them.

  • Temperate presets are US based

  • Product support videos are US based

Rib of Beef

Rib of Beef

The Next Cook

Budget Q is back again, and this time we are cooking a Rib of Beef.

Modifying the BBQ

After using the BBQ last time I found that the air intake blocked very quickly with ash, so I’ve modified it with a cut down sieve to try and improve matters,

We will be cooking the beef using a two zone system and finishing the beef off on the direct side (called reverse sear).

Cooking the Rib of Beef

Fill the chimney starter with charcoal and light a eco fire underneath and in 15 -20 minutes we will be ready to go.

Meanwhile I am going to setup the BUDGET thermometers. These were purchased from Aldi they retail at £12.99, but I got these on sale for £5.00, YES a fiver each ………. Bargain!

They are a single probe and they can be changed from centigrade to fahrenheit and are wireless. The base unit stays near the BBQ and the readout unit goes anywhere convenient.

I ran one thermometer for the pit temp and the other was monitoring the beef temp. I tested them together because I didn’t think they would side by side but worked very well.

I also prepared a few potatoes and popped in a tray with a bit of olive oil and salt to sit under the Rib of Beef.

When the charcoal is up to temperature carefully pour the coals onto the fire grate. Pop in small piece of your wood of choice – I went cherry.

Don’t get carried away with smoking wood. It’s easy to oversmoke. Less is more guys!

Pop on the cooking grate, insert the pit temperature probe through a screwed up piece of kitchen foil to keep it were it needs to be.

Next put the lid on and watch the pit tempature rise up to 225 / 250 f (107 / 121c).

Control the temp by opening or closing the air dampers on the bottom , leave the exhaust damper on the lid wide open.

When up to temperature open the lid and quickly pop on the meat. Push in the meat probe and quick as you can pop the lid back on making sure the exhaust damper is over the meat (so the smoke flows over the meat).

Now just relax………keep an eye on the temperatures and adjust damper accordingly. If you’re anything like me you can now tidy up the trail of destruction left behind in the kitchen.

Note on temperatures, don’t get stressed or hung up. If it goes up to 275f (135c) even 300f (149c) don’t panic and close the intake damper all the way. It’s just like steering a boat, steer and minutes later it turns ,just make slight adjustments and wait. If it goes down and the vents are wide open pop some more charcoal into your chimney and light, then pop in the BBQ.

When the meat temp reaches 120f (49c) lift off the lid and move the meat over to the hot direct side and brown on all sides until the internal temp is 135f (medium rare) 57c.

Take off the beef, lift the cooking grate and remove the potatoes and serve.

Rest the beef for 10 minutes, which allows the meat to reabsorb the juices.  As the chef you need to ensure you get the first slice – just for testing purposes of course.

Enjoy…….


Knowing when your food is cooked

Thermapen 4

Internal meat temperatures can help absolute beginners know when their food is ready to come off the BBQ and is safe to eat. It can mean the difference between dry, overcooked food and succulent, moist food.

By learning the recommended safe internal temperatures and removing your food when it reaches that point, you know that all bacteria has been destroyed but the meat is still tender and moist.

By using temperature probes, you no longer have to guess when your food is ready therefore allowing you to take it off the BBQ at the optimum time.

Food Safety

Food safety is a somewhat boring but highly important subject and is especially important when it comes to meat. There are many factors that can affect food safety such as the quality of your meat and how it is stored.

In this article we are going to cover the cooking of meat and safe internal temperatures.

Meat is considered safe to eat when the internal temperature has risen to the point where harmful bacteria has been destroyed. These safe internal temperatures vary for different types of meat but a great general rule of thumb is to cook your food to an internal temperature of 75C. Cooking fresh, quality meat that has been stored properly to this internal temperatures will, in most cases, avoid the risk of food poisoning.

For a more detailed list of internal meat temperatures, there is an amazing article over on Amazing ribs which discusses the different temperatures at which meat is pasteurised and other factors to consider.

I would just like to debunk the myth that you are more at risk of food poisoning whilst cooking on a BBQ as opposed to in your kitchen. Providing that basic food hygiene rules are followed and you are checking your internal temperatures, there is no reason for food poisoning to be a bigger issue whilst cooking on your BBQ than in your kitchen.

People will often overcook their food on a BBQ for fear of it being raw in the middle. By reading the internal temperatures of your meat, you will know when it is safe to eat and this doesn’t change when you step into the backyard.

Knowing when your food is ready to eat

Another important reason to read the internal temperatures of your food is to know when it is ready to eat.

For a lot of meat this is simply when it has reached a safe internal temperature.

For tougher cuts of meat, such as brisket and pork shoulder, you will need to take the internal temperature higher to break down the fats and connective tissues. On the other hand, leaner cuts of beef can be served rare meaning the internal temperature will be lower than the recommended 75C.

Experience will help you decide when something is cooked by look and feel but while you are learning different cooking techniques, internal temperatures are the perfect way to make sure your food turns out  great every time.

You need to pay attention to how your meat looks and feels at different internal temperatures and you will soon be able to tell what stage your food is at. You can then use internal temperatures as a final check before lifting your food off the BBQ.

Monitoring your food temperatures using a probe

So now that we’ve covered the reasons behind monitoring the internal temperature of your meat, let’s look at the different ways to take a reading using temperature probes.

There are 2 main types of temperature probes commonly used by the BBQ community. The first of these are instant read thermometers. They give you a quick reading of the internal temperature and will help you decide when your food is ready to come off the BBQ.

Wired Thermometer

If you want to monitor the temperature of your meat for the duration of the cook, you would need to use a wired thermometer.

Using a wired thermometer allows you to leave the probe in the meat as it cooks. It will continuously monitor the temperature and give you a reading on an external unit. A thermometer like this is great for monitoring how fast your food is cooking, when it might be time for the next stage of a cook e.g. wrapping, braising etc and also how long it may be before the cook is finished.

When using this style of thermometer, it is important to place the probe in the thickest part of the meat as this will tell you when the centre of the meat has reached an internal temperature. It’s always a good idea to check a few other parts of the meat with an instant read thermometer to make sure it is cooked evenly all the way through.

Instant Read Thermometer

Taking a reading with an instant read thermometer is simple. Insert the probe into the thickest part of the meat until the tip reaches the centre. Within a few seconds you should have an accurate reading of the internal temperature at the centre of the meat.

Cooked or Not Cooked

When checking meat that is being cooked on the bone, make sure the probe isn’t hitting the bone and it is situated within the meat. For something like a whole chicken, you would probe both breasts and both legs to ensure the chicken is cooked evenly all the way through.

Internal temperatures may seem a little like ‘Cooking by numbers’, and I suppose it is, however it takes all the guesswork out of BBQ and will help you understand what happens to different cuts of meat at different temperatures.

Sign up for our FREE Newsletter

Keep up to date with all the latest news on UK BBQ Week by entering your name and email address below. We will send you our latest recipes, helpful articles and details on our latest competitions.