ProQ Excel – Smoker

Some brands of BBQ manufacturers produce a product and then stick to the ‘If it aint broke, don’t try to fix it’ school of thought. Well that’s all well and good but more recent times in the BBQ world have meant that some of these long standing and well-established manufacturers are being left behind. The market for outdoor cooking is ever growing, and more and more people are looking to get involved, and are now armed with more knowledge than ever of cooking styles and types of BBQ and grilling, thanks to social media, BBQ blogs and YouTube videos. As that’s where more forward-thinking brands like ProQ have stepped up to the challenge.

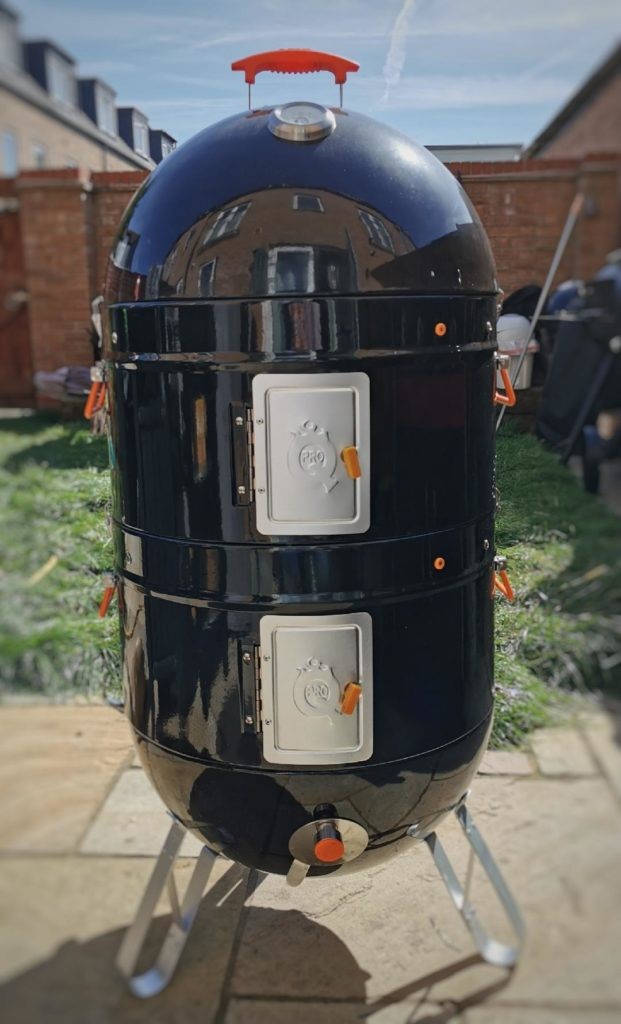
Way back to their original models of the classic ‘bullet shaped’ smoker (so named because of the shape), it was clear that ProQ wanted to offer their customers more. More flexibility, more options, more cooking styles and more enjoyment out of their products. But in the last few years, the guys behind the ProQ brand, looked over their models from top to bottom to see what could be changed to make their smokers even better; the result is a stronger than ever product offering with a host of new features. So, let’s have a look.

The smallest of the ProQ line up is called the Ranger with a 37cm wide circular cooking grate; next up is the Frontier with a 43cm circular cooking grate; and finally, the largest in this range, the Excel, with a 50cm circular cooking grate. The Excel is the model we will focus on but most of the features discussed span the whole range, but please check the ProQ website for full information www.proqsmokers.co.uk
I’ve been cooking on a ProQ Excel for around 8 years now but the guys at ProQ kindly offered me an upgrade to the latest version for review. That said, I am still free to give my own and honest opinion on the products in the article.

One of the biggest changes is to the main construction of the unit and the high-grade porcelain coated steel that is used. Heat retention in these units is key and whilst some manufacturers are saving money thinning the metal and coatings they use down, ProQ have gone the other way, meaning the units are more efficient and less fuel is used for each cook. Who doesn’t like saving money?

These range of smokers all break down into 4 sections giving several different set up styles, depending on the type of cook you are looking to do. This is one of the major advantages of the ProQ models over similar bullet style smokers, who only usually have one way they can be set up. The 4 sections on the ProQ working from the bottom up, are the base with the legs and 3 air vents, this is the part that holds the fire basket; then stacker 1, which would usually hold the water pan and have your first cooking grate and side handles for moving around; then stacker 2, which holds your second cooking grate and also has side handles; and then finally the lid with the hanging bar inside, the top vent and handle on the outside. Each of these stackers comes with the new and improved spring-loaded clips for a tighter seal.

So, as I mentioned above, these smokers come with a water pan; if you are not familiar with these, the idea is that for long cooks you fill the pan with water and it creates a nice moist environment inside, to help the meat during the cook, but to also help the smoke get onto the meat too. It also helps to keep a more even temperature as energy is used to heat the water, so less swings up or down in temp.  Just make sure the water pan doesn’t boil dry else you may see that temp change pretty quickly. A mistake we’ve all made.

Hanging meat in a smoker has become way more popular in recent years, and whilst the ProQ models (Ranger excluded) have always had a hanging bar tucked away in the lid it has mainly been used for cold smoking. But now more and more people are hanging racks of ribs and legs of lamb, as well as many other cuts in their smokers. And with the water pan removed, any fat drips go straight down onto the coals, creating an unmistakable smell and flavour that is one you just have to try. And once you do you’ll literally be…. hooked.

Vents! How many times have you burnt a finger adjusting a vent during a cook, well it’s no longer a problem with the cool touch tabs on all of the vents and handles. This covers the 3 daisy vents at the bottom, the exhaust vent at the top and also the chamber door and lifting handles on each of the stackers. No more burnt fingers for any changes needed during a cook.

The fire basket has now been improved to incorporate grooves, so one of the grills will fit securely in place if you are using it for high heat direct grilling, and there is also now a stand holder so you can attach one of ProQ’s other accessories, their Flip N Grate. Also handy and giving you huge versatility on the way you can cook from one single BBQ.

Each stacking level has a single silicone probe eyelet so you can easily feed through 2 wires for meat probes or grill temperature probes. These come in handy when you are cooking multiple meats on different levels in the BBQ. As they are silicone it means they won’t damage your cables and you don’t have to worry about feeding cables in through a vent or trapping them between the lid and potentially breaking a cable. A simple thing but really does help.

Whilst most of these ideas have focussed on the ProQ being a smoker one of the best tricks it has up its sleeve is by removing the middle stackers and leaving but the base and the lid. Now you have a super portable grill you can take anywhere with you for a picnic, to the beach camping or wherever you need to. How many other BBQ’s have that as an option?

All of these features and ways of cooking really give you a sense of why the ProQ offers such excellent value for money. All of this is backed up by a level of customer service that is second to none. Should you ever need to, the team will be happy to help via email or over the phone which can be a rare thing these days.

So I’ve owned a ProQ smoker in some form for around 8 years now and there is a good reason for that, they just work and they give you so many cooking options at a very reasonable price. And that price does not mean a compromise on quality. It has taken me from an absolute beginner cooking my first ever pork shoulder smoker overnight, through to the variety of cooks we now enjoy and with a lot more confidence in using the smoker. You can see from some of the pictures here and on many more of my social media feeds how much I enjoy cooking on my Excel in various different set-ups. And there are now more options too with the new plancha, rotisserie and Smartfire attachments, some of which we will discuss in later reviews so please keep checking back.

Please check out the ProQ website to see their full range of products including accessories, large commercial style smokers, cold smokers, BBQ controllers, charcoal, smoking wood, as well as recipes and tips.

Follow ProQ

Twitter : @ProQSmokers

Instagram: @proqsmokers

Website: www.proqsmokers.co.uk

Artust

Twitter : @ArtustBBQ

Instagram: @artustbbq

Outback Jupiter 4 burner Hybrid BBQ Review by ArtustBBQ

Around this time of year, I get asked the question a lot about what grill should someone buy. It’s such a massive question as what’s right for one isn’t right for another, then there is space, budget, family size and so many other factors to be considered. But the first starting point for most seems to be gas or charcoal.
Now as a big BBQ fan, my heart always leads with charcoal, but you forget that for the majority of folks out there the convenience of a gas grill is right for them and their situation, hence why they always were, and still are, so popular with many backyard grillers.

    But what if there was the option to have a grill that could do both? The convenience of a quality gas grill, but also the opportunity to really drive some charcoal flavour into the food you cook too? Well that option now exists through the Outback BBQ’s range of Hybrid grills. New for 2020 is the Jupiter 4 grill from Outback and that’s the one we will focus on for this review, however you can see the full range on their website, and you’ll find the link at the bottom of this article.
    For total clarity, I was sent the grill to review and I have also worked with Outback for content creation for social media. This does not mean, however, that I must give this grill a good review, my account and uses below will be honest and detailed. The grill was delivered to me disassembled as it would be delivered to a customer, this gave me the opportunity to get hands on with the nuts and bolts of the grill and understand the build quality. In a real world situation it took 2 of us around 1 hour and 20 minutes to build the Jupiter 4. This was with a few refreshment stops along the way.

    Thankfully for me and anyone buying this grill, large sections are assembled in the box ready for you to just build the main base stand and then bolt together. The instructions are pretty clear and easy to follow and we had no missing parts. There may be some re-sellers of the Outback range who will assemble them for you for a small additional fee.

    Let’s start by discussing the basics of what a hybrid grill is. The name Jupiter 4 is linked to the fact this is a 4-burner gas grill, meaning essentially, they are 4 stainless steel tubes underneath the grates creating heat from gas. They get super-hot very quickly which is why people love the convenience of this type of grill. Switch the burners on, shut the lid and within a few minutes the grill is up to temperature and you are ready to grill. Wait a few minutes more and you’ll be up to super-hot temps ready for searing steaks etc. Remember the bars of the grill always take a touch longer to catch up heat wise and really absorb all the heat for searing etc.

    Each of the dials on the front of the grill is linked to a burner and as the dial is turned, you’ll hear an ignition click and the burner will be alight, it’s then fully adjustable through the heat range from low, medium then to high. So, if you were only cooking something small and quick, then you may only need to light one burner and so you use less gas and keeping the lid down through any cook makes the grill even more efficient and helps to stop flare ups too. Above the main grill there is also a removable warming rack which is there to help you find a cooler area for food that is cooked whilst you wait for others to finish. In addition to the four main burners this grill also includes a side burner gas ring that you can use independently of the grill itself. This is perfect for warming sauces, melting a garlic butter for basting or boiling some new potatoes, or anything else you need.

    So, we’ve covered the gas side of the Outback grill, here is the hybrid part. You can lift out the grills and then take off the v shape covers that sit over the gas burner bars and insert what Outback call their ‘Charcoal basket’. This can then be loaded with specially produced Outback briquettes laid out in a grid pattern (shown in the pictures of the review). You simply then light the burners underneath the charcoal basket, set to full and shut the lid. When you return 15 minutes later the briquettes should be alight, ashed over and ready to cook on. So simply turn off the gas burners and then all your heat comes from the coals. Now you are ready to get that lovely charcoal flavour onto your chosen food and it’s great for things like steak and chicken. I used the charcoal basket for my rib cook in the pictures using the indirect method.
    So, I had the charcoal basket off to one side and the ribs away from the heat over an unlit burner, I then placed some small wood chips on the bars above the coals and shut the lid to let the ribs smoke away. I added more wood chips every 15 mins or so, and after 45 minutes turned the ribs 180 degrees so the other side of the rack was now facing the heat. After 90 minutes I wrapped the ribs in some foil with a dash of BBQ sauce and some apple juice and let them run. The briquettes stayed producing the heat needed for about 2hr30 minutes and then I just kicked the gas back on at the end to maintain heat. Once foiled, the ribs weren’t going to take on anymore charcoal flavour so using the gas again was fine.
    Once the ribs were tender, I then unwrapped them, brushed on both sides with a little more sauce and left them unwrapped for the sauce to set for another 10 minutes. The pictures speak for themselves and I was left with a nice lightly smoked rack of tender ribs in just a few hours. Clean up is then made easy by sweeping the briquettes down between the bars into the pull-out drip tray accessed from the back of the grill. There is a handle on the tray, and I have lined mine with foil for easy clean up.

    Having the 4 burners and bigger grill space gives you more options around your chosen cooking methods and range of temperatures too. As mentioned above you can set up zones in your grill for either direct cooking where the food is directly above the heat, or indirect where you set the food off to one side away from the heat for slower cooks making more of an oven effect with heat convection. All of this is a good thing.

    So, what are the interchangeable multi cook grills inserts? Obviously, the grill style centrepiece comes included in the grill, but for a small additional cost you can buy additional inserts for the centrepiece to help you cook in different styles. Outback kindly sent with my kit the pizza stone and the double-sided porcelain griddle featuring a flat top surface perfect for fried eggs or pancakes, and grilled side with ridges for those perfect grill marks, and there is even a wok too. I used the pizza stone for well… Pizzas and I have to say as an owner of a pizza oven I was genuinely surprised by the results, just some super high heat from all four burners and within 5 minutes I had perfectly cooked home pizza. I did use some homemade dough to really make sure you got the best crust possible, but I would definitely get this insert and have a go. I also used the flattop as part of a full English breakfast cook up I did and It couldn’t have gone better. Perfectly cooked eggs with runny yolks and the whites just crisped at the edges, sausages, bacon, beans, mushrooms and some hash browns for good measure.

    Let’s talk about the cool bits this grill has built in that Outback feel make life at the grill a little easier. The built-in bottle opener kicks things off, neatly built into the side of the grill it’s tucked away but there when you need it. The opener also has a magnetic base meaning no more bottle caps on the floor hiding in the grass ready to pounce when the flip flops are off. My favourite of all the features has to be the built-in chopping board on the shelf on the right side of the grill. I love this little touch. So handy as it pops out of its location easily with a finger hole for grip, meaning it’s also easy to remove for cleaning after you have been chopping or even better to serve your finished dishes on. Open the doors to the storage area underneath the grill you’ll see a very handy stacking rack for all the inserts for the interchangeable multi cook grill.  Perfect for keeping them all in one place by the grill and out of sight too. The amount of times I have searched around looking for grill bits before in the shed or garage, this just seems so obvious and it’s so useful.

    Along the front of the right hand shelf there is also a hanging bar for you to keep your BBQ tools, hot gloves and even a tea towel on etc. They have provided 3 movable hanging hooks for you to hang any items from too, again just a neat and handy feature. The grill sits on casters so you can it can easily be moved around the garden or out door cooking area. And when you want it to stay in place, 2 of the casters lock to ensure the grill doesn’t move around. As with most grill now, on the lid of the Outback there is a temperature dial to really help you dial in the perfect temperature for your cooks. The dial on the grill feels premium over some and I would describe it as oversized (in a good way) to make it easy to read with a quick glance. Another additional item that Outback sent with the grill was the premium outdoor cover.

    We’ve had all the weather in the last few weeks and the grill has been kept safe and dry from the rain and the cover has stayed in place thanks to the Velcro straps at either end. A must have item for anyone leaving a grill outside and uncovered. The grill also comes with a pre-installed regulator to fit your gas canister.

    Wrap up. So far, I have cooked on this grill over 12 times and have been happy with each and every cook. It’s easy enough to build with 2 people, looks great when you have it built too (this model comes in a few different colours so as well as the red I have you can also get blue, green and then stainless steel), it has a lot of well thought out extras that other manufacturers in this price bracket do not include, and most importantly it’s able to cook a whole range of different food using both gas and charcoal and most importantly of all it does it well. To make sure I was giving the grill a fair review I have tried cooks of all different types using both gas and charcoal and I did not encounter any issues. I obviously cannot vouch for the longevity of the grill, but a good cleaning routine and the outdoor cover will help massively. In this hybrid range there is also a smaller 3 burner and a larger 6 burner model should you require more or less space.

    The retail price of this Outback Jupiter 4 grill is £599 and comes with a warranty of 2 years for the hood and body, and 12 months for all other parts.

    About Outback taken from their website. “Since its formation as a family business in 1979, the Outback brand has stood for quality, innovation and total customer commitment, providing a comprehensive range of cutting edge British-designed barbecues, spare parts and accessories that leads the way in quality and value.

    Linked with the world class Chinese manufacturer TPA for the past 35 years, Outback is able to respond to the latest market trends and developments quickly and efficiently – simply click on to any of our comprehensive range of charcoal and gas barbecues to see how we stand out from the competition.

    The Outback factory has been ISO9001 approved since 1995 and has been awarded safety certificates from testing authorities worldwide. We have built our reputation on taking your alfresco dining experience very seriously. From the initial concept and design stages, to choosing the most up-to-date and sustainable materials, right through to our shipping and handling systems, we pay particular attention to every last detail to make sure the product delivers you 100% satisfaction each and every time.”

    Outback and all their range of BBQ’s covers and accessories can be found on their website https://www.outbackbarbecues.com/

    Instagram: @outbackbbqs

    Artust
    Twitter :@ArtustBBQ
    Instagram: @ArtustBBQ

    Cabrito al Disco

    Cabrito al Disco

    • Prep Time30 min
    • Cook Time1 hr 30 min
    • Total Time2 hr
    • Yield4 Servings

    Ingredients

    • 750gms Kid Goat Meat
    • 30ml extra virgin olive oil
    • 1/2 onion
    • 1/2 red pepper
    • 1 garlic clove
    • 2 tomatoes quartered
    • 1 tsp smoked paprika
    • 1 tsp black pepper
    • 2 tsp salt
    • 1 tsp dried oregano
    • 1/2 tsp chilli flakes (or to taste)
    • 1 glass white wine
    • 1 can chopped tomatoes
    • 2 spring onions
    • (we also added some bite sized chunks of peeled new potatoes in after adding the tomatoes)

    Method

    Preparing the BBQ Jerk Chicken

    1

    Heat the bbq, with no deflector plates in (if using a ceramic) or set up for indirect on a regular bbq.

    2

    In a lidded pot, brown the cubed meat in the olive oil, then add the onion, bell pepper, garlic and fresh tomatoes

    3

    Cook until the onions are translucent, about 10 mins

    4

    Add the spices, salt oregano, chilli and wine and cook until the alchohol has evaporated a bit.

    5

    Put the deflector plates in if using a ceramic or just move pot to indirect heat on a BBQ and add the canned tomatoes and the potatoes to the pot

    6

    Cover and cook on the bbq for about an hour, until the meat is tender. Add more water if it starts to dry out

    7

    Serve in a bowl with the spring onions sprinkled over and some nice crusty bread

    This is another recipe from our friend James Whetlor's book Goat. It is by Martin Anderson formerly of Mosimanns & Temper Soho.

    James worked as a chef in London for 12 years before returning to his home county of Devon and working at River Cottage
    After buying and keeping goats to clear an area of scrubland, he became interested in the plight of the British Billy Goat

    Free Recipe Card

    Cabrito al Disco

    Download the free PDF Recipe Card

    James Whetlor’s book ‘Goat is available from all good book shops.
    Winner of the James Beard Foundation Cookbook Award for the single subject book 2019.
    Winner of The Guild of Food Writers Best Specialist/Single Subject Book Award 2019

    Publisher: Quadrille Publishing Ltd (5 April 2018)

    ISBN-10: 1787131181
    ISBN-13: 978-1787131187

    Easy Pit Beans

    Pit Beans is one of Mr D’s all time favourites and he always cooks a huge pan so he can be sure of left overs. Great with Baked Potatoes, or as a side for ribs. They have also been known to end up in his lunch box with pasta or rice. You can adjust them to make them sweeter or spicier depending on your taste. We have a recipe that uses 4 table spoons of treacle but that is way too sweet for us

    Easy Pit Beans

    • Prep Time10 min
    • Cook Time4 hr
    • Total Time4 hr 10 min
    • Yield8 Servings
    • Cuisine
      • American
    • Course
    • Cooking Method
      • In-Direct

    Ingredients

    • 1 tsp oil,
    • 4 slices of back bacon.
    • One large onion chopped,
    • one garlic clove,
    • 1 red or yellow pepper.
    • 2tbs of pickled jalopenos
    • 1 tin toms
    • 150ml bbq sauce.
    • One tin of each cheap baked beans, haricot, cannelini, pinto, red kidney.
    • 1 tin premixed Jack Daniels and coke, don't worry the alcohol cooks off
    • 100mls of chicken stock
    • 1 tbs treacle
    • You can add leftover bbq meet if u have any.
    • 3tsp of rub. (I used the General from Angus and Oink which adds a nice smoky tex mex flavour)

    Method

    1

    Take rub and add 2-3tbs of water stir together to make a paste.

    2

    Heat oil add bacon and fry, remove from Pan

    3

    Add onion to pan and cook till softened.

    4

    Add garlic pepper and jalapenos and cook for 2-3 mins

    5

    Add rub/paste and cook for 1-2 mins

    6

    Add tomatoes, jd and coke, stock and bbq sauce and return the cooked bacon to the pan

    7

    Stir well, add beans and bbq meat if using.

    8

    Place pan on the bbq and cook until sauce has thickened adding water if necessary, probably for around 3-4 hours at a low temp or less time if higher

    Free Recipe Card

    Easy Pit Beans

    Download the free PDF Recipe Card

    Smoked Chicken with Alabama White Sauce

    Smoked Chicken with Alabama White Sauce

    • Prep Time30 min
    • Cook Time1 hr
    • Total Time1 hr 30 min
    • Yield4 Servings

    Ingredients

    • Spatchcock chicken
    • Rub of choice (we used Angus and Oink Big Phat Greek as its nice and herby and works well with chicken)
    • For the Sauce
    • 200gms mayonnaise
    • 50ml Apple juice
    • 50 ml Cider vinegar
    • 50ml fresh lemon juice
    • 1tbs creamed horse radish
    • 1tbs garlic powder
    • 1tsp onion powder
    • 1tsp English mustard powder
    • 1tsp freshly cracked black pepper
    • 1tsp finely grated lemon zest
    • 1/2tsp cayenne
    • 1/2tsp salt
    • 2tbs finely chopped flat leaf parsley

    Method

    Method

    1

     Make the alabama white sauce around 1-2 hours before cooking the chicken. Combine all ingredients apart from the parsley in a bowl and whisk until well mixed.

    2

    Stir through the parsley and set aside

    3

    Spatchcock the chicken, rub with olive oil and coat with rub. Leave to sit in the fridge for at least an hour.

    4

    Set the BBQ up for indirect with the deflector plates in (if required). Bring temp up to around 180°C

    5

    Put the chicken on to cook and add some pellets to the feeder or a small piece of smoking wood to the coals. This will give a nice mellow smoke and a good colour on the chicken.

    6

    Cook the chicken until it gets an internal temperature of 74°C, this will take around an hour.

    7

    Serve portions of chicken on top of the hominy

    8

    Serve portions of chicken on top of the hominy

    This recipe was made popular the Big Bob Gibson restaurant in America. Head Pit Boss Chris Lilly came up with this unusual sauce.
    After tasting it at the Big Grill in Dublin with hominy grits we just knew we had to give it a go.
    It was also the perfect chance to try out the smoke pellet feeder on the Monolith

    The hominy is dried corn and in America it is also known as grits, it was served in a cheese, leek and bacon sauce. Chris Lilly put jalapenos in his cheese sauce in Dublin

    Free Recipe Card

    Smoked Chicken with Alabama White Sauce

    Download the free PDF Recipe Card

    Tomato, Pesto and Mozzarella Tart

    This is an easy recipe and makes for a tasty meat free lunch or a starter for a dinner party. You’ll also have enough pastry left to make cheese straws.

    Tomato, Pesto and Mozzarella Tart

    • Prep Time20 min
    • Cook Time20 min
    • Total Time40 min
    • Yield4 Servings

    Ingredients

    • Puff Pastry (milk to glaze)
    • Pre made pesto (or you can make your own)
    • A ball of mozzerella
    • Half a dozen or so vine tomatoes
    • Parmesan
    • Rocket to serve

    Method

    1

    Pre-heat BBQ to 180°C for indirect cooking.

    2

    Unwrap the pastry and cut circles using a saucer (You can make smaller ones if using as a starter)

    3

    Keep leftover pastry as you can make cheese straws

    4

    Make a border on the tart by scoring the pastry and prick the middle to stop it rising

    5

    Spread the pesto in the middle of the tart

    6

    Slice and layer the tomatoes in the middle of the tart

    7

    Top with some torn mozzarella and grated parmesan

    8

    Brush border with milk and place on the preheated bbq on a baking tray (180°C) bake for 20mins or until browned

    9

    To make the cheese straws, twist long strips of leftover pastry and sprinkle with parmesan, place on making tray and bake for 10 mins

    10

    Serve the tart with some rocket salad

    11

    Serve the cheese straws with left over pesto for dipping

    Free Recipe Card

    Tomato, Pesto and Mozzarella Tart

    Download the free PDF Recipe Card

    Hawaiian Smash Burger

    Hawaiian Smash Burger

    • Prep Time15 min
    • Cook Time10 min
    • Total Time25 min
    • Yield2 Servings

    Ingredients

    • 2 Brioche Rolls
    • Lettuce
    • Beef Tomato
    • Pineapple (Optional)
    • 2 cheese slices (We used Jarlsberg this time)
    • Onions
    • Pickles or gherkins

    Method

    1

    Light the BBQ and put the coals in the middle, leaving a circle round the edge with no coals (this makes sure you have a cool zone)

    2

    Put the plancha on and heat until hot.

    3

    Spray a little oil on the surface of the plancha and on the smasher

    4

    Put the four balls of mince on, season, smash and cook till juices start bubbling.

    5

    Flip, put the cheese on and cover with a cloche, you can choose double or single cheese. (adding a splash of water under your cloche will melt the cheese quicker)

    6

    While the burgers are cooking, toast the buns, this adds flavour and helps prevent them falling apart when you load them up.

    7

    Load them up and tuck in

    Free Recipe Card

    Hawaiian Smash Burger

    Download the free PDF Recipe Card

    Baked Apple Cake

    Heres another lovely dessert recipe by Sue Stoneman This is a similar cake to what I remember as an Eve’s pudding, where you have lightly stewed (baked) fruit on the bottom with sponge on the top.  This would work well with any fruit, try it with pears, nectarines or peaches. I used a deep terracotta dish about 20cm diameter.

    Baked Apple Cake

    • Prep Time20 min
    • Cook Time1 hr
    • Total Time1 hr 20 min
    • Yield4 Servings
    • Course
    • Cooking Method
      • In-Direct

    Ingredients

    • 4 apples (if they are windfalls, maybe use a little more sugar)
    • 4 tsp demerara sugar
    • 4 tablespoons water (or fruit juice or cider)

    For the sponge

    • 125g unsalted butter
    • 125g caster sugar
    • 125g SR Flour
    • 2 eggs
    • Vanilla paste
    • Two tablespoons flaked almonds to decorate

    Method

    1

    Set up your BBQ for indirect cooking, temp about 160°C.

    2

    Grease your baking dish, especially the sides.

    3

    Cut up the apples and place into the dish along with the demerara sugar and water (juice or cider).

    4

    Put the dish into your BBQ for about 20 mins until the fruit is just soft.  You don’t want to over cook the fruit as you will be cooking it again.

    5

    While the fruit is baking, put all the other ingredients (except the flaked almonds) into a bowl and whisk with an electric mixer until light and creamy.

    6

    Pour this mixture on top of the baked fruit and level with a spatula.

    7

    Sprinkle with the flaked almonds and put the dish back into your BBQ for about 30 minutes or until the sponge is cooked (check with a skewer) and the top is lightly coloured.

    8

    Serve straight out of the dish with cream, ice cream, custard or crème fraiche.

    Free Recipe Card

    Baked Apple Cake

    Download the free PDF Recipe Card

    Chicken Fried Rice

    This is an excellent dish for using up left overs and bits from the freezer. This was cooked on a Monolith Ceramic with the Wok holder and Wok but can easily be cooked on a bbq in a skillet.

    Chicken Fried Rice

    • Prep Time15 min
    • Cook Time10 min
    • Total Time25 min
    • Yield4 Servings

    Ingredients

    • 1 cup of rice, cooked with 2 cups of water and 1tsp chicken stock powder (allow to cool)
    • 1 rotisseried chicken breast, roughly chopped
    • 1 slice of thick cut ham, roughly chopped
    • 100gms peas or edame beans
    • 100gms prawns
    • 2 spring onions (or scallions as we call them in Ireland), chopped
    • 2 eggs lightly beaten
    • 3 tsb oil for frying, I use peanut as it copes with the high heat

    For the sauce

    • 2tsp fish sauce
    • 2tbs dark soy sauce
    • 2tbs light soy sauce
    • 2tsp shaoxing wine
    • 1 tsp sugar
    • 1tsb sesame oil
    • 1 tsp oyster sauce

    Method

    1

    Combine the sauce ingredients

    2

    Light the bbq for direct cooking  and when hot,  heat pan and the oil for a few minutes

    3

    Add the chopped chicken and ham and stir fry for a couple of minutes

    4

    Add the peas, prawns and the whites of the spring onion, stir fry for a couple of mins

    5

    Add the cooked (and cooled) rice, again stir fry for a couple of mins

    6

    Move the ingredients to the side of the pan and add the beaten eggs in the middle, lightly scramble, amalgamate with the other ingredients.

    7

    Add the sauce and green bits of the spring onion, reserve a few for garnish, stir fry for a final couple of minutes.

    8

    Tip into a serving dish and garnish with the remaining spring onion.

    Free Recipe Card

    Chicken Fried Rice

    Download the free PDF Recipe Card

    Rustic Apple Pie

    Another easy and tasty recipe by Sue Stoneman. This is a very easy apple pie to make. It works well with other fruit and if you don’t want to make the pastry, buy a pack of the ready made stuff which will save you time.

    Rustic Apple Pie

    • Prep Time30 min
    • Cook Time40 min
    • Total Time1 hr 10 min
    • YieldServings

    Ingredients

    For the pastry

    • 225g plain flour
    • 100g unsalted butter
    • Pinch salt

    For the filling

    • About 7 apples (approx. weight 700g) cored and sliced (I leave the skins on but take them off if you prefer)
    • 50g light soft brown sugar
    • ¼ tsp ground cloves
    • 1tsp ground cinnamon

    to glaze

    • 1 egg, separated
    • 3 tablespoons demerara sugar

    Method

    1

    First you need to find a baking sheet which will fit into your BBQ as this will be what you will be cooking your pie on.  Light your BBQ if it isn’t already lit. You need it to be about 200°C cooking indirect.

    2

    To make the pastry, rub the butter into the flour with a pinch of salt until it resembles breadcrumbs then add enough cold water to bring it together to form a dough. If time, chill in the fridge for a while.

    3

    Wash, core and cut the apples, slice and then put into a bowl with the cinnamon, cloves and sugar.  Stir so that all the pieces of apple are coated with the spices.

    4

    Next, take the pastry and roll it out into a circle about 35cm.  It doesn’t matter if it’s not perfectly round – hence the name ‘rustic apple pie’.  Place this onto your greased baking sheet.  You need to mark lightly an inner circle of about 25cm diameter in the middle of the pastry

    5

    With the beaten egg yolk, brush it over this inside area. (This is to prevent the pastry from going soggy from the juice of the apples. Sprinkling with ground almonds also helps).

    6

    Then place the apple mixture on top and spread out to the edges of the circle.

    7

    Carefully lift up the edge of the pastry and bring it up making an open parcel, overlapping where necessary.  If any bits break off, just patch them back on again with a little egg white.

    8

    Brush the egg white around the pastry surface and sprinkle with the demerara sugar.

    9

    Place the baking tray into your BBQ and cook for about 30-40 minutes or until the pastry is cooked and it is lightly browned.

    10

    Serve warm with crème fraiche, ice cream or custard.

    11

    If you like, scatter some dried fruit in with the apples prior to cooking.

    Free Recipe Card

    Rustic Apple Pie

    Download the free PDF Recipe Card