Festive Chelsea Buns

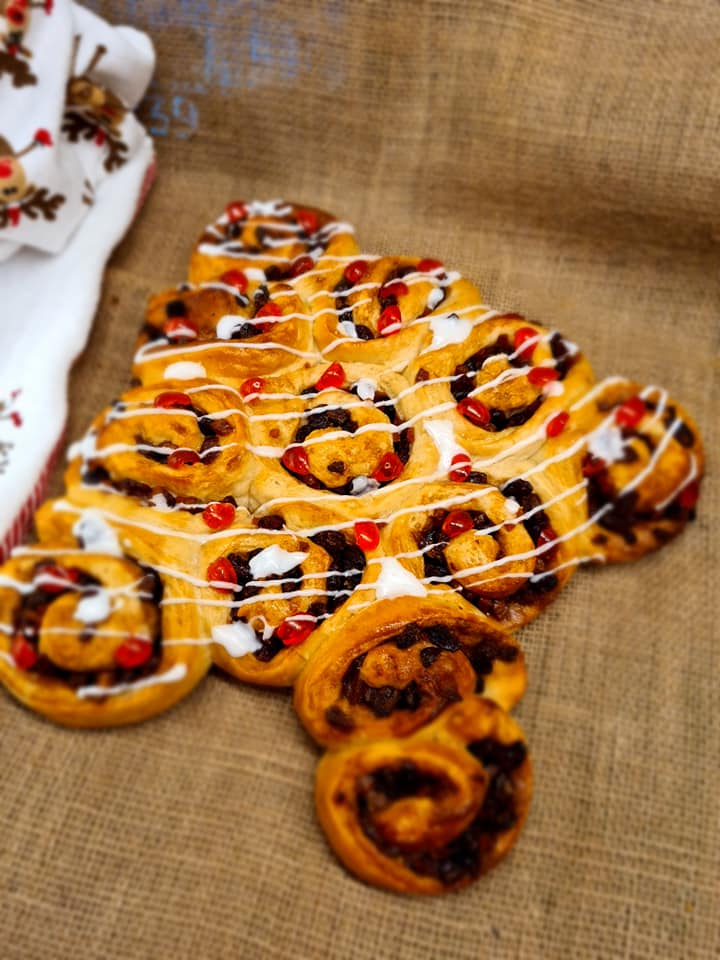
Christmas is just around the corner and to get you into the festive spirit, I’ve made some Chelsea Buns and instead of putting them into a rectangular baking tin, it’s quite fun to arrange the buns into the shape of a Christmas Tree for their second prove before going in the oven and then decorating them with glace cherries and glace icing.  Still a ‘Share n Tear’ plate of sweet sticky buns and it will brighten up any table.  It would work well with Cinnamon Buns, Olives, Sundried Tomatoes and even Pizza filling for a savoury snack.  Here’s the recipe.

I cooked these in my Kamado Joe at a temp of approx. 150C for 35 minutes. I placed the baking tray on an upturned baking tin – just watch to check the base doesn’t burn.

You could cook them in a domestic oven – temp 190C and find your largest baking sheet and line it with baking parchment or a silicone sheet & bake for 20-25 mins.

Festive Chelsea Buns

  • Prep Time30 min
  • Cook Time35 min
  • Total Time1 hr 5 min
  • Yield12 Servings
  • Course
  • Cooking Method
    • In - Direct

Ingredients

For the Dough

  • 500g Strong White Flour
  • 1 sachet dried yeast
  • 1 tsp salt
  • 1 egg
  • 300ml milk
  • 40g unsalted butter

For the Filling

  • 100g cranberries
  • 100g sultanas
  • 100g dried apricots
  • 25g unsalted butter
  • 75g soft light brown sugar
  • 2 tsp cinnamon
  • Zest of 1 orange
  • 1 egg for glazing

For the Topping

  • Glace cherries
  • Glace Icing – made up of icing sugar and water into a thick paste

Method

1

Melt the butter and warm the milk.  Into a bowl tip the flour, dried yeast and salt.  I use a KitchenAid mixer with a dough hook to mix my dough.

2

Add the warm milk, butter and egg and bring the mixture to a smooth dough which may take about 5-8 minutes.  Alternatively mix by hand and knead for about ten minutes on a lightly floured surface.  Leave the dough to prove for about an hour or until it has doubled in size.

3

While the dough is proving, weigh out the dried fruit and chop up the dried apricots.  You could use mixed dried fruit.  Melt the butter in a small bowl. Put the sugar with the cinnamon into a bowl and mix well

4

Once the dough has risen, turn it out onto a lighly floured surface and give it a little knead.  You then need to roll it out into a rectangle about 40 x 25 cm with a long edge just in front of you.  Take a pastry brush and cover the dough with the melted butter.

5

Sprinkle the sugar and cinnamon mix evenly over the top followed by the dried fruit.  Press it down into the dough with the palms of your hands.  Sprinkle over the grated zest of the orange for extra citrusy flavour.  Now take the long edge and carefully roll it away from you to make a long swirl, popping back in the pieces of fruit that may fall out.

6

Cut this into 12 even slices and arrange them cut side up in the shape of a Christmas Tree.  You can put the swirls fairly close together as you want them to stick together.

7

Leave to prove in a warm place for about half an hour before brushing with beaten egg and placing them in the oven to cook for about 20-25 minutes.  Check after about 15 minutes to see that they are not burning.  Cover with tinfoil if you need to.

8

 They are cooked if they sound hollow when tapped underneath.  Take them out of the oven when cooked and leave to cool.  Carefully transfer onto a large wooden board or tray and when cool enough, decorate with glace icing and chopped up glace cherries.

9

Alternatively you could give your Christmas Tree a shiny glaze by melting a tablespoon of apricot jam with a little water and paint it on with a brush. A dusting of icing sugar always adds a ‘snowy’ feel.

Best eaten on the day you make them – and not long after you have decorated them when they are still slightly warm.  Try eating them without licking your lips or your fingers!

Recipe from Sue Stoneman

Buttermilk Wings

Buttermilk Wings

  • Prep Time30 min
  • Cook Time40 min
  • Total Time1 hr 10 min
  • Yield2-3 Servings
  • Cuisine
    • American
  • Cooking Method

Ingredients

  • 1kg wings
  • 100 gms of Tropics Foods Texas BBQ chicken fry mix
  • (OR 30g BBQ Rub ,10g baking powder ,10g self raising flour )
  • 1/2 pint buttermilk with a generous shake of hot sauce
  • Favourite BBQ sauce, we used Red Dog Texas Chipolte which has a nice kick.

Method

1

Soak the wings overnight in the buttermilk overnight, if you can’t get buttermilk you can use 250ml milk with 1tsb of lemon juice. (I like to separate the wings at the joint, but you can leave them whole if desired. )

2

After marinating take them out of the milk, drain but don’t pat dry.

3

Toss your wings in the chicken fry mix. Put them on a rack on a plate and leave in the fridge to dry for 30 mins.

4

Set up your bbq for indirect cooking and heat to around 350°F or 180°C.

5

Cook for 40 mins..

6

Check internal temp is 165°F or 74°C

7

Remove from bbq, and toss in a sauce of choice. Serve with blue cheese sauce and celery

Recipe from Chillin N Grillin NI.

Free Recipe Card

Download the free PDF Recipe Card

Gambas Pil Pil

Gambas Pil Pil (Chilli and Garlic Prawns)

If you have ever been to spain you will most likely have seen this on the menu.
Its such an easy dish to recreate and works great on the BBQ.

Gambas Pil Pil

  • Prep Time15 min
  • Cook Time10 min
  • Total Time25 min
  • Yield2 Servings
  • Cuisine
  • Course
    • Appetizer
  • Cooking Method
    • Direct in Pan

Ingredients

  • 60ml of olive oil
  • 1 garlic clove sliced
  • 1/2 tsp of chilli flakes (or more if you like it hotter)
  • 200gms freshwater prawns (you can use tiger prawns but this is traditionally made with smaller juicer prawns)
  • A pinch of parsley (Optional)
  • Toasted sourdough bread to serve

Method

1

Heat the oil in a heat proof dish on the bbq

2

Add the sliced garlic and chilli and cook until sizzling

3

Toast the bread

4

Add the prawns and cook until they start to give out the juice (this is what helps make a delicious dipping sauce for the bread)

5

Sprinkle with parsley and serve along side the bread

Free Recipe Card

Download the free PDF Recipe Card

BBQ Hake with Langoustines

BBQ’d Hake, lightly smoked Kilkeel Langoustines, charred new comber baby potatoes, and grilled asparagus spears, blow torched chorizo & herb butter.

Dean Coppard is a well known chef in Northern Ireland, He is currently head chef at the Sweet Afton Bar and Kitchen. He grew up in Queensland Australia.

As he lived so close to the beach his father went fishing and brought home some amazing fresh fish which they barbecued. He moved to Northern Ireland in 2005 became head chef of the well known Yellow Door and then opened Uluru Bistro, an Australian restaurant in Armagh, it was recognised in the Michelin guide with 2 knife and forks.

He is an avid supporter of local suppliers and believes that Northern Ireland suppliers are going from strength to strength. He still lives in Armagh with his wife and 2 children who love eating out.

Although this recipe is cooked on a Mini Kamado, its easily adapted to other BBQ’s as its just Direct and Indirect grilling.

BBQ Hake with Langoustines

  • Prep Time30 min
  • Cook Time15 min
  • Total Time45 min
  • Yield2 Servings
  • Cuisine
  • Cooking Method
    • Direct / Indirect

Ingredients

  • 2 x 240g of fresh hake, skin on, scaled, pin boned.
  • 6 whole langoustines, split in half length ways.
  • 300g of new baby potatoes.
  • 6 tips of asparagus
  • 200g of butter
  • 100g of chorizo
  • 4 sprigs of fresh coriander
  • 50ml of Broighter Gold Hickory Rapeseed Oil

Method

1

Using a direct and indirect set up, light the bbq

2

Once the temperature is sitting between 180-200°C oil the grill barred grill rack and place the hake fillets skin side up over the direct heat area

3

Close the lid with the vent set to fully open and bake for 6 mins.

4

Open the lid and using a pallet knife or fish slice gently loosen the fish off the grill rack and set over the in-direct heat area.

5

Preboil the new potatoes until just cooked or still firm, remove from pan and slice into 1-2cm thick discs, coat these and the asparagus spears in a good quality rapeseed oil, I used the Broighter Gold Hickory Smoked infused oil giving the veg a rich flavor that gives depth once heated.

6

Add to the grill and place the halved langoustine on top. Cook for a further 4mins.

For The Butter

7

Soften the butter and add to a food processor blitz with the chopped chorizo and fresh coriander, roll in grease proof paper to form into a log shape and rest in the fridge

To Plate

8

Place the cooked potatoes on the plate first, rest the hake on top add the asparagus then finish with the grilled langoustine and slice the butter on the langoustines and blow torch the butter until it melts covering the langoustine and the hake.

Free Recipe Card

Download the free PDF Recipe Card

Make Your Own Bacon

If you haven’t tried curing your own bacon, a kit is a good place to start. We got this one from The Smokey Carter who kindly shared their instructions with us. There are a number of other companies who make bacon kits in a variety of flavours

I normally cold smoke my bacon in the winter but as it is too warm due to the summer months I thought I would start with the smokey hickory bacon cure.

The Smokey Carter Bacon Cure kits are available from here

Make Your Own Bacon

    Ingredients

    • The bacon curing kit contains enough cure to make 4kg of bacon and has two different flavours.
    • The following recipe is based on making 1kg of bacon at a time, so you will only require half a pot of cure (40g) per 1kg of pork.

    Curing Kit Contents

    • Curing Time: 7 Days
    • Make Your Own Bacon with bacon Hone Curing Kit
    • Curing Kit Contents
    • 1 x 80g Fennel & Lemon Pepper Bacon Cure
    • 1 x 80g Smokey Hickory Bacon Cure
    • 2 x 60cm of muslin mutton cloth
    • 2 x curing bags
    • 4 x plastic gloves

    What you will need in addition to the kit (not included)

    • 4 x 1kg of pork. Only 1kg of pork is required per batch. Use belly pork for streaky or pork loin for back bacon.
    • Sharp knife
    • Kitchen roll
    • Wire rack

    Method

    Home Curing Instructions

    1

    You can visit your local butcher for your pork, although even supermarket pork makes great bacon.

    2

    You need 1kg of either belly pork or pork loin, depending on the type of bacon you want to make. Belly makes streaky and loin makes back bacon.

    3

    Wash your hands thoroughly, put on a glove and place the pork into a plastic curing bag.

    4

    Pour in 40g (half a pot) of your chosen cure and massage into the meat to ensure the cure has covered the whole piece of meat. Seal the bag ensuring that there is no air left in the bag.

    5

    Place the bag in the fridge and leave undisturbed for two days.

    6

    Turn the bag over and leave for a further two days in the fridge.

    7

    After four days in the cure you will notice the meat will have slightly firmed up. Put on a glove, remove from the bag and rinse the pork under a cold running tap. Discard the plastic bag.

    8

    Dry the meat with a few pieces of kitchen towel, ensuring most of the moisture is soaked up.

    9

    Take a piece of the mutton cloth and place the meat inside, folding the edges underneath.

    10

    Place a wire wrack on a shelf in the fridge and place the wrapped pork on the rack. Leave undisturbed in the fridge for three days.

    11

    Unwrap the mutton cloth and slice off the required amount of bacon with a sharp knife. Cook and enjoy. Congratulations, you’ve made bacon!

    12

    Re-wrap the remaining bacon in the muslin and keep in the fridge for 4-6 days. Slice as you go.

    13

    You can also slice the bacon and freeze to use at your convenience.

    Tips
    If you like your bacon more salty you can leave it in the cure for an extra day.
    The mutton cloth can be cleaned in the washing machine and re-used to make another batch with the remaining cure.

    Marmalade Bread and Butter Pudding

    Leftover bread… Over-catered for your BBQ party and got loads of brioche buns or finger rolls left over?  In fact this pudding can be made with any type of bread, seeded loaf, croissant, pain au chocolat or hot cross bun. Or if you’ve an end bit of a loaf that’s been sitting in your bread bin for a few days, and you’re firing up your BBQ, the pudding can be made well in advance and left in the fridge prior to cooking as the egg custard will soak into the bread.

    Marmalade Bread and Butter Pudding

    • Prep Time20 min
    • Cook Time50 min
    • Total Time1 hr 10 min
    • Yield4 Servings

    Ingredients

    • 6 slices of bread, or a mixture of rolls and buns.
    • Enough soft butter for spreading on the bread
    • Orange Marmalade (about four tablespoons)
    • 200ml milk
    • 60ml double cream
    • 3 large eggs
    • 75g sugar
    • Few drops of vanilla extract or paste
    • Grated zest of 1 orange
    • 1 tablespoon demerara sugar
    • 25g candied peel

    Method

    1

    First generously butter the bread and make up marmalade sandwiches or rolls and cut into quarters to make little triangles or squares.

    2

    In a buttered heatproof dish (I used a terracotta dish 20cm diameter and 5cm deep) arrange the sandwiches standing upright and overlapping each other.

    3

    Whisk up the milk, cream, eggs and sugar together (a hand whisk is fine) and pour this all over the bread.

    4

    Scatter the tops with grated orange zest, demerara sugar and candied peel and leave to soak in for about 20 minutes (or longer) before putting in your BBQ.

    5

    I cooked it in the Kamado Joe Junior, using the deflector plate (indirect on a kettle) and put the dish on the top grill for 50 minutes at a temperature of 150C until the custard is cooked and it is all puffy and golden and the top crust is crunchy.

    6

    Serve while still warm with crème fraiche, cream, custard or ice cream.

    If you have some orange liqueur in your cupboard, zing up the custard with a few drops of that before pouring over the bread!   Also great with dark chocolate pieces added into the pudding!

    Free Recipe Card

    Marmalade Bread & Butter Pudding

    Download the free PDF Recipe Card

    Cabrito al Disco

    Cabrito al Disco

    • Prep Time30 min
    • Cook Time1 hr 30 min
    • Total Time2 hr
    • Yield4 Servings

    Ingredients

    • 750gms Kid Goat Meat
    • 30ml extra virgin olive oil
    • 1/2 onion
    • 1/2 red pepper
    • 1 garlic clove
    • 2 tomatoes quartered
    • 1 tsp smoked paprika
    • 1 tsp black pepper
    • 2 tsp salt
    • 1 tsp dried oregano
    • 1/2 tsp chilli flakes (or to taste)
    • 1 glass white wine
    • 1 can chopped tomatoes
    • 2 spring onions
    • (we also added some bite sized chunks of peeled new potatoes in after adding the tomatoes)

    Method

    Preparing the BBQ Jerk Chicken

    1

    Heat the bbq, with no deflector plates in (if using a ceramic) or set up for indirect on a regular bbq.

    2

    In a lidded pot, brown the cubed meat in the olive oil, then add the onion, bell pepper, garlic and fresh tomatoes

    3

    Cook until the onions are translucent, about 10 mins

    4

    Add the spices, salt oregano, chilli and wine and cook until the alchohol has evaporated a bit.

    5

    Put the deflector plates in if using a ceramic or just move pot to indirect heat on a BBQ and add the canned tomatoes and the potatoes to the pot

    6

    Cover and cook on the bbq for about an hour, until the meat is tender. Add more water if it starts to dry out

    7

    Serve in a bowl with the spring onions sprinkled over and some nice crusty bread

    This is another recipe from our friend James Whetlor's book Goat. It is by Martin Anderson formerly of Mosimanns & Temper Soho.

    James worked as a chef in London for 12 years before returning to his home county of Devon and working at River Cottage
    After buying and keeping goats to clear an area of scrubland, he became interested in the plight of the British Billy Goat

    Free Recipe Card

    Cabrito al Disco

    Download the free PDF Recipe Card

    James Whetlor’s book ‘Goat is available from all good book shops.
    Winner of the James Beard Foundation Cookbook Award for the single subject book 2019.
    Winner of The Guild of Food Writers Best Specialist/Single Subject Book Award 2019

    Publisher: Quadrille Publishing Ltd (5 April 2018)

    ISBN-10: 1787131181
    ISBN-13: 978-1787131187

    Rhubarb Skillet Pan Cake

    Most of you know Sue Stoneman for making bread and cakes on her BBQ and with summer comes the abundance of local fruit.  To make the most of the residual heat in your BBQ, why not stick a pudding to cook on it while you are tucking into your meat.  Here’s her recipe for a ‘skillet pan cake’ which would work well with any fruit such as nectarines, peaches, plums, apples or pears.  Sue’s used rhubarb as it’s in season. For this recipe Sue used a 30cm diameter skillet pan

    Rhubarb Skillet Pan Cake

    • Prep Time30 min
    • Cook Time1 hr
    • Total Time1 hr 30 min
    • Yield4 Servings

    Ingredients

    • 500g rhubarb, washed and cut into chunks
    • Zest & juice of one large orange
    • 2 tbsp light soft brown sugar
    • 2 tbsp honey
    • 30g unsalted butter

    For the cake topping:

    • 175g SR Flour
    • 1 tsp baking powder
    • 175g caster sugar
    • 175g unsalted butter (room temperature)
    • 3 eggs

    Method

    1

    Place the rhubarb and all the other ingredients into the skillet pan and place over indirect heat on your BBQ and poach gently for about 30 minutes or until the rhubarb is just soft.

    2

    While the rhubarb is cooking, it’s time to make the topping.

    3

    In a bowl place all the ingredients together and using an electric mixer, beat for 3 minutes so the mixture is light and fluffy.

    4

    Take the skillet pan off the heat and carefully put the cake mixture on top of the poached rhubarb in small spoonfuls to begin with.  Be careful that the liquid doesn’t spill over.  It will soak into the cake mixture during cooking.  Continue spooning over the mixture until the fruit is covered.

    5

    Cook for about an hour.  Test it with a skewer – if it comes out clean, it’s done.

    6

    Serve straight to the table and use a big spoon to dish it up.  Serve with cream or ice cream

    I cooked this in my Kamado Joe using indirect heat.  I have the grills on the top setting and had the temperature at about 150C.  When baking in the KJ, I upturn an old baking tin and sit the skillet pan on top of this to give the pan a bit of height from the heat of the grill so that the base doesn’t over cook.

    Free Recipe Card

    Rhubarb Skillet Pan Cake

    Download the free PDF Recipe Card

    Breakfast Bagels

    Whilst not really a recipe, it serves as a great reminder how versatile a BBQ can be. Nothing better than sitting outside with an early morning coffee whilst your breakfast cooks

    Breakfast Bagels

    • Prep Time15 min
    • Cook Time30 min
    • Total Time45 min
    • Yield2 Servings

    Ingredients

    • 4 slices of back bacon, (We cure our own and this one had a lovely flavour of maple smoke with bay, pink peppercorns and rosemary in with the cure)
    • 2 sausage patties, these can be bought or skin sausages and make into patties
    • 4 eggs lightly beaten and seasoned with salt and pepper
    • 50gms of grated mature cheddar added to beaten eggs.
    • 1 Tbs butter
    • 2 bagels

    Method

    1

    Cook the bacon and sausage on the grill, set aside but keep warm

    2

    Heat the butter in a small pan until foaming, pour in the egg and cheese mixture and stir until lightly scrambled, they will continue to cook in the residual heat so don’t over scramble.

    3

    Toast the bagels

    4

    place eggs on bagels, top with sausage and bacon and the sauce of choice  (in our house its red)

    Free Recipe Card

    Breakfast Bagels

    Download the free PDF Recipe Card

    Easy Pit Beans

    Pit Beans is one of Mr D’s all time favourites and he always cooks a huge pan so he can be sure of left overs. Great with Baked Potatoes, or as a side for ribs. They have also been known to end up in his lunch box with pasta or rice. You can adjust them to make them sweeter or spicier depending on your taste. We have a recipe that uses 4 table spoons of treacle but that is way too sweet for us

    Easy Pit Beans

    • Prep Time10 min
    • Cook Time4 hr
    • Total Time4 hr 10 min
    • Yield8 Servings
    • Cuisine
      • American
    • Course
    • Cooking Method
      • In-Direct

    Ingredients

    • 1 tsp oil,
    • 4 slices of back bacon.
    • One large onion chopped,
    • one garlic clove,
    • 1 red or yellow pepper.
    • 2tbs of pickled jalopenos
    • 1 tin toms
    • 150ml bbq sauce.
    • One tin of each cheap baked beans, haricot, cannelini, pinto, red kidney.
    • 1 tin premixed Jack Daniels and coke, don't worry the alcohol cooks off
    • 100mls of chicken stock
    • 1 tbs treacle
    • You can add leftover bbq meet if u have any.
    • 3tsp of rub. (I used the General from Angus and Oink which adds a nice smoky tex mex flavour)

    Method

    1

    Take rub and add 2-3tbs of water stir together to make a paste.

    2

    Heat oil add bacon and fry, remove from Pan

    3

    Add onion to pan and cook till softened.

    4

    Add garlic pepper and jalapenos and cook for 2-3 mins

    5

    Add rub/paste and cook for 1-2 mins

    6

    Add tomatoes, jd and coke, stock and bbq sauce and return the cooked bacon to the pan

    7

    Stir well, add beans and bbq meat if using.

    8

    Place pan on the bbq and cook until sauce has thickened adding water if necessary, probably for around 3-4 hours at a low temp or less time if higher

    Free Recipe Card

    Easy Pit Beans

    Download the free PDF Recipe Card